TT-3020B Installation Manual - Polaris-as.dk
TT-3020B Installation Manual - Polaris-as.dk
TT-3020B Installation Manual - Polaris-as.dk

You also want an ePaper? Increase the reach of your titles
YUMPU automatically turns print PDFs into web optimized ePapers that Google loves.
Thrane & Thrane<br />
<strong>TT</strong>-<strong>3020B</strong><br />
Capsat Transceiver<br />
<strong>Installation</strong> <strong>Manual</strong><br />
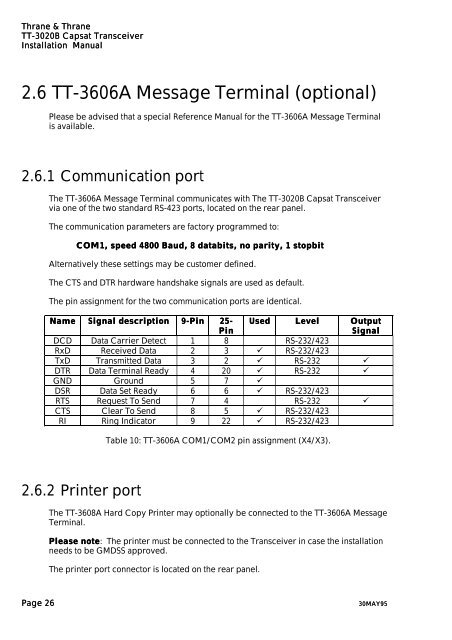
2.6 <strong>TT</strong>-3606A Message Terminal (optional)<br />
Ple<strong>as</strong>e be advised that a special Reference <strong>Manual</strong> for the <strong>TT</strong>-3606A Message Terminal<br />
is available.<br />
2.6.1 Communication port<br />
The <strong>TT</strong>-3606A Message Terminal communicates with The <strong>TT</strong>-<strong>3020B</strong> Capsat Transceiver<br />
via one of the two standard RS-423 ports, located on the rear panel.<br />
The communication parameters are factory programmed to:<br />
COM1, speed 4800 Baud, 8 databits, no parity, 1 stopbit<br />
Alternatively these settings may be customer defined.<br />
The CTS and DTR hardware handshake signals are used <strong>as</strong> default.<br />
The pin <strong>as</strong>signment for the two communication ports are identical.<br />
Name Signal description 9-Pin 25-<br />
Page 26 30MAY95<br />
Pin<br />
Used Level Output<br />
Signal<br />
DCD Data Carrier Detect 1 8 RS-232/423<br />
RxD Received Data 2 3 � RS-232/423<br />
TxD Transmitted Data 3 2 � RS-232 �<br />
DTR Data Terminal Ready 4 20 � RS-232 �<br />
GND Ground 5 7 �<br />
DSR Data Set Ready 6 6 � RS-232/423<br />
RTS Request To Send 7 4 RS-232 �<br />
CTS Clear To Send 8 5 � RS-232/423<br />
RI Ring Indicator 9 22 � RS-232/423<br />
2.6.2 Printer port<br />
Table 10: <strong>TT</strong>-3606A COM1/COM2 pin <strong>as</strong>signment (X4/X3).<br />
The <strong>TT</strong>-3608A Hard Copy Printer may optionally be connected to the <strong>TT</strong>-3606A Message<br />
Terminal.<br />
Ple<strong>as</strong>e note: note The printer must be connected to the Transceiver in c<strong>as</strong>e the installation<br />
needs to be GMDSS approved.<br />
The printer port connector is located on the rear panel.