Getting Started with IWS and TwinCAT Contents - InduSoft
Getting Started with IWS and TwinCAT Contents - InduSoft
Getting Started with IWS and TwinCAT Contents - InduSoft

You also want an ePaper? Increase the reach of your titles
YUMPU automatically turns print PDFs into web optimized ePapers that Google loves.
DRAFT — 8 September 2006 <strong>Getting</strong> <strong>Started</strong> <strong>with</strong> <strong>IWS</strong> <strong>and</strong> <strong>TwinCAT</strong><br />
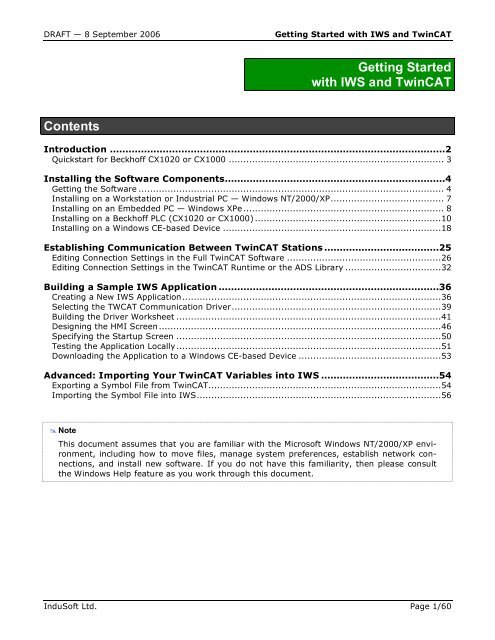
<strong>Contents</strong><br />
<strong>Getting</strong> <strong>Started</strong><br />
<strong>with</strong> <strong>IWS</strong> <strong>and</strong> <strong>TwinCAT</strong><br />
Introduction ............................................................................................................2<br />
Quickstart for Beckhoff CX1020 or CX1000 .......................................................................... 3<br />
Installing the Software Components.......................................................................4<br />
<strong>Getting</strong> the Software ......................................................................................................... 4<br />
Installing on a Workstation or Industrial PC — Windows NT/2000/XP....................................... 7<br />
Installing on an Embedded PC — Windows XPe ..................................................................... 8<br />
Installing on a Beckhoff PLC (CX1020 or CX1000) ................................................................10<br />
Installing on a Windows CE-based Device ...........................................................................18<br />
Establishing Communication Between <strong>TwinCAT</strong> Stations .....................................25<br />
Editing Connection Settings in the Full <strong>TwinCAT</strong> Software .....................................................26<br />
Editing Connection Settings in the <strong>TwinCAT</strong> Runtime or the ADS Library .................................32<br />
Building a Sample <strong>IWS</strong> Application .......................................................................36<br />
Creating a New <strong>IWS</strong> Application.........................................................................................36<br />
Selecting the TWCAT Communication Driver........................................................................39<br />
Building the Driver Worksheet ...........................................................................................41<br />
Designing the HMI Screen.................................................................................................46<br />
Specifying the Startup Screen ...........................................................................................50<br />
Testing the Application Locally...........................................................................................51<br />
Downloading the Application to a Windows CE-based Device .................................................53<br />
Advanced: Importing Your <strong>TwinCAT</strong> Variables into <strong>IWS</strong> ......................................54<br />
Exporting a Symbol File from <strong>TwinCAT</strong>................................................................................54<br />
Importing the Symbol File into <strong>IWS</strong>....................................................................................56<br />
� Note<br />
– This document assumes that you are familiar <strong>with</strong> the Microsoft Windows NT/2000/XP environment,<br />
including how to move files, manage system preferences, establish network connections,<br />
<strong>and</strong> install new software. If you do not have this familiarity, then please consult<br />
the Windows Help feature as you work through this document.<br />
<strong>InduSoft</strong> Ltd. Page 1/60
<strong>Getting</strong> <strong>Started</strong> <strong>with</strong> <strong>IWS</strong> <strong>and</strong> <strong>TwinCAT</strong> DRAFT — 8 September 2006<br />
Introduction<br />
This document describes how to configure <strong>InduSoft</strong> Web Studio (<strong>IWS</strong>) <strong>and</strong> Beckhoff’s <strong>TwinCAT</strong> control<br />
software to run together on various Microsoft Windows-based devices, as well as how to establish<br />
communication between those devices on an Ethernet network.<br />
The following diagram shows a mixed device network using both <strong>InduSoft</strong> <strong>and</strong> Beckhoff software<br />
components:<br />
Windows NT/2000/XP or XPe<br />
<strong>InduSoft</strong><br />
Web Studio<br />
TWCAT<br />
driver<br />
<strong>TwinCAT</strong><br />
development<br />
ADS<br />
Library<br />
Windows NT/2000/XP or XPe<br />
<strong>InduSoft</strong><br />
Web Studio<br />
TWCAT<br />
driver<br />
Windows CE-based device<br />
<strong>InduSoft</strong><br />
CEView<br />
TWCAT<br />
driver<br />
ADS<br />
Library<br />
(free)<br />
ADS<br />
Library<br />
(free)<br />
TCP/IP<br />
Beckhoff CX Series, Windows XPe<br />
<strong>TwinCAT</strong><br />
runtime<br />
(preinstalled)<br />
ADS<br />
Library<br />
Figure 1. Mixed Device Network Using <strong>IWS</strong> <strong>and</strong> Beckhoff Components<br />
<strong>InduSoft</strong><br />
Web Studio<br />
TWCAT<br />
driver<br />
Beckhoff CX Series, Windows CE<br />
<strong>TwinCAT</strong><br />
runtime<br />
(preinstalled)<br />
ADS<br />
Library<br />
<strong>InduSoft</strong><br />
CEView<br />
TWCAT<br />
driver<br />
Each device in the diagram shows a unique combination of operating system, <strong>InduSoft</strong> software<br />
components, <strong>and</strong> Beckhoff software components.<br />
The primary component in this system is Beckhoff’s Automation Device Specification (ADS) library,<br />
which makes a compatible workstation or industrial PC running Windows NT/2000/XP, an embedded<br />
PC running Windows XPe, or a Windows CE-based device into a <strong>TwinCAT</strong>-compliant node. This<br />
library establishes a data exchange protocol that works over st<strong>and</strong>ard Ethernet TCP/IP, so that any<br />
node <strong>with</strong> the library installed can communicate directly <strong>with</strong> your <strong>TwinCAT</strong> control application,<br />
Page 2/60 <strong>InduSoft</strong> Ltd.<br />
TCP/IP<br />
Component provided by <strong>InduSoft</strong><br />
Component provided by Beckhoff
DRAFT — 8 September 2006 <strong>Getting</strong> <strong>Started</strong> <strong>with</strong> <strong>IWS</strong> <strong>and</strong> <strong>TwinCAT</strong><br />
wherever it may be hosted. The ADS library is included in the full <strong>TwinCAT</strong> software, but it is also<br />
available as a free, separate package from Beckhoff.<br />
<strong>InduSoft</strong> provides a TWCAT communication driver for <strong>IWS</strong> <strong>and</strong> CEView. The TWCAT driver, when<br />
properly selected configured in your <strong>IWS</strong> application project, communicates <strong>with</strong> <strong>TwinCAT</strong> through<br />
the ADS library. In this way, <strong>IWS</strong> is fully compatible <strong>with</strong> <strong>TwinCAT</strong>.<br />
The rest of this document will explain…<br />
� How to choose, acquire <strong>and</strong> install the necessary software components for each of these device<br />
configurations;<br />
� How to use the utilities provided <strong>with</strong> the ADS library to establish communication between<br />
devices; <strong>and</strong><br />
� How to build a sample application in <strong>IWS</strong> that uses the TWCAT driver <strong>and</strong> the ADS library to<br />
communicate <strong>with</strong> <strong>TwinCAT</strong>.<br />
Quickstart for Beckhoff CX1020 or CX1000<br />
This document covers most conceivable options <strong>and</strong> configurations for working <strong>with</strong> <strong>IWS</strong> <strong>and</strong> Twin-<br />
CAT, <strong>and</strong> as such it is very detailed <strong>and</strong> somewhat spread out. However, the majority of users will<br />
probably need to know only how to set up a Beckhoff CX1020 or CX1000 running Windows CE.<br />
Figure 2. Typical Configuration for Majority of Users<br />
If this is your configuration, then you can use the following quickstart guide to jump directly to the<br />
relevant sections in this document:<br />
1) Download <strong>and</strong> run the CEView custom installer (i.e., the .CAB file) for Beckhoff CX Series<br />
devices — starting on page 12.<br />
2) Establish a link between <strong>IWS</strong> on your workstation <strong>and</strong> CEView on the device, <strong>and</strong> then update<br />
CEView to the latest version — starting on page 14.<br />
3) License CEView on the device — starting on page 15.<br />
4) Select the TWCAT driver <strong>and</strong> add it to your <strong>IWS</strong> application project — starting on page 39.<br />
5) Build the driver worksheet — starting on page 46.<br />
6) Download the finished <strong>IWS</strong> application to the device — starting on page 53.<br />
� Note<br />
Beckhoff CX Series, Windows CE<br />
<strong>TwinCAT</strong><br />
runtime<br />
(preinstalled)<br />
ADS<br />
Library<br />
<strong>InduSoft</strong><br />
CEView<br />
TWCAT<br />
driver<br />
– This quickstart guide assumes that you are already familiar <strong>with</strong> both <strong>InduSoft</strong> Web Studio<br />
<strong>and</strong> the <strong>TwinCAT</strong> programming software. It only describes how to set up a Beckhoff CX Series<br />
device in an existing production environment. If you need more thorough instructions,<br />
then please review this entire document.<br />
<strong>InduSoft</strong> Ltd. Page 3/60
<strong>Getting</strong> <strong>Started</strong> <strong>with</strong> <strong>IWS</strong> <strong>and</strong> <strong>TwinCAT</strong> DRAFT — 8 September 2006<br />
Installing the Software Components<br />
This section explains how to choose, acquire <strong>and</strong> install the necessary <strong>IWS</strong> <strong>and</strong> Beckhoff software<br />
components for several different platforms. These platforms include:<br />
� A workstation or industrial PC running Windows NT/2000/XP;<br />
� An embedded PC running Windows XPe;<br />
� A Beckhoff PLC, model CX1020 or CX1000; <strong>and</strong><br />
� A Windows CE-based device (other than Beckhoff’s CX Series).<br />
Each configuration is described in detail in this section, but first…<br />
<strong>Getting</strong> the Software<br />
Before proceeding <strong>with</strong> installation on any device, make sure that you have all of the correct software<br />
(as well as the latest versions thereof) on h<strong>and</strong>.<br />
<strong>IWS</strong>, CEView, <strong>and</strong> the TWCAT Driver<br />
As of this document revision, the latest version of <strong>IWS</strong> is 6.1+SP1. You can order it on CD from<br />
your <strong>InduSoft</strong> sales representative, or you can download it from <strong>InduSoft</strong>’s Web site at<br />
www.indusoft.com. The full version of <strong>IWS</strong> can be installed directly on a desktop PC running Windows<br />
NT/2000/XP or on an embedded PC running Windows XPe.<br />
Included in <strong>IWS</strong> are all of the files required to install CEView — the <strong>IWS</strong> runtime engine for Windows<br />
CE-based devices — on any of the following embedded PC (a.k.a. mobile) processor types:<br />
ARM V4, ARM V4I, ARM V4T, MIPS II, MIPS II FP, MIPS IV, MIPS IV FP, SH3, SH4, <strong>and</strong> x86.<br />
� Note<br />
– Although the full version of <strong>IWS</strong> can be downloaded from <strong>InduSoft</strong>’s Web site, you must<br />
have a valid license to run it beyond the free evaluation period. Please contact your Indu-<br />
Soft sales representative for licensing options, <strong>and</strong> consult the <strong>InduSoft</strong> Web Studio User<br />
Guide for more information about applying the license.<br />
Also included in <strong>IWS</strong> are all of the communication drivers available at the time of release. However,<br />
these drivers are always under development, so a newer version of the TWCAT driver may be<br />
available. You can download the latest TWCAT driver from <strong>InduSoft</strong>’s up-to-date driver list at<br />
www.indusoft.com.br/download/drivers/.<br />
<strong>TwinCAT</strong> <strong>and</strong> the ADS Communication Library<br />
You can order the <strong>TwinCAT</strong> development software on CD from your Beckhoff sales representative,<br />
or you can download it from Beckhoff’s Web site at www.beckhoff.com. <strong>TwinCAT</strong> can be installed<br />
on a wide variety of platforms including traditional PCs, embedded PCs, <strong>and</strong> Beckhoff’s own CX Series<br />
of PLCs. However, for the purposes of this document, only installation on traditional PCs will be<br />
discussed. For more information about installing <strong>TwinCAT</strong> on other platforms, please consult Beckhoff’s<br />
documentation.<br />
� Note<br />
– Although the full version of <strong>TwinCAT</strong> can be downloaded from Beckhoff’s Web site, you must<br />
have a valid license to run it beyond the free evaluation period. Please contact your Beck-<br />
Page 4/60 <strong>InduSoft</strong> Ltd.
DRAFT — 8 September 2006 <strong>Getting</strong> <strong>Started</strong> <strong>with</strong> <strong>IWS</strong> <strong>and</strong> <strong>TwinCAT</strong><br />
hoff sales representative for licensing options, <strong>and</strong> consult the <strong>TwinCAT</strong> documentation for<br />
more information about applying the license.<br />
Keep in mind that you may not need to acquire the full version of <strong>TwinCAT</strong> for your installation; the<br />
<strong>TwinCAT</strong> runtime engine comes preinstalled on most Beckhoff devices, <strong>and</strong> on other devices you<br />
may only need to install the ADS library to enable communication.<br />
The ADS communication library is freely available from Beckhoff <strong>and</strong> can be acquired in several different<br />
ways:<br />
� If you have already installed <strong>TwinCAT</strong> on a traditional PC, then the ADS library files are<br />
available on that PC in the \<strong>TwinCAT</strong>\ADS Api directory;<br />
� The ADS library can be installed from the <strong>TwinCAT</strong> Supplement CD that comes <strong>with</strong> the<br />
<strong>TwinCAT</strong> Installation CD; or<br />
� The ADS library is available as a free, st<strong>and</strong>alone download from Beckhoff’s Web site at<br />
www.beckhoff.com. The full name of the download is <strong>TwinCAT</strong>_ADS_Communication_Library, <strong>and</strong> it<br />
is listed in the <strong>TwinCAT</strong> Supplement section of the site.<br />
The ADS communication library can be installed on a traditional PC running Windows NT/2000/XP,<br />
on an embedded PC running Windows XPe, or on a Windows CE device using any of the following<br />
processor types: ARM, I586, MIPS, SH3, SH4, StrongARM HPC, StrongARM PPC, StrongARM 1100,<br />
<strong>and</strong> StrongARM V4I.<br />
Windows CE Utilities<br />
If you will be working <strong>with</strong> Windows CE — either on a Beckhoff PLC or on some other Windows CEbased<br />
device — then you should consider having these two utilities installed on your workstation:<br />
� First, you can use Microsoft ActiveSync to easily transfer files between your workstation<br />
<strong>and</strong> a connected Windows CE-based device. ActiveSync communicates <strong>with</strong> the device via<br />
serial or USB, <strong>and</strong> when the device is properly connected, it appears on your workstation<br />
(under My Computer) as a removable drive.<br />
Figure 3: Using Microsoft ActiveSync to Connect to a Windows CE-based Device<br />
ActiveSync can be downloaded for free from Microsoft’s Web site at:<br />
http://www.microsoft.com/windowsmobile/addons/<br />
<strong>InduSoft</strong> Ltd. Page 5/60
<strong>Getting</strong> <strong>Started</strong> <strong>with</strong> <strong>IWS</strong> <strong>and</strong> <strong>TwinCAT</strong> DRAFT — 8 September 2006<br />
� Second, you can use Remote Display Control for Windows CE (also known as<br />
CERHOST.exe) to open a console window on your workstation that shows the desktop of a<br />
connected Windows CE-based device. Through this console window, you can fully operate a<br />
“headless” device — that is, a device <strong>with</strong>out its own display, keyboard or mouse — using<br />
only your workstation.<br />
Remote Display Control communicates <strong>with</strong> the device via Ethernet TCP/IP, similar to both<br />
<strong>TwinCAT</strong> <strong>and</strong> <strong>IWS</strong>. However, you must know the hostname or IP address of the device in<br />
order to connect to it, so be sure to get this information beforeh<strong>and</strong>.<br />
Figure 4: Using Remote Display Control to Connect to a Windows CE-based Device<br />
Microsoft includes Remote Display Control as part of their Windows Mobile developer toolkit,<br />
but Beckhoff also offers the utility on their Web site at:<br />
http://ftp.beckhoff.de/Software/embPC-Control/CE/Tools/RemoteDisplay/<br />
For more information about using Microsoft ActiveSync or Remote Display Control, please consult<br />
Microsoft’s documentation.<br />
� Note<br />
– The addresses given above are accurate at the time of this writing, but they may change in<br />
the future as Microsoft <strong>and</strong>/or Beckhoff update their Web sites.<br />
Page 6/60 <strong>InduSoft</strong> Ltd.
DRAFT — 8 September 2006 <strong>Getting</strong> <strong>Started</strong> <strong>with</strong> <strong>IWS</strong> <strong>and</strong> <strong>TwinCAT</strong><br />
Installing on a Workstation or Industrial PC — Windows NT/2000/XP<br />
When installing on a workstation or industrial PC running Windows NT/2000/XP, there are typically<br />
only two possible configurations. (See page 2 for more information about these configurations <strong>and</strong><br />
their places in a mixed network.) Each configuration is described below.<br />
Full Version of <strong>IWS</strong> + Full Version of <strong>TwinCAT</strong><br />
To install both <strong>IWS</strong> <strong>and</strong> <strong>TwinCAT</strong> on the same PC:<br />
1) Install <strong>and</strong> license the full <strong>IWS</strong> development software, as described in its documentation.<br />
2) Download the latest TWCAT driver from <strong>InduSoft</strong>’s Web site (see page 4), unzip it, <strong>and</strong><br />
copy all of its files to the \DRV directory of your <strong>IWS</strong> installation. For example…<br />
C:\Program Files\Indusoft Web Studio v6.1\DRV\<br />
3) Install <strong>and</strong> license the full <strong>TwinCAT</strong> development software, as described in its own documentation.<br />
Installing <strong>TwinCAT</strong> will automatically enable communication between the PC <strong>and</strong> other <strong>TwinCAT</strong>compliant<br />
devices, so you do not need to do anything else to configure <strong>IWS</strong>.<br />
Full Version of <strong>IWS</strong> + the ADS Communication Library<br />
To install <strong>IWS</strong> <strong>and</strong> the ADS library on the same PC:<br />
1) Install <strong>and</strong> license the full <strong>IWS</strong> development software, as described in its documentation.<br />
2) Download the latest TWCAT driver from <strong>InduSoft</strong>’s Web site (see page 4), unzip it, <strong>and</strong> copy<br />
all of its files to the \DRV directory of your <strong>IWS</strong> installation. For example…<br />
C:\Program Files\Indusoft Web Studio v6.1\DRV\<br />
3) Acquire the ADS communication library (see page 4), <strong>and</strong> locate the following files therein:<br />
� \TcAdsDll\AdsDll.dll<br />
� \TcAdsDll\TcAdsDll.dll<br />
� \TcAdsDll\TcAdsTest.exe<br />
� \TcAdsDll\TcAmsRemoteMgr.exe<br />
4) Copy all four files to the \BIN directory of your <strong>IWS</strong> installation. For example…<br />
C:\Program Files\Indusoft Web Studio v6.1\BIN\<br />
With the ADS library <strong>and</strong> the latest TWCAT driver both installed, <strong>IWS</strong> is ready to communicate <strong>with</strong><br />
<strong>TwinCAT</strong> running on a remote device. Unless you are performing additional installations on other<br />
devices, you may proceed to the next section, “Establishing Communication Between <strong>TwinCAT</strong> Stations,”<br />
on page 25.<br />
<strong>InduSoft</strong> Ltd. Page 7/60
<strong>Getting</strong> <strong>Started</strong> <strong>with</strong> <strong>IWS</strong> <strong>and</strong> <strong>TwinCAT</strong> DRAFT — 8 September 2006<br />
Installing on an Embedded PC — Windows XPe<br />
Although it is technically an embedded PC — that is, a slimmed down operating system running on<br />
solid-state hardware — a system running Windows XP Embedded (XPe) provides the same basic<br />
compatibility as a workstation or industrial PC running Windows XP. As such, you can configure this<br />
Windows XPe-based device much like the workstation described in the previous section, <strong>with</strong> full<br />
versions of both <strong>IWS</strong> <strong>and</strong> <strong>TwinCAT</strong> or <strong>with</strong> the full version of <strong>IWS</strong> <strong>and</strong> the ADS library.<br />
The biggest difference between a traditional workstation <strong>and</strong> an embedded PC — at least for the<br />
purposes of this document — is that the embedded PC does not have its own CD drive. (If it did,<br />
then it wouldn’t be solid-state.) Without a CD drive, it is not possible to install software directly<br />
from CD to the device. Therefore, you must find another way to install the software.<br />
IMPORTANT! Do Not Install Supplemental Files!<br />
Regardless of how you install <strong>IWS</strong><br />
on your embedded PC, you are likely<br />
to use it only as a runtime engine<br />
<strong>and</strong> not as a development station.<br />
Therefore, you should not install<br />
any of the supplemental files (i.e.,<br />
files other than the core Program<br />
Files); when you run the <strong>IWS</strong> installation<br />
wizard, be sure to deselect<br />
these files as shown at right. Skipping<br />
these files will reduce the size<br />
of the <strong>IWS</strong> installation by over 260<br />
MB, which is important on an embedded<br />
PC where persistent (nonvolatile)<br />
memory is extremely limited.<br />
Don’t worry about not installing the<br />
communication drivers. You only<br />
need the TWCAT driver to communi-<br />
Deselecting the Supplemental Files in the Installation Wizard<br />
cate <strong>with</strong> other <strong>TwinCAT</strong> stations,<br />
<strong>and</strong> you can always download the latest version of that driver from <strong>InduSoft</strong>’s Web site. For more<br />
information, see pages 4 <strong>and</strong> 7.<br />
Installing from External CD<br />
You can attach an external (or “backpack”) CD drive to your embedded PC, typically using a USB<br />
2.0 connection. The drive should mount normally under Windows XPe. From there — assuming you<br />
have installation CDs for <strong>IWS</strong> <strong>and</strong> <strong>TwinCAT</strong> — you can proceed to install the software on your embedded<br />
PC just as if it’s a traditional workstation, as described in the previous section.<br />
Installing from Internet Download<br />
If your embedded PC is connected to the Internet, then you can directly download the <strong>IWS</strong>, Twin-<br />
CAT <strong>and</strong>/or ADS library installers from their respective Web sites. And again, you can proceed from<br />
there to install the software on your system as described in the previous section.<br />
However, you may not want to do this because merely downloading the installers requires several<br />
hundred megabytes, <strong>and</strong> an embedded PC’s persistent (non-volatile) memory is extremely limited.<br />
Page 8/60 <strong>InduSoft</strong> Ltd.
DRAFT — 8 September 2006 <strong>Getting</strong> <strong>Started</strong> <strong>with</strong> <strong>IWS</strong> <strong>and</strong> <strong>TwinCAT</strong><br />
It’s possible that there simply isn’t enough space to both download the installers <strong>and</strong> install the<br />
software. It all depends on how much non-volatile memory you have available.<br />
Furthermore, for the sake of network maintenance <strong>and</strong> security, embedded PCs on the plant floor<br />
often are not connected to the Internet. Yet, they usually are connected to the internal network so<br />
you may be able to run the installers from another PC.<br />
Installing from Another PC<br />
If your embedded PC is connected to the internal network, then you may be able to run the <strong>IWS</strong>,<br />
<strong>TwinCAT</strong> <strong>and</strong>/or ADS library installers from another PC on the network. To do this, you must first<br />
locate a workstation that is connected to both the Internet <strong>and</strong> the building network, <strong>and</strong> then you<br />
must download the installers to that workstation.<br />
Once you have the installers, you can upload them from the workstation to a common file server<br />
(a.k.a. network drive) or you can share them directly from that workstation. Either way, you can<br />
then go to the embedded PC, map the appropriate network drive, <strong>and</strong> run the installers. For more<br />
information on sharing files <strong>and</strong> mapping network drives, please consult the Windows help system.<br />
Installing from CompactFlash<br />
CompactFlash (CF) memory is a popular form of solid-state, non-volatile file storage, <strong>and</strong> most<br />
embedded PCs are designed <strong>with</strong> not only internal flash memory but also CF memory card readers.<br />
You can copy the <strong>IWS</strong>, <strong>TwinCAT</strong> <strong>and</strong>/or ADS library installers from your workstation onto a CF card,<br />
<strong>and</strong> then insert that card into your embedded PC. The card should appear under My Computer as a<br />
removable drive, <strong>and</strong> once it does, you can then run the installers saved on it.<br />
Installing from USB Drive<br />
Windows XPe provides full support for USB, so you should be able to use a USB flash drive (also<br />
known as a “thumb drive”) to transfer files in the same way that you would use a CF memory card,<br />
as described above. The only limitation is whether your embedded PC has an open USB port.<br />
<strong>InduSoft</strong> Ltd. Page 9/60
<strong>Getting</strong> <strong>Started</strong> <strong>with</strong> <strong>IWS</strong> <strong>and</strong> <strong>TwinCAT</strong> DRAFT — 8 September 2006<br />
Installing on a Beckhoff PLC (CX1020 or CX1000)<br />
Beckhoff offers the CX Series of embedded PCs that are packaged <strong>with</strong> all of the necessary communication<br />
<strong>and</strong> I/O options to make them fully functional PLCs. The CX Series includes:<br />
� The Beckhoff CX1020 <strong>with</strong> an Intel ® Celeron ® M processor up to 1.0 GHz; <strong>and</strong><br />
� The Beckhoff CX1000 <strong>with</strong> an AMD ® Geode processor up to 266 MHz.<br />
The CX1020 can be configured <strong>with</strong> either Windows XPe or Windows CE. The CX1000 can only be<br />
configured <strong>with</strong> Windows CE.<br />
Both models come <strong>with</strong> the <strong>TwinCAT</strong> runtime software preinstalled, so you only need install the <strong>InduSoft</strong><br />
software component that is appropriate to the operating system: the full version of <strong>IWS</strong> on<br />
Windows XPe, or the CEView runtime engine on Windows CE.<br />
Installing <strong>IWS</strong> on a Beckhoff CX1020 Running Windows XPe<br />
For the purposes of this document, a Beckhoff PLC running Windows XPe is just like any other embedded<br />
PC running that operating system. Therefore, to install the full version of <strong>IWS</strong>, follow the<br />
instructions already provided in “Installing on an Embedded PC — Windows XP” on page 8.<br />
Please consult Beckhoff’s documentation for more information about the device’s communication<br />
options <strong>and</strong> OS configuration.<br />
Installing CEView on a Beckhoff CX1020 or CX1000 Running Windows CE<br />
Installing new software on a Windows CE-based device can be tricky because the default system<br />
preferences <strong>and</strong> directory structure vary greatly from manufacturer to manufacturer <strong>and</strong> from<br />
model to model. This is because such devices have extremely specific hardware configurations <strong>and</strong><br />
limited system resources. When the manufacturer develops the OS load for these devices, it selects<br />
only the minimum options required to drive the hardware.<br />
The same is true for Beckhoff’s CX Series, but to make things easier for users who want to run<br />
<strong>TwinCAT</strong> <strong>and</strong> <strong>InduSoft</strong> together on the same device, Beckhoff has also developed a custom installer<br />
that automatically installs <strong>InduSoft</strong>’s CEView in the correct directory <strong>and</strong> makes the necessary<br />
changes to the system registry.<br />
� Note<br />
– This custom installer is only available for Beckhoff CX Series devices running Windows CE.<br />
There is no equivalent for CX Series devices running Windows XPe; see “Installing <strong>IWS</strong> on a<br />
Beckhoff CX1020 Running Windows XPe” above.<br />
CX Series devices can be ordered from Beckhoff <strong>with</strong> this custom installer already applied; the option<br />
is listed in Beckhoff’s catalog as “CX1800-0005 <strong>InduSoft</strong> HMI CE Runtime.” The installer can<br />
also be downloaded from Beckhoff’s Web site <strong>and</strong> run by the user, in case a device is ordered <strong>with</strong>out<br />
the <strong>InduSoft</strong> option.<br />
<strong>InduSoft</strong> <strong>and</strong> Beckhoff work together to try to make sure this installer always includes the latest<br />
version of CEView. It is important to have the latest version installed on your CX Series device, in<br />
order to correctly run your <strong>IWS</strong> applications. Working <strong>with</strong> different versions of <strong>IWS</strong> <strong>and</strong> CEView<br />
may result in serious errors.<br />
Unfortunately, it’s still possible for <strong>InduSoft</strong> <strong>and</strong> Beckhoff to fall out of sync, so that even a freshly<br />
downloaded installer may include an old version of CEView. As such, when you receive a new device<br />
<strong>with</strong> the <strong>InduSoft</strong> option or when you run the installer yourself, you should still use the Execution<br />
Environment tool in <strong>IWS</strong> to update CEView on the device.<br />
Page 10/60 <strong>InduSoft</strong> Ltd.
DRAFT — 8 September 2006 <strong>Getting</strong> <strong>Started</strong> <strong>with</strong> <strong>IWS</strong> <strong>and</strong> <strong>TwinCAT</strong><br />
In general, the rest of this section describes the following procedure:<br />
1) Check to see if CEView is already installed on the device — that is, check to see if the<br />
custom installer has already been applied.<br />
2) If CEView is not installed, then download the custom installer <strong>and</strong> run it.<br />
3) Use the Execution Environment tool in <strong>IWS</strong> to connect to the device, <strong>and</strong> then update CE-<br />
View to match <strong>IWS</strong>.<br />
4) Entire your runtime license for CEView.<br />
You may wonder why you should download <strong>and</strong> run the custom installer if there’s a chance it will<br />
install an old version of CEView that needs to be updated anyhow. Why not install CEView from<br />
scratch using the Execution Environment tool in <strong>IWS</strong>? Well, because the installer automatically<br />
makes changes to the device’s directory structure <strong>and</strong> system registry that are more difficult to<br />
make manually. In the end, it’s simply easier to run the installer <strong>and</strong> then update.<br />
Before you proceed, make sure that you meet the following prerequisites:<br />
� You must have the full <strong>IWS</strong> development software installed on your workstation;<br />
� Your CX Series device should be connected to your workstation by serial or Ethernet. If it is<br />
connected by Ethernet, then it should be assigned a valid IP address;<br />
� You must have a way to control the device, either through a console window (see page 6) or<br />
by physically attaching a display <strong>and</strong> a mouse; <strong>and</strong><br />
� You must have a way to transfer files from your workstation to the device, either through<br />
Microsoft ActiveSync (see page 5), by manually copying the files onto the device’s Compact<br />
Flash memory card, or by copying across the network.<br />
For help <strong>with</strong> meeting these prerequisites, please consult Microsoft’s documentation for Windows<br />
CE <strong>and</strong> Beckhoff’s documentation for the CX Series device.<br />
Checking for CEView <strong>and</strong> Remote Agent<br />
Now that you’re ready, check to see if the custom installer has already been run on your CX Series<br />
device. You can do this by looking for the \Hard Disk\<strong>InduSoft</strong> directory which contains the CE-<br />
View files.<br />
Also, if the installer has been run on the device, then it should already be configured to automatically<br />
start Remote Agent on boot. Try rebooting the device — that is, tap the Start button to open<br />
the Start menu <strong>and</strong> then select Suspend. When the device boots up again, the Remote Agent utility<br />
should appear:<br />
Figure 5. Remote Agent Utility Running in Windows CE<br />
<strong>InduSoft</strong> Ltd. Page 11/60
<strong>Getting</strong> <strong>Started</strong> <strong>with</strong> <strong>IWS</strong> <strong>and</strong> <strong>TwinCAT</strong> DRAFT — 8 September 2006<br />
� Note<br />
– Remote Agent is a communications utility included in the CEView installation. It enables<br />
communication between <strong>IWS</strong> on your workstation <strong>and</strong> CEView on the device. In this way, it<br />
serves much the same purpose that the ADS library serves in <strong>TwinCAT</strong>.<br />
If the CEView files are present <strong>and</strong> Remote Agent starts automatically on boot, then skip to<br />
“Updating CEView to the Latest Version” on page 14. If not, then proceed to “Downloading <strong>and</strong><br />
Running the Custom Installer” below.<br />
Downloading <strong>and</strong> Running the Custom Installer<br />
To download <strong>and</strong> run the installer yourself:<br />
1) Acquire the “CX1800-0005 <strong>InduSoft</strong> HMI CE Runtime” installer. The actual name of the installer<br />
file is:<br />
CX1800-0005_HMI_<strong>InduSoft</strong>.I586.CAB<br />
This file is included on the <strong>TwinCAT</strong> Supplement CD, but it can also be downloaded for free<br />
from Beckhoff’s Web site at:<br />
http://www.beckhoff.com/english/default.htm?download/cx_ce_hmi.htm<br />
� Note<br />
– The address given above is correct at the time of this writing, but it may become invalid<br />
as Beckhoff updates their Web site. You can also use the site’s navigation tree<br />
to find the Web page; it should be listed under Download > Software > Embedded PC.<br />
2) Copy the installer file to the device. You should save the file in the device’s \Hard<br />
Disk\System directory.<br />
3) Locate the installer file on the device <strong>and</strong> double-tap its icon. This will run the installer.<br />
4) Follow the on-screen installation instructions. When the installer prompts you to confirm the<br />
creation of the \Hard Disk\<strong>InduSoft</strong> directory, tap the OK button.<br />
Figure 6. Creating the <strong>InduSoft</strong> Directory<br />
Page 12/60 <strong>InduSoft</strong> Ltd.
DRAFT — 8 September 2006 <strong>Getting</strong> <strong>Started</strong> <strong>with</strong> <strong>IWS</strong> <strong>and</strong> <strong>TwinCAT</strong><br />
The CEView files are installed in the \Hard Disk\<strong>InduSoft</strong> directory, <strong>and</strong> the system registry<br />
is updated.<br />
Figure 7. Installing Files in the <strong>InduSoft</strong> Directory<br />
5) When the installation is finished, reboot the device by selecting Start � Suspend. This will save<br />
the updated directory <strong>and</strong> registry information to the persistent (non-volatile) memory.<br />
After the reboot, the Remote Agent utility should start automatically.<br />
6) Tap Setup to open the Setup dialog:<br />
Figure 8. Remote Agent Utility Running in Windows CE<br />
Figure 9. Setup Dialog in Remote Agent<br />
Configure the Device Connection settings as needed, depending on how you’ve connected<br />
the device to your workstation. For complete instructions, please consult the <strong>InduSoft</strong> Web<br />
Studio User Guide. You do not need to enter a license at this time.<br />
7) Tap OK to close the Setup dialog.<br />
Remote Agent is now ready to receive communication from <strong>IWS</strong> running on your workstation.<br />
<strong>InduSoft</strong> Ltd. Page 13/60
<strong>Getting</strong> <strong>Started</strong> <strong>with</strong> <strong>IWS</strong> <strong>and</strong> <strong>TwinCAT</strong> DRAFT — 8 September 2006<br />
Updating CEView to the Latest Version<br />
Assuming you have already installed the full, latest version of <strong>IWS</strong> <strong>and</strong> the latest TWCAT driver<br />
(see “<strong>Getting</strong> the Software” on page 4), you can use the following instructions to update CEView on<br />
your CX Series device:<br />
1) On your workstation, start Indusoft Web Studio.<br />
2) From the main menu bar, select Tools � Execution Environment. The Execution Environment dialog<br />
will be displayed:<br />
Figure 10. Execution Environment Dialog<br />
3) Configure the Target Station settings as needed, depending on how you’ve connected the<br />
device to your workstation. For complete instructions, please consult the <strong>InduSoft</strong> Web Studio<br />
User Guide.<br />
4) Click Connect to establish communication <strong>with</strong> the device.<br />
If communication is successfully established, then the Status <strong>and</strong> Platform fields will be updated<br />
to reflect the connected device. Also, the Remote Agent utility on the device will show<br />
that it has successfully connected back to <strong>IWS</strong>.<br />
5) Make sure the Only newer files option (checkbox) is enabled, <strong>and</strong> then click Install system files… to<br />
update the CEView files on the device.<br />
6) When the installation is completed, click Close to close the Execution Environment dialog.<br />
7) Reboot the device once more by selecting Start � Suspend. This will save the updated files to<br />
the device’s persistent (non-volatile) memory.<br />
You should now have the <strong>TwinCAT</strong> runtime software, the Remote Agent utility, <strong>and</strong> the updated<br />
CEView files all installed on your CX Series device.<br />
Page 14/60 <strong>InduSoft</strong> Ltd.
DRAFT — 8 September 2006 <strong>Getting</strong> <strong>Started</strong> <strong>with</strong> <strong>IWS</strong> <strong>and</strong> <strong>TwinCAT</strong><br />
Licensing CEView<br />
You must have a valid license to run CEView beyond the free evaluation period. You can obtain this<br />
license by contacting your <strong>InduSoft</strong> sales representative <strong>and</strong> providing the device’s “site code.” The<br />
representative will use this site code to generate a corresponding license code, which you can then<br />
apply to the device.<br />
The actual licensing can be done in either of two ways: via the Execution Environment tool in <strong>IWS</strong>,<br />
or directly at the device. If you’ve already used the Execution Environment tool to connect to the<br />
device <strong>and</strong> update the CEView software (see the previous page), then it’s very easy to also license<br />
the software.<br />
When you are ready, proceed <strong>with</strong> the following instructions:<br />
1) In the Execution Environment dialog, select the CE License tab:<br />
Figure 11: CE License Tab in the Execution Environment Dialog<br />
2) Copy the code given in the Site Code field <strong>and</strong> send it to your <strong>InduSoft</strong> sales representative.<br />
Your representative will return a license key that corresponds to the site code.<br />
� Note<br />
– The site code shown above is given only as an example. Your device’s actual site<br />
code is generated when CEView is installed, <strong>and</strong> it is unique to your device.<br />
3) Enter the license key in the Site Key field <strong>and</strong> click Send.<br />
If the site key is accepted (validated), then a confirmation message will be displayed. If the<br />
site key is not accepted, verify that you have entered it correctly <strong>and</strong> try again. If it is still<br />
not accepted, then contact your <strong>InduSoft</strong> sales representative for assistance.<br />
<strong>InduSoft</strong> Ltd. Page 15/60
<strong>Getting</strong> <strong>Started</strong> <strong>with</strong> <strong>IWS</strong> <strong>and</strong> <strong>TwinCAT</strong> DRAFT — 8 September 2006<br />
If for whatever reason you cannot connect to the device via the Execution Environment tool in <strong>IWS</strong>,<br />
you can still apply a license directly on the device itself:<br />
1) On your CX Series device, in the Remote Agent utility, tap Setup to open the Setup dialog:<br />
2) Tap License to open the License dialog:<br />
Figure 12. Setup Dialog in Remote Agent<br />
Figure 13: License Dialog in Remote Agent<br />
3) Tap Change License to open the Change License dialog:<br />
Figure 14: Change License Dialog in Remote Agent<br />
4) Copy the code given in Site Code field <strong>and</strong> send it to your <strong>InduSoft</strong> sales representative.<br />
Your representative will return a license key that corresponds to the site code.<br />
� Note<br />
– The site code shown above is given only as an example. Your device’s actual site<br />
code is generated when CEView is installed, <strong>and</strong> it is unique to your device.<br />
Page 16/60 <strong>InduSoft</strong> Ltd.
DRAFT — 8 September 2006 <strong>Getting</strong> <strong>Started</strong> <strong>with</strong> <strong>IWS</strong> <strong>and</strong> <strong>TwinCAT</strong><br />
5) Enter the license key in the Site Key field <strong>and</strong> click Authorize.<br />
If the site key is accepted (validated), then the following message is displayed:<br />
Figure 15: Site Key Accepted<br />
If the site key is not accepted, verify that you have entered it correctly <strong>and</strong> try again. If it is<br />
still not accepted, then contact your <strong>InduSoft</strong> sales representative for assistance.<br />
When CEView is properly installed, updated, licensed, <strong>and</strong> ready for runtime, you can proceed to<br />
“Establishing Communication Between <strong>TwinCAT</strong> Stations” on page 25.<br />
<strong>InduSoft</strong> Ltd. Page 17/60
<strong>Getting</strong> <strong>Started</strong> <strong>with</strong> <strong>IWS</strong> <strong>and</strong> <strong>TwinCAT</strong> DRAFT — 8 September 2006<br />
Installing on a Windows CE-based Device<br />
� Note<br />
– This section discusses Windows CE-based devices in general. Beckhoff’s CX Series devices<br />
(i.e., the CX1020 <strong>and</strong> the CX1000) are discussed in the previous section.<br />
Any Windows CE-based device can be made a fully compatible node in your <strong>TwinCAT</strong>/<strong>InduSoft</strong> system,<br />
but it requires a few extra steps because the device does not come <strong>with</strong> any of the necessary<br />
software preinstalled <strong>and</strong> there is no custom installer to do it for you.<br />
Since this is not a Beckhoff device, you cannot install the full <strong>TwinCAT</strong> runtime software. Instead,<br />
you can install the ADS library that enables communication <strong>with</strong> other <strong>TwinCAT</strong> nodes. You can<br />
then install <strong>InduSoft</strong> CEView, which ties into <strong>and</strong> communicates through the ADS library.<br />
In general, the rest of this section describes the following procedure:<br />
1) Determine the OS version <strong>and</strong> processor type of your Windows CE-based device.<br />
2) Install the ADS library that is appropriate to the processor type.<br />
3) Install the Remote Agent utility <strong>and</strong> configure it to start automatically on boot.<br />
4) Use the Execution Environment tool in <strong>IWS</strong> to establish communication between your workstation<br />
<strong>and</strong> the device, <strong>and</strong> then install CEView on the device.<br />
5) Enter your runtime license for CEView.<br />
Before you proceed, make sure that you meet the following prerequisites:<br />
� You must have the full <strong>IWS</strong> development software installed on your workstation;<br />
� Your Windows CE-based device should be connected to your workstation by serial or<br />
Ethernet. If it is connected by Ethernet, then it should be assigned a valid IP address;<br />
� You must have a way to control the device, either through a console window (see page 6) or<br />
by physically attaching a display <strong>and</strong> a mouse; <strong>and</strong><br />
� You must have a way to transfer files from your workstation to the device, either through<br />
Microsoft ActiveSync (see page 5), by manually copying the files onto the device’s Compact<br />
Flash memory card, or by copying across the network.<br />
For help <strong>with</strong> meeting these prerequisites, please consult Microsoft’s documentation for Windows<br />
CE <strong>and</strong> the manufacturer’s documentation for the device.<br />
Determining Your OS Version <strong>and</strong> Processor Type<br />
Both CEView <strong>and</strong> the ADS library come in different “flavors” for the various processor types, so you<br />
must determine the processor type on your Windows CE-based device. You should also note which<br />
specific version of Windows CE your device is running.<br />
To determine OS version <strong>and</strong> processor type in Windows CE:<br />
1) Tap the Start button to open the Start menu, <strong>and</strong> then select Settings � Control Panel.<br />
2) In the Control Panel, double-tap the System icon to open the System dialog.<br />
3) In the System dialog, select the General tab. The OS version (e.g., Windows CE 3.x, Windows<br />
CE .NET, Windows CE 5.x) <strong>and</strong> processor type (e.g., ARM, MIPS, SH3) will be displayed.<br />
Make note of this information.<br />
4) Close the System dialog.<br />
Page 18/60 <strong>InduSoft</strong> Ltd.
DRAFT — 8 September 2006 <strong>Getting</strong> <strong>Started</strong> <strong>with</strong> <strong>IWS</strong> <strong>and</strong> <strong>TwinCAT</strong><br />
� Note<br />
– “Windows CE .NET” is another name for Windows CE 4.x.<br />
Installing the ADS Library<br />
The ADS communication library for Windows CE is provided as a single cabinet file, as opposed to<br />
the h<strong>and</strong>ful of separate files that are provided for Windows NT/2000/XP. A cabinet file (*.CAB) is<br />
an automated installer that is specifically written for Windows CE. All you have to do is copy the<br />
cabinet file to the Windows CE device <strong>and</strong> run it there; it will install its files in the correct places,<br />
edit the system registry (if necessary), <strong>and</strong> remove itself when it’s done.<br />
To install the ADS library on your Windows CE device:<br />
1) Acquire the ADS communication library as described previously (see page 4), open it on<br />
your workstation, <strong>and</strong> locate the following file therein:<br />
\TcAdsDllCe\setup\TcAdsDllCe..CAB<br />
…where is the type of processor that is in your device.<br />
For example:<br />
\TcAdsDllCe\setup\TcAdsDllCe.MIPS.CAB<br />
Please note that each cabinet file is a complete installer. You will only need one file — the<br />
one that corresponds to your device’s processor type — to install the ADS library.<br />
2) Copy this file to the device’s persistent (non-volatile) file storage. If you don’t know where<br />
this is, then please consult the manufacturer’s documentation.<br />
The directory structures of different Windows CE-based devices can vary greatly, <strong>and</strong> the<br />
device manufacturer may require that files be stored in a specific directory, so please consult<br />
the manufacturer’s documentation.<br />
3) Go to the Windows CE device, locate the cabinet file there, <strong>and</strong> double-tap its icon to run it.<br />
4) Follow the on-screen instructions, if any.<br />
5) When the installation is finished, reboot the device to save the new files <strong>and</strong> settings to persistent<br />
(non-volatile) memory.<br />
The ADS library should now be installed on your Windows CE device. You will verify it in the next<br />
section, “Establishing Communication Between <strong>TwinCAT</strong> Stations,” on page 25.<br />
Installing the Remote Agent Utility<br />
To install Remote Agent on your Windows CE device:<br />
1) On your workstation, locate the following file:<br />
\\Redist\\\BIN\CEServer.exe<br />
…where:<br />
– is the directory where you installed <strong>IWS</strong>;<br />
– is the version of Windows CE running on your device (see note); <strong>and</strong><br />
– is the processor type that is in your device.<br />
<strong>InduSoft</strong> Ltd. Page 19/60
<strong>Getting</strong> <strong>Started</strong> <strong>with</strong> <strong>IWS</strong> <strong>and</strong> <strong>TwinCAT</strong> DRAFT — 8 September 2006<br />
� Note<br />
– For devices running Windows CE 3.x, use the files located in the \Redist\CeView directory.<br />
– For devices running Windows CE 4.x (a.k.a. Windows CE .NET) <strong>and</strong> Windows CE 5.x,<br />
use the files located in the \Redist\Wince 4.0 directory.<br />
For example, for a device running Windows CE 3.1 on an Intel x86 processor:<br />
\<strong>InduSoft</strong> Web Studio v6.1\Redist\CeView\x86\BIN\CEServer.exe<br />
For a device running Windows CE 5.0 on an ARM V4 processor:<br />
\<strong>InduSoft</strong> Web Studio v6.1\Redist\Wince 4.0\Armv4\BIN\CEServer.exe<br />
2) Copy this file to the device’s persistent (non-volatile) file storage.<br />
The directory structures of different Windows CE-based devices can vary greatly, <strong>and</strong> the<br />
device manufacturer may require that applications be stored in a specific directory, so<br />
please consult the manufacturer’s documentation.<br />
3) You can now run Remote Agent in Windows CE by double-tapping the CEServer.exe icon.<br />
When you run it, the Remote Agent window is displayed:<br />
4) Tap Setup to open the Setup dialog:<br />
Figure 16. Remote Agent Running in Windows CE<br />
Figure 17. Setup Dialog in Remote Agent<br />
Page 20/60 <strong>InduSoft</strong> Ltd.
DRAFT — 8 September 2006 <strong>Getting</strong> <strong>Started</strong> <strong>with</strong> <strong>IWS</strong> <strong>and</strong> <strong>TwinCAT</strong><br />
Configure the Device Connection settings as needed, depending on how you’ve connected<br />
the device to your workstation. For complete instructions, please consult the <strong>InduSoft</strong> Web<br />
Studio User Guide. You do not need to enter a license at this time.<br />
5) Tap OK to close the Setup dialog.<br />
Remote Agent is now ready to receive communication from <strong>IWS</strong> running on your workstation.<br />
Automatically Starting Remote Agent on Boot<br />
Please keep in mind that it can be awkward to have to manually start Remote Agent on the device<br />
every time you want to establish communication between the device <strong>and</strong> <strong>IWS</strong> on your workstation.<br />
As such, you should configure the device to automatically start Remote Agent whenever the device<br />
is booted. Please consult the manufacturer’s documentation for the preferred method to automatically<br />
start an application.<br />
Installing the Remaining CEView Files<br />
Now, <strong>with</strong> Remote Agent installed <strong>and</strong> running on the Windows CE-based device, <strong>IWS</strong> can connect<br />
to the device <strong>and</strong> install the remaining CEView files.<br />
To install CEView on your device:<br />
1) On your workstation, start Indusoft Web Studio.<br />
2) From the main menu bar, select Tools � Execution Environment. The Execution Environment dialog<br />
will be displayed:<br />
Figure 18. Execution Environment Dialog<br />
3) Configure the Target Station settings as needed, depending on how you’ve connected the<br />
device to your workstation. For complete instructions, please consult the <strong>InduSoft</strong> Web Studio<br />
User Guide.<br />
4) Click Connect to establish communication <strong>with</strong> the device.<br />
If communication is successfully established, then the Status <strong>and</strong> Platform fields will be updated<br />
to reflect the connected device. Also, the Remote Agent utility on the device will show<br />
that it has successfully connected back to <strong>IWS</strong>.<br />
5) Click Install system files… to install the CEView files on the device.<br />
6) When the installation is completed, click Close to close the Execution Environment dialog.<br />
7) Reboot the device once more to save the updated files to the device’s persistent (nonvolatile)<br />
memory.<br />
<strong>InduSoft</strong> Ltd. Page 21/60
<strong>Getting</strong> <strong>Started</strong> <strong>with</strong> <strong>IWS</strong> <strong>and</strong> <strong>TwinCAT</strong> DRAFT — 8 September 2006<br />
You should now have the ADS library, the Remote Agent utility, <strong>and</strong> the CEView files all installed on<br />
your Windows CE-based device.<br />
Licensing CEView<br />
You must have a valid license to run CEView beyond the free evaluation period. You can obtain this<br />
license by contacting your <strong>InduSoft</strong> sales representative <strong>and</strong> providing the device’s “site code.” The<br />
representative will use this site code to generate a corresponding license code, which you can then<br />
apply to the device.<br />
The actual licensing can be done in either of two ways: via the Execution Environment tool in <strong>IWS</strong>,<br />
or directly at the device. If you’ve already used the Execution Environment tool to connect to the<br />
device <strong>and</strong> update the CEView software (see the previous page), then it’s very easy to also license<br />
the software.<br />
When you are ready, proceed <strong>with</strong> the following instructions:<br />
1) In the Execution Environment dialog, select the CE License tab:<br />
Figure 19: CE License Tab in the Execution Environment Dialog<br />
2) Copy the code given in the Site Code field <strong>and</strong> send it to your <strong>InduSoft</strong> sales representative.<br />
Your representative will return a license key that corresponds to the site code.<br />
� Note<br />
– The site code shown above is given only as an example. Your device’s actual site<br />
code is generated when CEView is installed, <strong>and</strong> it is unique to your device.<br />
3) Enter the license key in the Site Key field <strong>and</strong> click Send.<br />
If the site key is accepted (validated), then a confirmation message will be displayed. If the<br />
site key is not accepted, verify that you have entered it correctly <strong>and</strong> try again. If it is still<br />
not accepted, then contact your <strong>InduSoft</strong> sales representative for assistance.<br />
Page 22/60 <strong>InduSoft</strong> Ltd.
DRAFT — 8 September 2006 <strong>Getting</strong> <strong>Started</strong> <strong>with</strong> <strong>IWS</strong> <strong>and</strong> <strong>TwinCAT</strong><br />
If for whatever reason you cannot connect to the device via the Execution Environment tool in <strong>IWS</strong>,<br />
you can still apply a license directly on the device itself:<br />
1) On your Windows CE-based device, in the Remote Agent utility, tap Setup to open the Setup<br />
dialog:<br />
2) Tap License to open the License dialog:<br />
Figure 20. Setup Dialog in Remote Agent<br />
Figure 21: License Dialog in Remote Agent<br />
3) Tap Change License to open the Change License dialog:<br />
Figure 22: Change License Dialog in Remote Agent<br />
4) Copy the code given in Site Code field <strong>and</strong> send it to your <strong>InduSoft</strong> sales representative.<br />
Your representative will return a license key that corresponds to the site code.<br />
� Note<br />
– The site code shown above is given only as an example. Your device’s actual site<br />
code is generated when CEView is installed, <strong>and</strong> it is unique to your device.<br />
<strong>InduSoft</strong> Ltd. Page 23/60
<strong>Getting</strong> <strong>Started</strong> <strong>with</strong> <strong>IWS</strong> <strong>and</strong> <strong>TwinCAT</strong> DRAFT — 8 September 2006<br />
5) Enter the license key in the Site Key field <strong>and</strong> click Authorize.<br />
If the site key is accepted (validated), then the following message is displayed:<br />
Figure 23: Site Key Accepted<br />
If the site key is not accepted, verify that you have entered it correctly <strong>and</strong> try again. If it is<br />
still not accepted, then contact your <strong>InduSoft</strong> sales representative for assistance.<br />
When CEView is properly installed, licensed, <strong>and</strong> ready for runtime, you can proceed to<br />
“Establishing Communication Between <strong>TwinCAT</strong> Stations” on page 25.<br />
Page 24/60 <strong>InduSoft</strong> Ltd.
DRAFT — 8 September 2006 <strong>Getting</strong> <strong>Started</strong> <strong>with</strong> <strong>IWS</strong> <strong>and</strong> <strong>TwinCAT</strong><br />
Establishing Communication Between <strong>TwinCAT</strong> Stations<br />
To establish communication between <strong>TwinCAT</strong> stations, you must assign each station — that is,<br />
each workstation, industrial PC, embedded PC, Beckhoff PLC, or Windows CE-based device that is<br />
running either the <strong>TwinCAT</strong> software or the ADS library — a unique station ID.<br />
Furthermore, you must give each station a list of the other <strong>TwinCAT</strong> stations <strong>with</strong> which it is allowed<br />
to communicate. Why is this necessary? Well, because <strong>TwinCAT</strong> messages are not broadcast<br />
over the network for all stations to hear. Instead, messages are routed directly to their intended<br />
station(s) according to the specified list.<br />
Keep in mind that for two stations to communicate <strong>with</strong> each other, in both directions, you must<br />
make these changes on both stations.<br />
What is an AMS Net ID?<br />
Each <strong>TwinCAT</strong> station must be assigned a unique station ID, which is also called an AMS Net ID.<br />
AMS st<strong>and</strong>s for “Anlagenmanagement-System,” which is a German translation of “Plant Management<br />
System.” It simply refers to the messaging protocol used by <strong>TwinCAT</strong> <strong>and</strong> the ADS library,<br />
<strong>and</strong> it works on top of the physical network.<br />
By default, a station’s AMS Net ID is automatically generated when the software is installed, by<br />
combining the station’s existing IP address <strong>with</strong> a minimum “.1.1” suffix. For example, on a station<br />
<strong>with</strong> the IP address 10.168.23.163, the default AMS Net ID would be 10.168.23.163.1.1.<br />
However, you can change the AMS Net ID to whatever you need it to be, according to your Twin-<br />
CAT system layout. This is especially important in a mixed-network system (i.e., TCP/IP <strong>and</strong> Serial)<br />
where not all stations have IP addresses. The only requirements are that the ID must follow the<br />
six-byte, period delimited format <strong>and</strong> it must be unique to the station.<br />
For more information about the AMS messaging protocol, please consult Beckhoff’s documentation.<br />
<strong>InduSoft</strong> Ltd. Page 25/60
<strong>Getting</strong> <strong>Started</strong> <strong>with</strong> <strong>IWS</strong> <strong>and</strong> <strong>TwinCAT</strong> DRAFT — 8 September 2006<br />
Editing Connection Settings in the Full <strong>TwinCAT</strong> Software<br />
If you have the full <strong>TwinCAT</strong> development software installed on your workstation or industrial PC,<br />
then the connection settings are completed in two parts. First, you must use the System Properties<br />
dialog to assign an AMS Net ID to the station. Second, you must use the System Manager to<br />
search for other <strong>TwinCAT</strong> stations on the network <strong>and</strong> add them to your router list.<br />
Assigning an AMS Net ID<br />
To assign the AMS Net ID in the <strong>TwinCAT</strong> System Properties dialog:<br />
1) If the <strong>TwinCAT</strong> software is not running already, then start it now.<br />
� Note<br />
– By default, the <strong>TwinCAT</strong> software is configured to start automatically on boot.<br />
2) Find the <strong>TwinCAT</strong> icon in the Windows system tray:<br />
Figure 24. <strong>TwinCAT</strong> Icon in the System Tray<br />
3) Right-click on the <strong>TwinCAT</strong> icon <strong>and</strong> select Properties from the pop-up menu:<br />
Figure 25. Opening the <strong>TwinCAT</strong> System Properties<br />
Page 26/60 <strong>InduSoft</strong> Ltd.
DRAFT — 8 September 2006 <strong>Getting</strong> <strong>Started</strong> <strong>with</strong> <strong>IWS</strong> <strong>and</strong> <strong>TwinCAT</strong><br />
The <strong>TwinCAT</strong> System Properties dialog is displayed:<br />
4) Select the AMS Router tab:<br />
Figure 26. <strong>TwinCAT</strong> System Properties Dialog<br />
Figure 27. AMS Router Tab in the System Properties Dialog<br />
<strong>InduSoft</strong> Ltd. Page 27/60
<strong>Getting</strong> <strong>Started</strong> <strong>with</strong> <strong>IWS</strong> <strong>and</strong> <strong>TwinCAT</strong> DRAFT — 8 September 2006<br />
5) Check the default AMS Net ID <strong>and</strong> change it if necessary:<br />
Figure 28. AMS Router Tab in the System Properties Dialog<br />
6) Click OK to apply your changes <strong>and</strong> close the <strong>TwinCAT</strong> System Properties dialog.<br />
Adding Stations to the Router List<br />
To search for other <strong>TwinCAT</strong> stations <strong>and</strong> add them to your router list:<br />
1) Right-click on the <strong>TwinCAT</strong> icon in the system tray, <strong>and</strong> then select System Manager from the<br />
pop-up menu:<br />
Figure 29. Opening the <strong>TwinCAT</strong> System Manager<br />
Page 28/60 <strong>InduSoft</strong> Ltd.
DRAFT — 8 September 2006 <strong>Getting</strong> <strong>Started</strong> <strong>with</strong> <strong>IWS</strong> <strong>and</strong> <strong>TwinCAT</strong><br />
The <strong>TwinCAT</strong> System Manager window is displayed:<br />
Figure 30: <strong>TwinCAT</strong> System Manager<br />
2) Click Choose Target. The Choose Target System dialog is displayed:<br />
Figure 31: Choose Target System Dialog<br />
<strong>InduSoft</strong> Ltd. Page 29/60
<strong>Getting</strong> <strong>Started</strong> <strong>with</strong> <strong>IWS</strong> <strong>and</strong> <strong>TwinCAT</strong> DRAFT — 8 September 2006<br />
3) Click Search (Ethernet). The Add Route dialog is displayed:<br />
Figure 32: Add Route Dialog<br />
4) Click Broadcast Search. The System Manager will search the network for other <strong>TwinCAT</strong> stations<br />
<strong>and</strong> display them. Stations to which routes have already been established will be marked:<br />
Figure 33: Results of Broadcast Search for Other <strong>TwinCAT</strong> Stations<br />
5) Select a new station <strong>and</strong> click Add Route, or simply double-click on the station. You will be<br />
prompted for a Username <strong>and</strong> Password for the station:<br />
Figure 34: Logon Information for the Target Station<br />
6) Enter the Username <strong>and</strong> Password for the new station, <strong>and</strong> then click OK.<br />
� Note<br />
– If the target station is a Beckhoff CX Series device (CX1020 or CX1000) running Windows<br />
CE, then the default Username is administrator <strong>with</strong> no password.<br />
Page 30/60 <strong>InduSoft</strong> Ltd.
DRAFT — 8 September 2006 <strong>Getting</strong> <strong>Started</strong> <strong>with</strong> <strong>IWS</strong> <strong>and</strong> <strong>TwinCAT</strong><br />
If the logon is successful, then the station will be marked as connected in the route list:<br />
Figure 35: Target Station is Successfully Connected<br />
7) Repeat steps 5 <strong>and</strong> 6 for each station to which you want to establish a route.<br />
Keep in mind that this list only shows the other <strong>TwinCAT</strong> stations to which routes have been<br />
established, allowing communications <strong>and</strong> making those stations available to be targeted by<br />
the <strong>TwinCAT</strong> development software. Actually targeting a station for your control program is<br />
a separate procedure; please consult Beckhoff’s documentation for more information.<br />
8) Click Close to close the Add Route dialog <strong>and</strong> return to the Choose Target System dialog.<br />
Stations that can be targeted for your control program are now listed here.<br />
Figure 36: Choose Target System Dialog Showing Available Stations<br />
9) Click OK to close the Choose Target System dialog.<br />
10) From the main menu bar in the <strong>TwinCAT</strong> System Manager window, select File � Exit to exit<br />
the System Manager.<br />
Your connections are now set <strong>and</strong> ready for communications. Furthermore, because you used this<br />
method to establish your connections — that is, you searched the network <strong>and</strong> actually logged onto<br />
the stations — there is no need to manually test them. You can proceed to “Building a Sample <strong>IWS</strong><br />
Application” on page 36.<br />
<strong>InduSoft</strong> Ltd. Page 31/60
<strong>Getting</strong> <strong>Started</strong> <strong>with</strong> <strong>IWS</strong> <strong>and</strong> <strong>TwinCAT</strong> DRAFT — 8 September 2006<br />
Editing Connection Settings in the <strong>TwinCAT</strong> Runtime or the ADS Library<br />
If you have the <strong>TwinCAT</strong> runtime engine on a Beckhoff PLC, or the ADS library on any other type of<br />
station, then you can use the AMS Remote Connections Manager utility to assign the AMS Net ID<br />
<strong>and</strong> establish routes to other <strong>TwinCAT</strong> stations…<br />
1) On your station, find the AMS Remote Connections Manager utility (TcAmsRemoteMgr.exe).<br />
� Note<br />
– Even though this file is installed as part of the <strong>TwinCAT</strong> runtime engine or ADS library,<br />
it can be difficult to find since the installation of the library varies by platform.<br />
For more information, please see pages 7 <strong>and</strong> 19.<br />
– You can also use the Windows Search function to find the file more quickly, but remember<br />
to search for the actual filename (TcAmsRemoteMgr.exe).<br />
2) Double-click (or double-tap) on the utility to run it. The AMS Remote Connections dialog is<br />
displayed:<br />
Figure 37. AMS Remote Connections Manager<br />
3) Check the default AMS Net ID for the local station <strong>and</strong> change it if necessary.<br />
Page 32/60 <strong>InduSoft</strong> Ltd.
DRAFT — 8 September 2006 <strong>Getting</strong> <strong>Started</strong> <strong>with</strong> <strong>IWS</strong> <strong>and</strong> <strong>TwinCAT</strong><br />
4) Click Add to add a new connection (route) to another <strong>TwinCAT</strong> station:<br />
Figure 38. Adding a New Route in AMS Remote Connections<br />
The Add Remote Connection dialog is displayed:<br />
Figure 39. Add Remote Connection Dialog<br />
Before you proceed, make sure that you have the required information for the other station.<br />
5) In the Name field, enter a descriptive name for the remote computer. For example, “SupportPC”<br />
or “CX1020 #3.”<br />
6) In the AMS Net ID field, enter the unique station ID of the remote computer.<br />
7) In the Address field, enter the address of the remote computer on the physical network.<br />
The format of this address depends on the type of network. For example, if the type of network<br />
is Ethernet TCP/IP, then the address will be in st<strong>and</strong>ard four-byte, period delimited<br />
format (ex. 10.168.23.163).<br />
8) Click on the Transport pull-down menu <strong>and</strong> select the type of physical network.<br />
� Note<br />
– There are many different types of physical network to choose from, <strong>and</strong> the address<br />
format can vary greatly from type to type. If you are using a network other than<br />
Ethernet TCP/IP, then please consult Beckhoff’s documentation <strong>and</strong>/or the hardware<br />
manufacturer’s documentation for more information.<br />
<strong>InduSoft</strong> Ltd. Page 33/60
<strong>Getting</strong> <strong>Started</strong> <strong>with</strong> <strong>IWS</strong> <strong>and</strong> <strong>TwinCAT</strong> DRAFT — 8 September 2006<br />
9) Click OK to accept the properties <strong>and</strong> add the connection to the Remote Computers list.<br />
10) Repeat steps 4 through 9 for each connection (route) you want to add.<br />
New connections are not tested as they are added. You will be able to test these connections<br />
in the next section below.<br />
11) Click OK to close the AMS Remote Connections dialog.<br />
12) To apply these new settings, you must restart the <strong>TwinCAT</strong> runtime engine or ADS library.<br />
If you are working on a workstation or industrial PC running Windows NT/2000/XP, or an<br />
embedded PC running Windows XPe, then you must completely reboot the PC.<br />
If you are working on a Beckhoff CX1020 or CX1000, or any other Windows CE-based device,<br />
then you must save the registry <strong>and</strong> restart the device. On a Beckhoff device, simply<br />
tap the Start button to open the Start menu <strong>and</strong> then select Suspend. On any other device,<br />
please consult the manufacturer’s documentation.<br />
Testing the Connections<br />
Since you manually entered the information for your connections, you must now test those connections<br />
to make sure they are valid <strong>and</strong> able to h<strong>and</strong>le communications. To test a connection:<br />
1) On your station, find the ADS Test utility (TcAdsTest.exe).<br />
The location of this utility can vary, depending on how the <strong>TwinCAT</strong> runtime engine or ADS<br />
library was installed on the station. In most cases, it should be in the same directory as the<br />
AMS Remote Connections Manager utility (TcAmsRemoteMgr.exe) described previously.<br />
2) Double-click (or double-tap) on the utility to run it. The TcAdsTest panel is displayed.<br />
3) Click AdsPortOpen to open the port for communication:<br />
Figure 40: Opening the ADS Port for Communication<br />
Page 34/60 <strong>InduSoft</strong> Ltd.
DRAFT — 8 September 2006 <strong>Getting</strong> <strong>Started</strong> <strong>with</strong> <strong>IWS</strong> <strong>and</strong> <strong>TwinCAT</strong><br />
4) Click Test to open the Test dialog:<br />
Figure 41: Setting Up the Test<br />
5) In the AmsNetId field, select the connection to be tested from the pull-down menu.<br />
� Note<br />
– This menu should list the same stations/connections that you specified earlier using<br />
the AMS Remote Connections Manager utility.<br />
Also, if you want to test a specific <strong>TwinCAT</strong> port on the other station, then enter it in the<br />
Port field. (Ports are used by various subroutines in a <strong>TwinCAT</strong> control program.)<br />
6) Click Start to start the test. The results, including errors, are displayed in the Output field:<br />
If the results are successful, then your AMS routing information is correct <strong>and</strong> the connection<br />
is ready for use. If the results show any errors, then check your physical cabling <strong>and</strong><br />
routing information <strong>and</strong> try again.<br />
7) Click Stop to stop the current test.<br />
8) Repeat steps 5 through 7 for each connection that you want to test.<br />
9) Close the Test dialog <strong>and</strong> exit the ADS Test utility.<br />
Your connections are now set <strong>and</strong> ready for communications. You can proceed to “Building a Sample<br />
<strong>IWS</strong> Application” on the next page.<br />
<strong>InduSoft</strong> Ltd. Page 35/60
<strong>Getting</strong> <strong>Started</strong> <strong>with</strong> <strong>IWS</strong> <strong>and</strong> <strong>TwinCAT</strong> DRAFT — 8 September 2006<br />
Building a Sample <strong>IWS</strong> Application<br />
After you have installed the software, configured the communication settings, <strong>and</strong> tested the connections,<br />
you are ready to build a sample <strong>IWS</strong> application that uses all of these components.<br />
For the purposes of this section, you must have the following minimum network configuration:<br />
Figure 42: Network Configuration for Sample Application<br />
Using the instructions below, you will create a <strong>IWS</strong>/CEView application screen that displays a Twin-<br />
CAT program variable (a.k.a. PLC register) on the Beckhoff CX1000. Of course your network configuration<br />
may be different than the one shown above, but the same basic instructions apply to all<br />
possible configurations; only certain options would vary.<br />
� Note<br />
Windows NT/2000/XP<br />
<strong>InduSoft</strong><br />
Web Studio<br />
TWCAT<br />
driver<br />
<strong>TwinCAT</strong><br />
development<br />
ADS<br />
Library<br />
– These instructions do not cover how to initially configure the CX1000, nor how to use the<br />
<strong>TwinCAT</strong> development software to program the device. It is assumed that you have already<br />
created the <strong>TwinCAT</strong> program <strong>and</strong> downloaded it to the CX1000. For more information,<br />
please see Beckhoff’s documentation for <strong>TwinCAT</strong>.<br />
– Also, please keep in mind this is only a basic walkthrough for creating a sample <strong>IWS</strong> application.<br />
For complete instructions on using <strong>IWS</strong>, please see the <strong>IWS</strong> User Guide.<br />
The rest of this section describes how to:<br />
� Run <strong>InduSoft</strong> Web Studio <strong>and</strong> create a new <strong>IWS</strong>/CEView application project;<br />
� Select the TWCAT communication driver;<br />
� Build a driver worksheet that links an <strong>IWS</strong> database tag to the <strong>TwinCAT</strong> program variable;<br />
� Lay out a simple <strong>IWS</strong>/CEView application screen that displays the variable;<br />
� Compile the application <strong>and</strong> download it to the CX1000; <strong>and</strong><br />
� Start the CEView application.<br />
Creating a New <strong>IWS</strong> Application<br />
TCP/IP<br />
Beckhoff CX1000, Windows CE<br />
<strong>TwinCAT</strong><br />
runtime<br />
preinstalled<br />
ADS<br />
Library<br />
<strong>InduSoft</strong><br />
CEView<br />
TWCAT<br />
driver<br />
On the PC where <strong>InduSoft</strong> Web Studio is installed, create a new <strong>IWS</strong>/CEView application project:<br />
1) Run <strong>IWS</strong> by selecting it from the Start menu or double-clicking on the desktop icon.<br />
Page 36/60 <strong>InduSoft</strong> Ltd.
DRAFT — 8 September 2006 <strong>Getting</strong> <strong>Started</strong> <strong>with</strong> <strong>IWS</strong> <strong>and</strong> <strong>TwinCAT</strong><br />
2) From the main menu bar, select File � New. The New dialog is displayed:<br />
3) Click on the Project tab:<br />
Figure 43: New Dialog<br />
Figure 44: Project Tab of the New Dialog<br />
4) In the Application name field, enter TWCATSample.<br />
<strong>InduSoft</strong> Ltd. Page 37/60
<strong>Getting</strong> <strong>Started</strong> <strong>with</strong> <strong>IWS</strong> <strong>and</strong> <strong>TwinCAT</strong> DRAFT — 8 September 2006<br />
5) Under Target platform, select CEView St<strong>and</strong>ard:<br />
Figure 45: Selecting the Target Platform<br />
6) Click OK to proceed to the Project Wizard dialog:<br />
7) The default settings are fine for this sample application, so click OK to close the dialog.<br />
The new application project is created in <strong>IWS</strong> <strong>and</strong> it is ready for configuration.<br />
Page 38/60 <strong>InduSoft</strong> Ltd.
DRAFT — 8 September 2006 <strong>Getting</strong> <strong>Started</strong> <strong>with</strong> <strong>IWS</strong> <strong>and</strong> <strong>TwinCAT</strong><br />
Selecting the TWCAT Communication Driver<br />
By default, all available communication drivers are installed <strong>with</strong> the <strong>IWS</strong> development software,<br />
but they are not automatically enabled when you create a new <strong>IWS</strong>/CEView application project.<br />
You must manually select the specific driver(s) that you need for your application. In this case, you<br />
must select the TWCAT driver to enable communication between your <strong>IWS</strong>/CEView application <strong>and</strong><br />
your <strong>TwinCAT</strong> control system.<br />
To select the TWCAT communication driver:<br />
� Note<br />
1) In the <strong>IWS</strong> Workspace, select the Comm tab.<br />
2) Right-click on the Drivers folder <strong>and</strong> select Add/Remove drivers from the pop-up menu:<br />
Figure 46: Right-clicking on the Drivers Folder<br />
The Communication Drivers dialog is displayed.<br />
3) In the Communication Drivers dialog, under Available drivers, select the TWCAT driver:<br />
Figure 47: Selecting the TWCAT Driver<br />
– If you have not already downloaded <strong>and</strong> installed the latest version of the TWCAT driver (see<br />
pages 4 <strong>and</strong> 7), then take a moment to note the driver version displayed in the description —<br />
in the figure above, the driver version is 1.06 — <strong>and</strong> then compare it to the latest version<br />
posted at www.indusoft.com.br/download/drivers/. If a newer version is available, then you<br />
should pause here to download <strong>and</strong> install it. (You must restart <strong>IWS</strong> to make the new driver<br />
available, so save your application project <strong>and</strong> exit <strong>IWS</strong> before you install the new driver.)<br />
<strong>InduSoft</strong> Ltd. Page 39/60
<strong>Getting</strong> <strong>Started</strong> <strong>with</strong> <strong>IWS</strong> <strong>and</strong> <strong>TwinCAT</strong> DRAFT — 8 September 2006<br />
4) With the TWCAT driver selected, click Select to add it to the Selected drivers list for the application<br />
project:<br />
Figure 48: TWCAT Driver Added to Selected Drivers List<br />
5) Click OK to close the dialog. The TWCAT driver is inserted into the Drivers folder:<br />
Figure 49: TWCAT Driver in the Drivers Folder<br />
The TWCAT driver is now ready for configuration. In most cases, you should not need to change<br />
the driver’s communication settings because <strong>TwinCAT</strong> communications are managed by the Twin-<br />
CAT software (or ADS library), according to how you configured it earlier. For more information,<br />
see “Establishing Communication Between <strong>TwinCAT</strong> Stations” starting on page 25.<br />
As such, you can proceed directly to building the driver worksheet.<br />
Page 40/60 <strong>InduSoft</strong> Ltd.
DRAFT — 8 September 2006 <strong>Getting</strong> <strong>Started</strong> <strong>with</strong> <strong>IWS</strong> <strong>and</strong> <strong>TwinCAT</strong><br />
Building the Driver Worksheet<br />
Generally speaking, driver worksheets are used to associate database tags in <strong>IWS</strong> <strong>with</strong> device registers<br />
in your PLC or I/O. When the worksheets are processed during runtime, each tag/register<br />
association is scanned <strong>and</strong> the values are updated, as needed. You can build multiple worksheets in<br />
order to control which tag/register associations are scanned under what circumstances.<br />
For a complete discussion about building driver worksheets, please consult the <strong>IWS</strong> User Guide. For<br />
driver-specific syntax <strong>and</strong> parameters, please consult the TWCAT driver document (TWCAT.pdf)<br />
that was installed <strong>with</strong> the driver files in the \DRV directory (see page 7).<br />
To build a basic driver worksheet for the TWCAT driver:<br />
1) In the Workspace, exp<strong>and</strong> the TWCAT driver folder <strong>and</strong> select MAIN DRIVER WORKSHEET. Rightclick<br />
on the worksheet <strong>and</strong> select Open from the pop-up menu.<br />
The worksheet is opened for editing:<br />
Figure 50: Opening the Main Driver Worksheet<br />
Figure 51: TWCAT Main Driver Worksheet<br />
The Disable, Read Completed, Read Status, Write Completed, <strong>and</strong> Write Status fields are used for checking<br />
read/write status <strong>and</strong> logging runtime errors. They’re not necessary for this sample application,<br />
so you can proceed directly to making your first tag/register association.<br />
<strong>InduSoft</strong> Ltd. Page 41/60
<strong>Getting</strong> <strong>Started</strong> <strong>with</strong> <strong>IWS</strong> <strong>and</strong> <strong>TwinCAT</strong> DRAFT — 8 September 2006<br />
2) Tab down to the Tag Name field in the first row of the worksheet table, <strong>and</strong> then enter the<br />
name of your <strong>IWS</strong> database tag:<br />
Figure 52: Entering the Tag Name<br />
3) If the tag is not already defined in your <strong>IWS</strong> database, then you will be prompted to create<br />
the tag now:<br />
Click Yes. A New Tag dialog is displayed:<br />
Figure 53: Creating a New Database Tag<br />
Figure 54: New Tag Dialog<br />
Size is the number of elements, if the tag is an array (0 is not an array); Type is the type of<br />
data (e.g., Integer, Boolean, Real, String); <strong>and</strong> Description is short description of the tag.<br />
For this sample application, you can accept the default values for the tag, so click OK.<br />
Page 42/60 <strong>InduSoft</strong> Ltd.
DRAFT — 8 September 2006 <strong>Getting</strong> <strong>Started</strong> <strong>with</strong> <strong>IWS</strong> <strong>and</strong> <strong>TwinCAT</strong><br />
4) Tab into the Station field <strong>and</strong> enter the station ID for the target PLC, I/O or control program:<br />
Figure 55: Entering the Station<br />
For the TWCAT driver, the syntax of the Station field is:<br />
Where:<br />
:<br />
� is the AMS Net ID of the target station (see page 25);<br />
� is the runtime number (1, 2, 3 or 4) of the <strong>TwinCAT</strong> control program; <strong>and</strong><br />
� is the ADS port used for the <strong>TwinCAT</strong> PLC, <strong>TwinCAT</strong> NC or <strong>TwinCAT</strong> I/O<br />
communications. The following ports are implemented <strong>and</strong> tested in the current version<br />
of the TWCAT driver:<br />
o 301 — <strong>TwinCAT</strong> I/O<br />
o 800 — BC9000<br />
o 801, 811, 821, 831 — <strong>TwinCAT</strong> PLC on Windows NT/2000/XP or Windows CE<br />
For more information about AMS Net IDs <strong>and</strong> <strong>TwinCAT</strong> port numbers, please consult Beckhoff’s<br />
documentation.<br />
� Note<br />
– You can also leave the Station field blank. If you do, then the driver will automatically<br />
communicate <strong>with</strong> the first <strong>TwinCAT</strong> PLC runtime on the same workstation or device.<br />
This is equivalent to entering a value of 127.0.0.1.1.1:801.<br />
– This feature is typically used when the same <strong>IWS</strong> application will be deployed to multiple<br />
devices; you do not need to customize the addressing for each device. However,<br />
you must have both <strong>IWS</strong> (or CEView) <strong>and</strong> <strong>TwinCAT</strong> installed <strong>and</strong> running.<br />
5) Tab into the I/O Address field <strong>and</strong> enter the program variable or register address on the target<br />
station:<br />
Figure 56: Entering the I/O Address<br />
<strong>InduSoft</strong> Ltd. Page 43/60
<strong>Getting</strong> <strong>Started</strong> <strong>with</strong> <strong>IWS</strong> <strong>and</strong> <strong>TwinCAT</strong> DRAFT — 8 September 2006<br />
In this example, .MyTcVar_Int16 is a Global Variable defined <strong>with</strong>in a <strong>TwinCAT</strong> control program<br />
running on the target station. For more information about <strong>TwinCAT</strong> program variables<br />
<strong>and</strong> device registers, please consult Beckhoff’s documentation.<br />
� Note<br />
– If you want to actually download <strong>and</strong> run your sample application (see page 50),<br />
then this must be a real program variable on a real <strong>TwinCAT</strong> station. Otherwise, you<br />
will receive communication errors during runtime.<br />
With the Tag Name, Station <strong>and</strong> I/O Address fields completed, you’ve established an association<br />
between the tag in your <strong>IWS</strong> database <strong>and</strong> the variable in your <strong>TwinCAT</strong> control program.<br />
Now you must specify what action is taken <strong>and</strong> when.<br />
6) In the Action field, click on the pull-down menu <strong>and</strong> select the type of action to be taken on<br />
this tag:<br />
Where:<br />
Figure 57: Selecting the Action<br />
� Read is only read values from the target station into the <strong>IWS</strong> database;<br />
� Write is only write values from the <strong>IWS</strong> database to the target station; <strong>and</strong><br />
� Read+Write is both read from <strong>and</strong> write to the target station.<br />
7) In the Scan field, click on the pull-down menu <strong>and</strong> select when the values are scanned:<br />
Where:<br />
Figure 58: Selecting the Action<br />
� Screen is only when the value of the tag is changed by user input (e.g., a button press<br />
or text entry) from your HMI screen; <strong>and</strong><br />
� Always is on every execution cycle.<br />
Page 44/60 <strong>InduSoft</strong> Ltd.
DRAFT — 8 September 2006 <strong>Getting</strong> <strong>Started</strong> <strong>with</strong> <strong>IWS</strong> <strong>and</strong> <strong>TwinCAT</strong><br />
8) From the main menu bar, select File � Close. You will be prompted to save the driver worksheet:<br />
Figure 59: Saving the Driver Worksheet<br />
9) Click Yes to save <strong>and</strong> close the driver worksheet.<br />
MyTag is now ready to be used in an HMI screen.<br />
� Note<br />
– Although it is good to know how to manually build a driver worksheet, you can also use the<br />
Import Wizard to automatically build a driver worksheet from your existing <strong>TwinCAT</strong> program<br />
variables <strong>and</strong> communication settings. For more information, see “Advanced: Importing<br />
Your <strong>TwinCAT</strong> Variables into <strong>IWS</strong>” on page 54.<br />
<strong>InduSoft</strong> Ltd. Page 45/60
<strong>Getting</strong> <strong>Started</strong> <strong>with</strong> <strong>IWS</strong> <strong>and</strong> <strong>TwinCAT</strong> DRAFT — 8 September 2006<br />
Designing the HMI Screen<br />
You can now design an HMI screen that uses MyTag, as you defined it in the driver worksheet. For<br />
this sample application, you’ll only add a simple text I/O field to the screen, but the basic procedure<br />
is the same for any screen layout.<br />
1) In the Workspace, select the Graphics tab. Right-click on the Screens folder <strong>and</strong> select Insert<br />
from the pop-up menu:<br />
The Screen Attributes dialog is displayed:<br />
Figure 60: Inserting a New Screen<br />
Figure 61: Screen Attributes Dialog for New Screen<br />
2) Enter a description for the screen, such as TWCAT Driver Test Screen. Leave the screen<br />
Size <strong>and</strong> Location settings at their default values, <strong>and</strong> then click OK.<br />
Page 46/60 <strong>InduSoft</strong> Ltd.
DRAFT — 8 September 2006 <strong>Getting</strong> <strong>Started</strong> <strong>with</strong> <strong>IWS</strong> <strong>and</strong> <strong>TwinCAT</strong><br />
The new screen (display) is opened for editing:<br />
Figure 62: Editing a New Screen<br />
3) From the Static Objects toolbar, select the Text tool:<br />
Figure 63: Selecting the Text Tool<br />
4) Using the Text tool, click in the screen <strong>and</strong> type “This is the Value of .MyTcVar_Int16: ” followed<br />
by six hash marks (#).<br />
The hash marks will be used to define a dynamic text I/O field. Six hash marks means that<br />
the field will be six characters long.<br />
<strong>InduSoft</strong> Ltd. Page 47/60
<strong>Getting</strong> <strong>Started</strong> <strong>with</strong> <strong>IWS</strong> <strong>and</strong> <strong>TwinCAT</strong> DRAFT — 8 September 2006<br />
5) Click again on the text to highlight it.<br />
Figure 64: Highlighting the Text Object<br />
6) From the Dynamic Properties toolbar, select the Text I/O tool:<br />
Figure 65: Selecting the Text I/O Tool<br />
By selecting the Text I/O tool while the text object is highlighted, you are adding the Text<br />
I/O dynamic property to the object.<br />
7) Right-click the text object <strong>and</strong> then choose Properties from the pop-up menu.<br />
The Object Properties dialog is displayed.<br />
Figure 66: Opening the Object Properties<br />
8) Click the (…) button to the right of the Tag/Expression field.<br />
Figure 67: Object Properties for Text Object <strong>with</strong> Text I/O<br />
Page 48/60 <strong>InduSoft</strong> Ltd.
DRAFT — 8 September 2006 <strong>Getting</strong> <strong>Started</strong> <strong>with</strong> <strong>IWS</strong> <strong>and</strong> <strong>TwinCAT</strong><br />
The Object Finder dialog (a.k.a. the tag browser) is displayed:<br />
Figure 68: Opening a Tag Browser<br />
9) Select MyTag from the tag list <strong>and</strong> then click OK. The tag is added to the Object Properties<br />
dialog:<br />
Figure 69: MyTag Added to Text I/O<br />
10) Click (enable) the Input Enabled checkbox to allow the user to input a value during runtime.<br />
Figure 70: Enabling Input for Text I/O<br />
The value is applied to MyTag in the <strong>IWS</strong> database, <strong>and</strong> from there it is written to the Twin-<br />
CAT program variable on the target station. Also, make sure the Minimum <strong>and</strong> Maximum Values<br />
are valid for the selected tag; e.g. a signed integer, in this instance, dictates a range of<br />
-32768 to 32767.<br />
<strong>InduSoft</strong> Ltd. Page 49/60
<strong>Getting</strong> <strong>Started</strong> <strong>with</strong> <strong>IWS</strong> <strong>and</strong> <strong>TwinCAT</strong> DRAFT — 8 September 2006<br />
10) From the main menu bar, select File � Save. You will be prompted to give the screen a filename;<br />
you can change the name or accept the default (e.g., Display1.scr). Either way,<br />
click OK to save the screen in your project directory.<br />
With your tag defined <strong>and</strong> your screen laid out, you can specify the screen for startup.<br />
Specifying the Startup Screen<br />
A single <strong>IWS</strong> application can have many different screens, so it is important to specify which screen<br />
should be displayed upon startup. We have only one screen in this sample application, but the procedure<br />
is the same.<br />
To specify a startup screen:<br />
1) From the main menu bar, select Project � Settings. The Project Settings dialog is displayed.<br />
2) Select the Runtime Desktop tab:<br />
3) In the Startup screen field, enter the filename of your application screen.<br />
� Note<br />
– If you saved the screen <strong>with</strong> the default fiilename, then it should be something like<br />
Display1.scr. You can also check the list of screens in the Graphics tab of the<br />
Workspace.<br />
4) Click OK to close the Project Settings dialog.<br />
You can now compile <strong>and</strong> test your application.<br />
Page 50/60 <strong>InduSoft</strong> Ltd.
DRAFT — 8 September 2006 <strong>Getting</strong> <strong>Started</strong> <strong>with</strong> <strong>IWS</strong> <strong>and</strong> <strong>TwinCAT</strong><br />
Testing the Application Locally<br />
� Note<br />
– This sample application is for education <strong>and</strong> demonstration ONLY. Do not deploy any <strong>IWS</strong><br />
application in a live production environment <strong>with</strong>out thoroughly testing it first.<br />
It is easy to test a sample application locally: <strong>IWS</strong> has a built-in CEView emulator that executes the<br />
HMI screen as if it was downloaded to an actual Windows CE-based device, <strong>and</strong> the Database Spy<br />
can show how the tag values change as the screen is used.<br />
To test your application locally:<br />
1) In the Database Spy, select MyTag for watching.<br />
Figure 71: Watching MyTag in the Database Spy<br />
2) From the main menu bar, select Project � Run Application. The application will run locally in the<br />
CEView emulator.<br />
Figure 72: Sample Application Running in CEView Emulator<br />
<strong>InduSoft</strong> Ltd. Page 51/60
<strong>Getting</strong> <strong>Started</strong> <strong>with</strong> <strong>IWS</strong> <strong>and</strong> <strong>TwinCAT</strong> DRAFT — 8 September 2006<br />
3) Enter a new value into the text I/O field <strong>and</strong> watch the tag change in the Database Spy.<br />
Figure 73: Entering a New Value for MyTag<br />
4) When you are done, select Project � Stop Application from the main menu bar.<br />
� Note<br />
– If the Quality of the tag is GOOD, then the new value is successfully being written to the<br />
<strong>TwinCAT</strong> program variable on the target station. If the Quality of the tag is BAD, then <strong>IWS</strong><br />
is receiving a communication error from the TWCAT driver. Check your <strong>TwinCAT</strong> communication<br />
settings <strong>and</strong> your TWCAT driver worksheet.<br />
Page 52/60 <strong>InduSoft</strong> Ltd.
DRAFT — 8 September 2006 <strong>Getting</strong> <strong>Started</strong> <strong>with</strong> <strong>IWS</strong> <strong>and</strong> <strong>TwinCAT</strong><br />
Downloading the Application to a Windows CE-based Device<br />
� Note<br />
– This sample application is for education <strong>and</strong> demonstration ONLY. Do not deploy any <strong>IWS</strong><br />
application in a live production environment <strong>with</strong>out thoroughly testing it first.<br />
If you’ve already established a connection <strong>with</strong> a Beckhoff PLC or other Windows CE-based device,<br />
using the Execution Environment tool in <strong>IWS</strong> (see pages 14 <strong>and</strong> 21), then you can also download<br />
your sample application to that device <strong>and</strong> run it.<br />
1) Make sure that the Remote Agent utility (CEServer.exe) is running on the target device.<br />
2) From the main menu bar, select Project � Execution Environment. The Execution Environment<br />
dialog will appear. Check your Target Station settings <strong>and</strong> then click Connect.<br />
If you cannot establish a connection <strong>with</strong> the target device, then check your physical cabling<br />
<strong>and</strong> <strong>TwinCAT</strong> communication settings.<br />
3) Once a connection is made, select the Application tab of the Execution Environment dialog:<br />
Figure 74: Application Tab of Execution Environment Dialog<br />
4) Click Send To Target to download your application to the target device.<br />
5) When the download is complete, click Run to run the application on the target device. The<br />
Status field will display the status of your application on the device.<br />
You can also start <strong>and</strong> stop the application by using the Remote Agent control panel on the device:<br />
Figure 75. Remote Agent Running in Windows CE<br />
<strong>InduSoft</strong> Ltd. Page 53/60
<strong>Getting</strong> <strong>Started</strong> <strong>with</strong> <strong>IWS</strong> <strong>and</strong> <strong>TwinCAT</strong> DRAFT — 8 September 2006<br />
Advanced: Importing Your <strong>TwinCAT</strong> Variables into <strong>IWS</strong><br />
Although it is good to know how to manually build a driver worksheet (see page 41), you can also<br />
use the database import wizard in <strong>IWS</strong> to automatically build a driver worksheet from your existing<br />
<strong>TwinCAT</strong> program variables <strong>and</strong> communication settings.<br />
This is considered an advanced technique for a couple reasons. First, you must configure <strong>TwinCAT</strong><br />
to export a file that defines all of the variables <strong>and</strong> settings that you want to import into <strong>IWS</strong>. Configuring<br />
this export can be tricky, as will be described below. Second, you must carefully review the<br />
variables after you’ve imported them into <strong>IWS</strong>, to make sure they are correct. You are more prone<br />
to overlook errors in a worksheet built automatically from an import than a worksheet you’ve built<br />
by h<strong>and</strong>.<br />
Nevertheless, importing your <strong>TwinCAT</strong> variables into <strong>IWS</strong> can save a great deal of time.<br />
� Note<br />
– This section assumes that you are already familiar <strong>with</strong> using <strong>TwinCAT</strong> to develop <strong>and</strong> deploy<br />
control programs, <strong>and</strong> that you have a program ready to import into <strong>IWS</strong>. For complete<br />
instructions on using <strong>TwinCAT</strong>, please consult Beckhoff’s documentation.<br />
Exporting a Symbol File from <strong>TwinCAT</strong><br />
Before you can import program variables into <strong>IWS</strong>, you must export them from <strong>TwinCAT</strong> — or<br />
more specifically, you must export a symbol file (*.sym) that defines those variables.<br />
To export a symbol file from <strong>TwinCAT</strong>:<br />
1) Start the <strong>TwinCAT</strong> PLC Control programming software <strong>and</strong> open your project.<br />
2) From the main menu bar, select Project � Options. The Options control panel is displayed.<br />
3) From the Category menu, select Symbol configuration:<br />
Figure 76: Symbol Configuration Control Panel<br />
4) Enable (check) the Dump symbol entries option.<br />
5) Click the Configure symbol file button. The Set object attributes dialog is displayed.<br />
Page 54/60 <strong>InduSoft</strong> Ltd.
DRAFT — 8 September 2006 <strong>Getting</strong> <strong>Started</strong> <strong>with</strong> <strong>IWS</strong> <strong>and</strong> <strong>TwinCAT</strong><br />
<strong>IWS</strong> can only import program objects (POUs) <strong>and</strong> global variables. It cannot import libraries or<br />
other system settings, so you must make sure those items are not included in the exported file.<br />
6) In the program directory tree, select only the POUs <strong>and</strong> Global Variables that you want to<br />
export to <strong>IWS</strong>. (Ctrl-click to select/deselect individual items.)<br />
Figure 77: Selecting Program Objects <strong>and</strong> Global Variables for Export<br />
7) Disable (uncheck) all export options other than Export variables of object. This will ensure that<br />
only basic variable definitions are exported, rather than any metadata or other structures.<br />
Figure 78: Disabling All Export Options<br />
8) Click OK to accept the configuration <strong>and</strong> return to the Options control panel.<br />
9) Click OK to close the Options control panel.<br />
10) From the main menu bar, select Project � Rebuild All. As <strong>TwinCAT</strong> rebuilds the project, it generates<br />
the symbol file <strong>and</strong> saves it in the project directory.<br />
The symbol file is now ready for import into <strong>IWS</strong>. It will have the same name as the project file<br />
from which it was generated, so for a <strong>TwinCAT</strong> project named Maschine.pro, the symbol file is<br />
named Maschine.sym.<br />
Keep in mind that the symbol file will be regenerated every time you rebuild your <strong>TwinCAT</strong> project,<br />
so if in the future you make changes to your project, you must consider whether you also need to<br />
reimport the symbol file into <strong>IWS</strong>.<br />
<strong>InduSoft</strong> Ltd. Page 55/60
<strong>Getting</strong> <strong>Started</strong> <strong>with</strong> <strong>IWS</strong> <strong>and</strong> <strong>TwinCAT</strong> DRAFT — 8 September 2006<br />
Importing the Symbol File into <strong>IWS</strong><br />
Once you have exported your symbol file from the <strong>TwinCAT</strong> programming software, you can use<br />
the database import wizard to import it into <strong>IWS</strong>:<br />
1) Start the <strong>InduSoft</strong> Web Studio development software <strong>and</strong> open your application project.<br />
2) From the main menu bar, select File � Import Wizard. The Import Wizard dialog is displayed.<br />
3) From the Source Type menu, select <strong>TwinCAT</strong> PLC Database:<br />
Figure 79: Selecting <strong>TwinCAT</strong> PLC Database<br />
4) Click Next to proceed to the next step of the wizard.<br />
Page 56/60 <strong>InduSoft</strong> Ltd.
DRAFT — 8 September 2006 <strong>Getting</strong> <strong>Started</strong> <strong>with</strong> <strong>IWS</strong> <strong>and</strong> <strong>TwinCAT</strong><br />
5) Enter the AMS Net ID <strong>and</strong> port number of the <strong>TwinCAT</strong> runtime, station or device <strong>with</strong> which<br />
your <strong>IWS</strong> application will communicate. (For more information, see “Establishing Communication<br />
Between <strong>TwinCAT</strong> Stations” on page 25.)<br />
Figure 80: Specifying the AMS Net ID <strong>and</strong> Port Number<br />
The import wizard will use this information to build the driver worksheet.<br />
� Note<br />
– If you plan to have <strong>IWS</strong> <strong>and</strong> <strong>TwinCAT</strong> running together on the same workstation or<br />
device, then you can specify an AMS Net ID of 127.0.0.1.1.1 <strong>and</strong> a port number of<br />
801. This will instruct <strong>IWS</strong> to communicate <strong>with</strong> the first <strong>TwinCAT</strong> runtime that is<br />
running locally.<br />
– This feature is typically used when the same <strong>IWS</strong> application will be deployed to multiple<br />
devices; you do not need to customize the addressing for each device. However,<br />
you must have both <strong>IWS</strong> (or CEView) <strong>and</strong> <strong>TwinCAT</strong> installed <strong>and</strong> running on<br />
every device.<br />
<strong>InduSoft</strong> Ltd. Page 57/60
<strong>Getting</strong> <strong>Started</strong> <strong>with</strong> <strong>IWS</strong> <strong>and</strong> <strong>TwinCAT</strong> DRAFT — 8 September 2006<br />
6) Click the Browse button to open a st<strong>and</strong>ard Windows file browser, <strong>and</strong> then find the <strong>TwinCAT</strong><br />
symbol file that you want to import into <strong>IWS</strong>. The file should be saved in your <strong>TwinCAT</strong> project<br />
directory.<br />
Figure 81: Browsing for the Symbol File<br />
7) Click Open to select the file <strong>and</strong> return to the import wizard.<br />
Figure 82: Symbol File Selected<br />
8) Click Next to proceed to the next step of the wizard.<br />
Page 58/60 <strong>InduSoft</strong> Ltd.
DRAFT — 8 September 2006 <strong>Getting</strong> <strong>Started</strong> <strong>with</strong> <strong>IWS</strong> <strong>and</strong> <strong>TwinCAT</strong><br />
9) Review the variables (i.e., tags) exported from <strong>TwinCAT</strong>, <strong>and</strong> deselect (uncheck) any variables<br />
that you do not want to import into <strong>IWS</strong>.<br />
10) Click Finish to proceed <strong>with</strong> the import.<br />
Figure 83: Reviewing the Variables To Be Imported<br />
Figure 84: Finshing the Import Process<br />
As the import process finishes up, it does several things for you automatically:<br />
� Selects <strong>and</strong> configures the TWCAT communication driver;<br />
� Creates new <strong>IWS</strong> database tags that correspond to the imported <strong>TwinCAT</strong> variables; <strong>and</strong><br />
� Configures the Main Driver Sheet to associate the new database tags <strong>with</strong> the <strong>TwinCAT</strong><br />
variables at the specified AMS Net ID.<br />
<strong>InduSoft</strong> Ltd. Page 59/60
<strong>Getting</strong> <strong>Started</strong> <strong>with</strong> <strong>IWS</strong> <strong>and</strong> <strong>TwinCAT</strong> DRAFT — 8 September 2006<br />
When it is done, it should look something like the figure below.<br />
Figure 85: Final Results of the Database Import Wizard<br />
Make sure you thoroughly review both the TWCAT communication settings <strong>and</strong> the driver worksheet.<br />
If everything is satisfactory, then you can proceed to develop the rest of your <strong>IWS</strong> application<br />
as you normally would.<br />
For more information about using the database import wizard, please refer to “Importing a Database”<br />
in Chapter 3 of the <strong>IWS</strong> User Guide.<br />
Page 60/60 <strong>InduSoft</strong> Ltd.