

SSL Mixer Manual - Absolute Professional Audio
SSL Mixer Manual - Absolute Professional Audio
SSL Mixer Manual - Absolute Professional Audio

Create successful ePaper yourself
Turn your PDF publications into a flip-book with our unique Google optimized e-Paper software.
Next, select the Create tool again, click in the blank area of the<br />
mixer strip under the track insert. The mixer elements menu that<br />
you used to create the track insert will appear again.<br />
This time, select "multi EQ 4-Band (Stereo)", then release the<br />
mouse button.<br />
The Multi EQ module is now inserted.<br />
The strip is simple but it is now complete.<br />
In <strong>Mixer</strong> Edit mode, take some time to experiment with the other<br />
tools. It's possible to move or copy any mixer element within a mixer strip using the<br />
Move or Copy tool.<br />
It's also possible to move or copy an entire mixer strip to another mixer column. If the<br />
destination column is already occupied by a mixer strip, that mixer strip and any<br />
other mixer strips will automatically be shifted to the right to make room as<br />
necessary.<br />
Clicking on the input or output element with the I/O Assign tool will allow you to<br />
select a different input source or output destination. With the Delete tool, you can<br />
delete any mixer element or strip by clicking on it.<br />
Placing mixer elements into the mixer strip<br />
Clicking with the Create tool in an existing mixer strip opens a menu displaying all mixer elements that are available to insert.<br />
The selected element is inserted as soon as the mouse<br />
button is released.<br />
If you have followed the step by step mixer strip creation<br />
procedure described earlier above, you are already familiar<br />
with this menu. There is no limit to the number of elements<br />
that can be inserted in a mixer strip (within the available<br />
DSP power).<br />
If you insert too many elements and the height of the strip<br />
cannot be fully displayed in the <strong>SSL</strong> <strong>Mixer</strong> window, a vertical<br />
scroll bar will appear.<br />
It is also possible to resize the window. Even if there seems<br />
to be no space left in the mixer strip, existing mixer<br />
elements will automatically be moved to make space for a<br />
new one at the point where you click.<br />
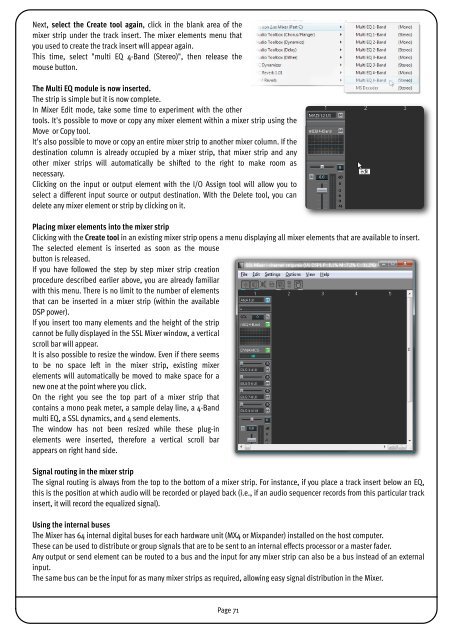
On the right you see the top part of a mixer strip that<br />
contains a mono peak meter, a sample delay line, a 4-Band<br />
multi EQ, a <strong>SSL</strong> dynamics, and 4 send elements.<br />
The window has not been resized while these plug-in<br />
elements were inserted, therefore a vertical scroll bar<br />
appears on right hand side.<br />
Signal routing in the mixer strip<br />
The signal routing is always from the top to the bottom of a mixer strip. For instance, if you place a track insert below an EQ,<br />
this is the position at which audio will be recorded or played back (i.e., if an audio sequencer records from this particular track<br />
insert, it will record the equalized signal).<br />
Using the internal buses<br />
The <strong>Mixer</strong> has 64 internal digital buses for each hardware unit (MX4 or Mixpander) installed on the host computer.<br />
These can be used to distribute or group signals that are to be sent to an internal effects processor or a master fader.<br />
Any output or send element can be routed to a bus and the input for any mixer strip can also be a bus instead of an external<br />
input.<br />
The same bus can be the input for as many mixer strips as required, allowing easy signal distribution in the <strong>Mixer</strong>.<br />
Page 71