Download PDF LaCie D2 Quadra Hard Drive
Download PDF LaCie D2 Quadra Hard Drive
Download PDF LaCie D2 Quadra Hard Drive

Create successful ePaper yourself
Turn your PDF publications into a flip-book with our unique Google optimized e-Paper software.
<strong>LaCie</strong> d2 <strong>Quadra</strong><br />
Table of Contents<br />
Quadruple Interface <strong>Hard</strong> <strong>Drive</strong> page<br />
Table of Contents<br />
Health and Safety Precautions 3<br />
General Use Precautions 3<br />
1. Introduction To The <strong>LaCie</strong> d2 <strong>Quadra</strong> <strong>Hard</strong> <strong>Drive</strong> 5<br />
1.1. <strong>Hard</strong> <strong>Drive</strong> Heat Management 6<br />
2. Your <strong>LaCie</strong> d2 <strong>Quadra</strong> <strong>Hard</strong> <strong>Drive</strong> 7<br />
2.1. Minimum System Requirements 7<br />
2.2. Package Content 8<br />
2.3. Views Of The <strong>Drive</strong> 9<br />
2.4. Cables and Connectors 11<br />
3. Installing Your <strong>LaCie</strong> d2 <strong>Quadra</strong> <strong>Hard</strong> <strong>Drive</strong> 14<br />
3.1. Connecting the Power Supply 15<br />
3.2.a. Connecting the USB 2.0 Interface Cable 16<br />
3.2.b. Connecting the FireWire 400 Interface Cable 17<br />
3.2.c. Connecting the FireWire 800 Interface Cable 18<br />
3.2.d. Connecting the eSATA Interface Cable 19<br />
3.3. Connecting Multiple Devices 20<br />
3.4. Disconnecting Your <strong>LaCie</strong> d2 <strong>Quadra</strong> <strong>Hard</strong> <strong>Drive</strong> 21<br />
3.5. Switching Interfaces 21<br />
3.6. <strong>LaCie</strong> Shortcut Button 22<br />
4. Helpful Information 30<br />
4.1. Formatting and Partitioning Your <strong>LaCie</strong> d2 <strong>Quadra</strong> <strong>Hard</strong> <strong>Drive</strong> 31<br />
4.2. Interface Comparisons 34<br />
5. FireWire Questions & Answers 35<br />
6. USB Questions & Answers 37<br />
7. eSATA Questions & Answers 39<br />
8. Troubleshooting 41<br />
8.1. Mac Users 41<br />
8.2. Windows Users 43<br />
9. Contacting Customer Support 46<br />
9.1. <strong>LaCie</strong> Technical Support Contacts 47<br />
10. Warranty Information 48<br />
Glossary 49
<strong>LaCie</strong> d2 <strong>Quadra</strong><br />
Forward<br />
Quadruple Interface <strong>Hard</strong> <strong>Drive</strong> page<br />
Copyrights<br />
Copyright © 2007 <strong>LaCie</strong>. All<br />
rights reserved. No part of this publication<br />
may be reproduced, stored in a<br />
retrieval system, or transmitted in any<br />
form or by any means, electronic, mechanical,<br />
photocopying, recording or<br />
otherwise, without the prior written<br />
consent of <strong>LaCie</strong>.<br />
Trademarks<br />
Apple, Mac, and Macintosh are registered<br />
trademarks of Apple Computer,<br />
Inc. Microsoft, Windows 98, Windows<br />
98 SE, Windows 2000, Windows Millennium<br />
Edition and Windows XP<br />
are registered trademarks of Microsoft<br />
Corporation. Other trademarks mentioned<br />
in this manual are the property<br />
of their respective owners.<br />
Changes<br />
The material in this document is<br />
for information only and subject to<br />
change without notice. While reasonable<br />
efforts have been made in the<br />
preparation of this document to assure<br />
its accuracy, <strong>LaCie</strong> assumes no liability<br />
resulting from errors or omissions in<br />
this document, or from the use of the<br />
information contained herein. <strong>LaCie</strong><br />
reserves the right to make changes or<br />
revisions in the product design or the<br />
product manual without reservation<br />
and without obligation to notify any<br />
person of such revisions and changes.<br />
Canada Compliance Statement<br />
This Class A digital apparatus<br />
meets all requirements of the Canadian<br />
Interference-Causing Equipment<br />
Regulations.<br />
FCC Statement<br />
This device complies with Part 15<br />
of the FCC Rules. Operation is subject<br />
to the following conditions:<br />
1.<br />
2.<br />
<strong>LaCie</strong> d2 <strong>Quadra</strong><br />
<strong>Hard</strong> <strong>Drive</strong><br />
Tested To Comply<br />
With FCC standards<br />
For Home or Office Use<br />
The devices may not cause harmful<br />
interference<br />
The devices must accept any interference<br />
received, including interference<br />
that may cause undesired<br />
operation.<br />
NOTE: This equipment has been<br />
tested and found to comply with the<br />
limits for a Class B digital device, pursuant<br />
to Part 15 of the FCC Rules.<br />
These limits are designed to provide<br />
reasonable protection against harmful<br />
interference in a residential installation.<br />
This equipment generates, uses<br />
and can radiate radio frequency energy<br />
and, if not installed and used in<br />
accordance with the instructions, may<br />
cause harmful interference to radio<br />
communications. However, there is no<br />
guarantee that interference will not occur<br />
in a particular installation. If this<br />
equipment does cause harmful interference<br />
to radio or television reception,<br />
which can be determined by turning<br />
the equipment off and on, the user is<br />
encouraged to try and correct the interference<br />
by one or more of the following<br />
measures:<br />
•<br />
•<br />
•<br />
•<br />
Reorient or relocate the receiving<br />
antenna.<br />
Increase the separation between the<br />
equipment and receiver.<br />
Connect the equipment into an outlet<br />
on a circuit different from that to<br />
which the receiver is connected.<br />
Consult the dealer or an experienced<br />
radio/TV technician for help.<br />
Modifications to this product not<br />
authorized by <strong>LaCie</strong> could void the<br />
FCC & Industry Canada regulations<br />
and negate your authority to operate<br />
the product.<br />
CAUTION: Modifications<br />
not authorized by the manufacturer<br />
may void the user’s<br />
authority to operate this device.<br />
Manufacturer’s Declaration<br />
for CE Certification<br />
We, <strong>LaCie</strong>, solemnly declare<br />
that this product conforms to the following<br />
European standards: Class B<br />
EN60950, EN55022, EN55024<br />
With reference to the following conditions:<br />
73/23/EEC Low Voltage Directive;<br />
89/336/EEC EMC Directive
<strong>LaCie</strong> d2 <strong>Quadra</strong><br />
Forward<br />
Quadruple Interface <strong>Hard</strong> <strong>Drive</strong> page<br />
This symbol on the product<br />
or on its packaging<br />
indicates that this product<br />
must not be disposed<br />
of with your other household waste.<br />
Instead, it is your responsibility to<br />
dispose of your waste equipment by<br />
handing it over to a designed collection<br />
point for the recycling of waste<br />
Health and Safety Precautions<br />
•<br />
•<br />
•<br />
Only qualified persons are authorized<br />
to carry out maintenance on<br />
this device.<br />
Read this User Manual carefully<br />
and follow the correct procedure<br />
when setting up the device.<br />
Do not open your <strong>LaCie</strong> d2 <strong>Quadra</strong><br />
<strong>Hard</strong> <strong>Drive</strong> or attempt to disassemble<br />
or modify it. Never insert<br />
any metallic object into the drive<br />
to avoid any risk of electrical shock,<br />
fire, short-circuiting or dangerous<br />
General Use Precautions<br />
electrical and electronic equipment.<br />
The separate collection and recycling<br />
of your waste equipment at the time of<br />
disposal will help to conserve natural<br />
resources and ensure that it is recycled<br />
in a manner that protects human<br />
health and the environment. For more<br />
information about where you can drop<br />
off your waste equipment for recycling,<br />
•<br />
emissions. Your <strong>LaCie</strong> d2 <strong>Quadra</strong><br />
<strong>Hard</strong> <strong>Drive</strong> contains no user-serviceable<br />
parts. If it appears to be<br />
malfunctioning, have it inspected<br />
by a qualified <strong>LaCie</strong> Technical Support<br />
representative.<br />
Never expose your device to rain,<br />
or use it near water, or in damp or<br />
wet conditions. Never place objects<br />
containing liquids on the <strong>LaCie</strong> d2<br />
<strong>Quadra</strong> <strong>Hard</strong> <strong>Drive</strong>, as they may<br />
spill into its openings. Doing so increases<br />
the risk of electrical shock,<br />
• Do not expose the <strong>LaCie</strong> d2 <strong>Quadra</strong> of heat or exposing it to sunlight<br />
<strong>Hard</strong> <strong>Drive</strong> to temperatures outside (even through a window). Inverse-<br />
the range of 5° C to 35° C (41° F ly, placing your <strong>LaCie</strong> d2 <strong>Quadra</strong><br />
to 95° F); or to operational humid- <strong>Hard</strong> <strong>Drive</strong> in an environment that<br />
ity beyond 5-80%, non-condensing, is too cold or humid may damage<br />
or non-operating humidity beyond the unit.<br />
10-90%, non-condensing. Doing so<br />
may damage the <strong>LaCie</strong> d2 <strong>Quadra</strong><br />
<strong>Hard</strong> <strong>Drive</strong> or disfigure its casing.<br />
Avoid placing your <strong>LaCie</strong> d2<br />
<strong>Quadra</strong> <strong>Hard</strong> <strong>Drive</strong> near a source<br />
• Always unplug the <strong>LaCie</strong> d2 <strong>Quadra</strong><br />
<strong>Hard</strong> <strong>Drive</strong> from the electrical outlet<br />
if there is a risk of lightning or<br />
if it will be unused for an extended<br />
period of time. Otherwise, there is<br />
please contact your local city office,<br />
your household waste disposal service,<br />
or the shop where you purchased the<br />
product.<br />
•<br />
•<br />
•<br />
CAUTION: The <strong>LaCie</strong> d2<br />
<strong>Quadra</strong> <strong>Hard</strong> drive's warranty<br />
may be void as a result of the<br />
failure to respect the precautions<br />
listed above.<br />
short-circuiting, fire or personal injury.<br />
Make sure that the computer and<br />
<strong>LaCie</strong> d2 <strong>Quadra</strong> <strong>Hard</strong> <strong>Drive</strong> are<br />
electrically grounded. If the devices<br />
are not grounded, there is an<br />
increased risk of electrical shock.<br />
Power requirements 100-240 V~,<br />
1.5 A, 60-50 Hz, (Supply voltage<br />
fluctuations not exceeding ± 10% of<br />
the nominal, transient over-voltages<br />
according to over-voltage category<br />
II).<br />
an increased risk of electrical shock,<br />
short-circuiting or fire.<br />
Use only the power supply shipped<br />
with the device.<br />
Do not use the <strong>LaCie</strong> d2 <strong>Quadra</strong><br />
<strong>Hard</strong> <strong>Drive</strong> near other electrical<br />
appliances such as televisions or radios.<br />
Doing so may cause interference<br />
which will adversely affect the<br />
operation of the other products.
<strong>LaCie</strong> d2 <strong>Quadra</strong><br />
Forward<br />
Quadruple Interface <strong>Hard</strong> <strong>Drive</strong> page<br />
• Do not place the <strong>LaCie</strong> d2 <strong>Quadra</strong> • Do not place heavy objects on top of<br />
<strong>Hard</strong> <strong>Drive</strong> near sources of mag- the <strong>LaCie</strong> d2 <strong>Quadra</strong> <strong>Hard</strong> <strong>Drive</strong><br />
netic interference, such as computer or use excessive force on it.<br />
displays, televisions or speakers.<br />
Magnetic interference can affect<br />
the operation and stability of your<br />
<strong>LaCie</strong> d2 <strong>Quadra</strong> <strong>Hard</strong> <strong>Drive</strong>.<br />
• Never use excessive force on your<br />
<strong>LaCie</strong> d2 <strong>Quadra</strong> <strong>Hard</strong> <strong>Drive</strong>. If<br />
you detect a problem, see the Troubleshooting<br />
section in this manual.<br />
CAUTION: A shielded-type<br />
power cord is required in order<br />
to meet FCC emission limits<br />
and also to prevent interference<br />
to the nearby radio and television<br />
reception. It is essential<br />
that only the supplied power<br />
cord be used.<br />
IMporTanT InFo: 1GB = 1,000,000,000 bytes. 1TB = 1,000,000,000,000 bytes. Once formatted, the actual available<br />
storage capacity varies depending on operating environment (typically 5-10% less).<br />
ImpOrTANT INfO: Any loss, corruption or destruction of data while using a <strong>LaCie</strong> drive is the sole responsibility of the<br />
user, and under no circumstances will <strong>LaCie</strong> be held liable for the recovery or restoration of this data. To help prevent the loss<br />
of your data, <strong>LaCie</strong> highly recommends that you keep TWO copies of your data; one copy on your external hard drive, for<br />
instance, and a second copy either on your internal hard drive, another external hard drive or some other form of removable<br />
storage media. <strong>LaCie</strong> offers a complete line of CD and DVD drives. If you would like more information on backup, please<br />
refer to our website.
<strong>LaCie</strong> d2 <strong>Quadra</strong><br />
Introduction<br />
Quadruple Interface <strong>Hard</strong> <strong>Drive</strong> page<br />
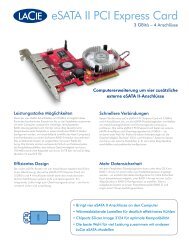
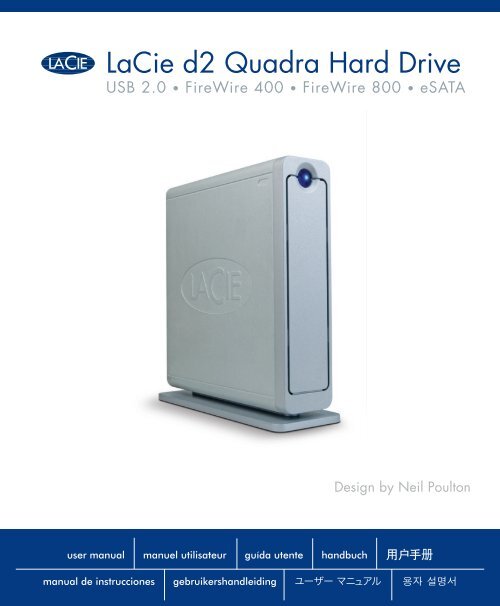
1. Introduction To The <strong>LaCie</strong> d2 <strong>Quadra</strong> <strong>Hard</strong> <strong>Drive</strong><br />
Thank you for purchasing the new <strong>LaCie</strong> d2 <strong>Quadra</strong><br />
with Quadruple Interface. Combining compatibility<br />
with high throughput rates and mammoth storage<br />
capacity, the <strong>Quadra</strong> is ideally suited for audio/video<br />
pros working with large amounts of DV and SD video<br />
or professional level 2D/3D imaging projects, or high<br />
speed data backup.<br />
With its four interfaces, the <strong>Quadra</strong> <strong>Hard</strong> <strong>Drive</strong> is<br />
universally compatible with almost any computer and<br />
can be daisy-chained with peripherals or expanded via<br />
FireWire.<br />
Engineered to fit seamlessly in to any work environment,<br />
the <strong>LaCie</strong> d2 <strong>Quadra</strong> <strong>Hard</strong> <strong>Drive</strong> with Quadruple<br />
Interface can be stood vertically on the <strong>LaCie</strong> <strong>Drive</strong><br />
Stand (included), placed in the <strong>LaCie</strong> Desk Rack (sold<br />
separately) or incorporated into standard 19” computer<br />
equipment racks with the <strong>LaCie</strong> Rackmount Kit (sold<br />
separately).<br />
■ Your <strong>Quadra</strong> <strong>Hard</strong> <strong>Drive</strong> Capabilities<br />
•<br />
•<br />
•<br />
•<br />
•<br />
•<br />
USB 2.0, FireWire 400, FireWire 800, eSATA<br />
interfaces<br />
Interface transfer rate of up to 1.5 Gbits/s via<br />
eSATA<br />
Daisy-chain digital video cameras directly to the<br />
drive<br />
Connects to all of the FireWire and USB standard<br />
interfaces<br />
Back up your computer’s internal hard drive<br />
Store and exchange data between several<br />
computers
<strong>LaCie</strong> d2 <strong>Quadra</strong><br />
Introduction<br />
Quadruple Interface <strong>Hard</strong> <strong>Drive</strong> page<br />
1.1. <strong>Hard</strong> <strong>Drive</strong> Heat Management<br />
■ Heat Dissipation Design<br />
The <strong>LaCie</strong> d2 <strong>Quadra</strong> <strong>Hard</strong> <strong>Drive</strong>’s metal body is<br />
ideal for naturally dissipating internal drive heat. Its<br />
unique design actually draws heat away from the internal<br />
drive toward the external casing. The casing absorbs heat<br />
and will take advantage of its large surface to further dissipate<br />
heat outside the casing. Because of this advantageous<br />
feature, heat is taken away from the internal drive,<br />
keeping it safe and prolonging its life and reliability. As<br />
a consequence, it is normal that the external casing is<br />
hot to the touch. Please make sure that the vents of the<br />
back-bezel and front-bezel are not obstructed so that<br />
there is a natural airflow across the casing.<br />
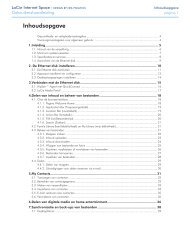
■ Upright, Stack & Rackmount Configuration<br />
Heat dissipation is maximized when the drive is in<br />
the upright position (1). If you have several <strong>LaCie</strong> drives<br />
stacked on each other, please remember to attach the<br />
included rubber feet on the under side of your drives<br />
(2). This will allow for some airflow between your drives<br />
so that the heat dissipation can work effectively - especially<br />
if your <strong>LaCie</strong> drive does not include a fan. <strong>LaCie</strong><br />
does not recommend stacking or racking more than 3<br />
d2 drives on top of each other (3), especially if these<br />
drives are turned ON simultaneously.<br />
■ Smart Fan Technology<br />
The casing alone is a great way to dissipate heat without<br />
the need of a fan. Therefore, currently, most drives do<br />
not require a fan. Only the largest capacity drives may<br />
need a fan. To find out if your drive includes a fan, please<br />
refer to the item number and product datasheet.<br />
Some models of the d2 <strong>Quadra</strong> <strong>Hard</strong> <strong>Drive</strong> have<br />
a thermo-regulated “smart fan”, which activates when<br />
the heat inside the casing reaches a certain temperature.<br />
The smart fan adjusts automatically to changes in temperature.<br />
1 2<br />
3
<strong>LaCie</strong> d2 <strong>Quadra</strong><br />
Your <strong>LaCie</strong> d2 <strong>Quadra</strong> <strong>Hard</strong> <strong>Drive</strong><br />
Quadruple Interface <strong>Hard</strong> <strong>Drive</strong> page<br />
2. Your <strong>LaCie</strong> d2 <strong>Quadra</strong> <strong>Hard</strong> <strong>Drive</strong><br />
2.1. Minimum System Requirements<br />
■ Windows Users<br />
■ Mac Users<br />
•<br />
•<br />
•<br />
•<br />
eSATA*, FireWire 800*, FireWire 400 or USB 2.0<br />
port<br />
Windows 2000, Windows XP or later<br />
500MHz processor or higher<br />
Minimum 128MB RAM (512MB recommended)<br />
* Most computers do not come from the factory with FireWire<br />
800 or eSATA ports, so you may need to purchase a PCI,<br />
PCI-X or PCI-Express card to be able to connect your d2<br />
<strong>Quadra</strong> via these interfaces. <strong>LaCie</strong> offers a wide selection of<br />
eSATA and FireWire 800 cards. Visit the <strong>LaCie</strong> website at<br />
www.lacie.com/accessories<br />
•<br />
•<br />
•<br />
•<br />
eSATA*, FireWire 800*, FireWire 400 or USB 2.0<br />
port<br />
Mac OS 10.2.8 (Mac OS 10.3 for eSATA) or later<br />
G4, G5, Intel 500MHz processor or higher<br />
Minimum 128MB RAM (512MB recommended)<br />
ImpOrTANT INfO: The <strong>LaCie</strong> d2 <strong>Quadra</strong> is<br />
compatible with the Intel Core processors.<br />
TEChnICal noTE: The <strong>LaCie</strong> Shortcut<br />
Button is not compatible with eSATA. To use the<br />
Shortcut Button, connect your <strong>LaCie</strong> hard drive<br />
to your computer via USB or FireWire.
<strong>LaCie</strong> d2 <strong>Quadra</strong><br />
Your <strong>LaCie</strong> d2 <strong>Quadra</strong> <strong>Hard</strong> <strong>Drive</strong><br />
Quadruple Interface <strong>Hard</strong> <strong>Drive</strong> page<br />
1<br />
2<br />
3<br />
4<br />
5<br />
6<br />
7<br />
8<br />
9<br />
10<br />
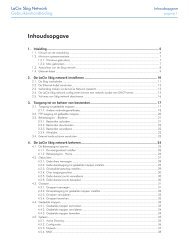
2.2. Package Content<br />
Your <strong>LaCie</strong> d2 <strong>Quadra</strong> <strong>Hard</strong> <strong>Drive</strong> should contain the following:<br />
<strong>LaCie</strong> d2 <strong>Quadra</strong> <strong>Hard</strong> <strong>Drive</strong><br />
Vertical stand kit<br />
Power supply kit<br />
Hi-Speed USB 2.0 cable<br />
FireWire 400 6-to-6-pin cable<br />
eSATA-to-eSATA cable<br />
FireWire 800 9-to-9-pin cable<br />
<strong>LaCie</strong> Storage Utilities CD-ROM (includes<br />
User Manual)<br />
<strong>LaCie</strong> Shortcut Button CD-ROM<br />
Quick Install Guide<br />
ImpOrTANT INfO: Please save your packaging.<br />
In the event that the drive should need to<br />
be repaired or serviced, it must be returned in its<br />
original packaging.<br />
1<br />
8<br />
w<br />
d2 Storage Utilities<br />
version 1.4.6<br />
(Windows and Mac OS compatible)<br />
<strong>LaCie</strong> User Manuals<br />
<strong>LaCie</strong> ‘1-Click’ Backup Software (Windows XP/2000, Mac OS X)<br />
Silverkeeper backup software (Mac OS 9 & OS X)<br />
Silverlining Pro Utilities (Mac OS 9)<br />
2<br />
© 2007, <strong>LaCie</strong>. All rights reserved. <strong>LaCie</strong>andthe<strong>LaCie</strong>logo aretrademarksof<strong>LaCie</strong>,whichmayberegisteredinsomejurisdictions.•711268<br />
10<br />
<strong>LaCie</strong> d2 <strong>Quadra</strong> <strong>Hard</strong> <strong>Drive</strong><br />
USB 2.0, FireWire 400, FireWire 800 & eSATA<br />
Quick Install Guide<br />
9<br />
3<br />
<strong>LaCie</strong> Shortcut Button<br />
Launch any application with one easy push<br />
Windows:<br />
EMC ® Retrospect ® Express HD 2.0 with Shortcut Button<br />
for Windows XP, Windows 2000<br />
©2007 <strong>LaCie</strong>, all rights reserved. <strong>LaCie</strong> and the <strong>LaCie</strong> logoaretrademarks of<strong>LaCie</strong>whichmayberegisteredinsomejurisdictions.711269<br />
Mac:<br />
EMC ® Retrospect ® Express HD with Shortcut Button<br />
for Mac OS 10.2.8 or higher<br />
4<br />
5<br />
6<br />
7<br />
SATA<br />
SATA
<strong>LaCie</strong> d2 <strong>Quadra</strong><br />
Your <strong>LaCie</strong> d2 <strong>Quadra</strong> <strong>Hard</strong> <strong>Drive</strong><br />
Quadruple Interface <strong>Hard</strong> <strong>Drive</strong> page<br />
2.3. Views Of The <strong>Drive</strong><br />
■ Front View<br />
1<br />
1<br />
Shortcut Button with Activity LED<br />
Push the Shortcut Button to launch the document<br />
or application of your choice (see section<br />
3.6, <strong>LaCie</strong> Shortcut Button for more information).<br />
The LED remains lit to show that the drive is<br />
on, and blinks to indicate drive activity.
<strong>LaCie</strong> d2 <strong>Quadra</strong><br />
Your <strong>LaCie</strong> d2 <strong>Quadra</strong> <strong>Hard</strong> <strong>Drive</strong><br />
Quadruple Interface <strong>Hard</strong> <strong>Drive</strong> page 0<br />
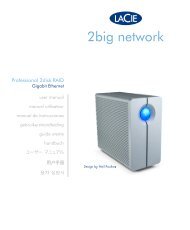
■ Rear View<br />
WARRANTY VOID IF<br />
SEAL BROKEN.<br />
• • • ••• •••••••••••<br />
• • • • • • •••••••<br />
!<br />
8<br />
1<br />
FW4OO<br />
FW8OO FW8OO USB 2.O<br />
eSATA<br />
1 Lock Slot - This slot is used to connect an antitheft<br />
chain lock, such as a Kensington security<br />
lock*, for maximum protection.<br />
2 Rackmount Grooves - These grooves are used<br />
for attaching your drive to the <strong>Drive</strong> Stand,<br />
mounting in the Desk Rack kit (sold separately)<br />
or placing your drive in standard 19” computer<br />
equipment racks using the <strong>LaCie</strong> Rackmount<br />
Kit (sold separately).<br />
3 On/Off/Auto Power Switch - The auto<br />
position allows the drive to be powered on and<br />
off automatically with your computer (works<br />
with FireWire and USB connections only). This<br />
feature also allows the drive to manage power<br />
consumption. If the system’s power fan supports<br />
it, the <strong>LaCie</strong> d2 <strong>Quadra</strong> will spin down while in<br />
power save mode. The d2 <strong>Quadra</strong> will then<br />
take several seconds to spin up to full power.<br />
4 eSATA Port - This is where you plug in the<br />
eSATA cable furnished with the drive. See page<br />
19, Connecting the Interface Cable for more<br />
information.<br />
* Kensington © 2006 Kensington Computer Products Group<br />
off<br />
auto<br />
7 6 5 4 3<br />
on<br />
5 Hi-Speed USB 2.0 Port - This is where you<br />
plug in the Hi-Speed USB 2.0 cable furnished<br />
with the drive. See page 16, Connecting the<br />
Interface Cable for more information.<br />
6 FireWire 800 Ports - This is where you plug in<br />
the FireWire 800 cable furnished with the drive.<br />
See page 18, Connecting the Interface Cable for<br />
more information.<br />
7 FireWire 400 Port - This is where you plug in<br />
the FireWire 400 cable furnished with the drive.<br />
See page 17, Connecting the Interface Cable for<br />
more information.<br />
8 Power Supply Connection - This is where you<br />
plug in the AC adapter supplied with the drive.<br />
See page 15, Connecting The Power Supply for<br />
more information.<br />
2
<strong>LaCie</strong> d2 <strong>Quadra</strong><br />
Your <strong>LaCie</strong> d2 <strong>Quadra</strong> <strong>Hard</strong> <strong>Drive</strong><br />
Quadruple Interface <strong>Hard</strong> <strong>Drive</strong> page<br />
2.4. Cables and Connectors<br />
■ FireWire 400 & FireWire 800<br />
FireWire 400, also known as IEEE 1394, is a highspeed<br />
serial input/output technology for connecting<br />
peripheral devices to a computer or to each other, and<br />
FireWire 800 is the implementation of the new IEEE<br />
1394b standard.<br />
FireWire 800 offers increased bandwidth and extended<br />
distance between devices. FireWire 800 is ideal<br />
for bandwidth-intensive applications, such as audio,<br />
video and graphics. Please see page 35, FireWire Questions<br />
And Answers for more information on FireWire.<br />
FireWire Icons<br />
Theses icons will help you easily identify the FireWire<br />
interface. They appear on FireWire cables, and next to<br />
the FireWire port connectors on certain computers.<br />
FireWire icon iLink icon DV icon<br />
FireWire Cables<br />
There are two categories of FireWire cables on the<br />
market: FireWire 800 cables, which feature the 9-to-9pin,<br />
9-to-6-pin, and 9-to-4-pin cables; and the original<br />
FireWire cables which feature the 6-to-6-pin and 6-to-<br />
4-pin cables.<br />
For more information on the differences between<br />
the d2 <strong>Quadra</strong>’s interfaces, see chapter 4.2. Interface<br />
Comparison.<br />
FireWire 800 Benefits<br />
•<br />
•<br />
Resourceful architecture: FireWire 800 reduces<br />
delays in arbitration and signal distortion, and<br />
increases throughput.<br />
Backwards compatibility: adapter cables allow<br />
FireWire 400 devices to operate under the<br />
FireWire 800 port (at FireWire 400 speed).<br />
FireWire 400 & FireWire 800 Benefits<br />
•<br />
•<br />
•<br />
Hot-pluggable: devices can be added and removed<br />
while the bus is active.<br />
Isochronous data delivery: no dropped frames<br />
– FireWire supports real-time data delivery.<br />
Flexible: up to 63 devices can be connected on a<br />
single bus.<br />
FireWire 800 Cable and Cable End<br />
FireWire 400 Cable and Cable End<br />
iLink/DV Cable and Cable End (Sold separately)
<strong>LaCie</strong> d2 <strong>Quadra</strong><br />
Your <strong>LaCie</strong> d2 <strong>Quadra</strong> <strong>Hard</strong> <strong>Drive</strong><br />
Quadruple Interface <strong>Hard</strong> <strong>Drive</strong> page<br />
■ Hi-Speed USB 2.0<br />
USB is a serial input/output technology for connecting<br />
peripheral devices to a computer or to each other.<br />
Hi-Speed USB 2.0 is the latest implementation of this<br />
standard, and it provides the necessary bandwidth and<br />
data transfer rates to support high speed devices such as<br />
hard drives, CD/DVD drives and digital cameras.<br />
Please see page 37, USB Questions And Answers<br />
for more information on USB’s uses and capabilities.<br />
USB Icons<br />
These icons will help you easily identify the USB<br />
interfaces. They appear on USB cables and next to the<br />
USB port connectors on certain computers.<br />
USB 2.0 icon USB 1.1 icon<br />
USB 2.0 Cables<br />
Your <strong>LaCie</strong> drive is shipped with a Hi-Speed USB<br />
2.0 cable, to ensure maximum data transfer performance<br />
when connected to a Hi-Speed USB 2.0 port. The cable<br />
will also work when connected to a USB port, but drive<br />
performance will be limited to USB 1.1 transfer rates.<br />
USB 2.0 Cable and Cable End<br />
For more information on the differences between<br />
the d2 <strong>Quadra</strong>’s interfaces, see chapter 4.2. Interface<br />
Comparison.<br />
Hi-Speed USB 2.0 Benefits<br />
•<br />
•<br />
Backwards compatibility: Hi-Speed USB 2.0<br />
works with the original USB specifications.<br />
Hot-swappable: no need to shut down or restart<br />
your computer when adding or removing devices.
<strong>LaCie</strong> d2 <strong>Quadra</strong><br />
Your <strong>LaCie</strong> d2 <strong>Quadra</strong> <strong>Hard</strong> <strong>Drive</strong><br />
Quadruple Interface <strong>Hard</strong> <strong>Drive</strong> page<br />
■ eSATA<br />
Your <strong>LaCie</strong> d2 <strong>Quadra</strong> <strong>Hard</strong> <strong>Drive</strong> uses the latest<br />
in SATA technology, allowing interface (or bus) transfer<br />
rates of up to 1.5 Gbits/s. SATA technology was<br />
originally developed to serve as an internal interface, delivering<br />
improved performance to internal connections.<br />
Soon after, eSATA, or external SATA was developed,<br />
allowing for the use of shielded cables outside the PC.<br />
eSATA technology was developed to be rugged and<br />
durable. eSATA connectors do not have the “L” shaped<br />
design of other SATA connectors. In addition, the guide<br />
features are vertically offset and reduced in size to prevent<br />
the use of unshielded internal cables in external applications.<br />
Please see page 39, eSATA Questions And Answers<br />
for more information on eSATA’s uses and capabilities.<br />
eSATA Icons<br />
These icons will help you easily identify the eSATA<br />
interfaces. They appear on eSATA cables and next to the<br />
eSATA port connectors on certain computers.<br />
eSATA 1.5 Gbits/s icon<br />
eSATA Cables<br />
Your <strong>LaCie</strong> drive is shipped with a eSATA cable, to<br />
ensure maximum data transfer performance when connected<br />
to a eSATA port.<br />
eSATA Cable and Cable End<br />
SATA<br />
SATA<br />
External SATA (eSATA) Benefits<br />
•<br />
•<br />
•<br />
eSATA interface can achieve up to 1.5 Gbits/s<br />
transfer rate<br />
Plug orientation – An extrusion on the outside of<br />
the connector helps guide and align the connector<br />
during insertion.<br />
Hot-plug support – eSATA enables adding and<br />
removing a drive without having to power down<br />
the system or reboot. Utilizing staggered pins to<br />
aid insertion, the specification ensures device detection<br />
and passive and active limits to in-rush<br />
current.<br />
TeChNICAl NOTe: You can connect your d2<br />
<strong>Quadra</strong> to a first-generation SATA PCI card interface.<br />
However, you will need a SATA-to-eSATA<br />
cable (not included).<br />
For more information on the differences between<br />
the d2 <strong>Quadra</strong>’s interfaces, see chapter 4.2. Interface<br />
Comparison.
<strong>LaCie</strong> d2 <strong>Quadra</strong><br />
Installing Your <strong>LaCie</strong> <strong>Hard</strong> <strong>Drive</strong><br />
Quadruple Interface <strong>Hard</strong> <strong>Drive</strong> page<br />
3. Installing Your <strong>LaCie</strong> d2 <strong>Quadra</strong> <strong>Hard</strong> <strong>Drive</strong><br />
There are two parts to connecting and turning on<br />
your <strong>LaCie</strong> d2 <strong>Quadra</strong>: 1) connect the power supply to<br />
the drive and to an outlet, and 2) connecting an interface<br />
cable to the drive and to your computer In about<br />
five minutes, you should be able to access your new hard<br />
drive to back up data and to transfer files between computers<br />
and other peripherals.<br />
Thanks to its support of four different interfaces and<br />
its support of both the Mac and Windows operating<br />
system, the <strong>LaCie</strong> d2 <strong>Quadra</strong> <strong>Hard</strong> <strong>Drive</strong> gives you<br />
many connectivity options. These steps are divided into<br />
sections by operating system (Mac or Windows) and<br />
the type of interface cable (FireWire 800, FireWire 400,<br />
eSATA and Hi-Speed USB 2.0).<br />
This chapter also has helpful information about connecting<br />
digital video cameras to the <strong>LaCie</strong> drive, connecting<br />
multiple devices and special steps that need to<br />
be followed when disconnecting the drive or switching<br />
between the different interfaces.<br />
Step 1 Connecting the Power Supply Page 15<br />
Step 2 Connecting the USB 2.0 Cable Page 16<br />
Connecting the FireWire 400 Cables Page 17<br />
Connecting the FireWire 800 Cables Page 18<br />
Connecting the eSATA Cable Page 19<br />
Connecting Multiple Devices Page 20<br />
CAUTION: Your <strong>LaCie</strong> d2 <strong>Quadra</strong> relies on<br />
its aluminum alloy casing to help dissipate heat.<br />
Make sure to place your drive in a well ventilated<br />
space, do not block the ventilation outlet on the<br />
back of the drive and keep the area in front of the<br />
drive unobstructed to allow for proper airflow.<br />
ImpOrTANT INfO: You cannot have the<br />
FireWire, USB, or eSATA interfaces connected<br />
at the same time. If you would like to switch between<br />
interfaces, you must follow the steps on<br />
page 21, Switching Interfaces.<br />
TeChNICAl NOTe: If you plan to use your<br />
drive in a cross-platform (Mac/Windows) environment,<br />
consider reformatting the drive to the<br />
MS-DOS (also known as FAT 32) File System<br />
format. See page 30 for more details.
<strong>LaCie</strong> d2 <strong>Quadra</strong><br />
Installing Your <strong>LaCie</strong> <strong>Hard</strong> <strong>Drive</strong><br />
Quadruple Interface <strong>Hard</strong> <strong>Drive</strong> page<br />
3.1. Connecting the Power Supply<br />
The power supply kit is composed of two cables: one<br />
cable (A) connects to the <strong>LaCie</strong> drive; and the other<br />
cable (B) connects to a power outlet, such as a wall outlet<br />
or a surge protector.<br />
1. Connect Cable A to your <strong>LaCie</strong> <strong>Drive</strong>.<br />
FW4OO<br />
FW8OO FW8OO USB 2.O<br />
2. Connect Cable B to the Power supply brick (C).<br />
3. Connect Cable B to a surge protector or wall outlet.<br />
CAUTION:<br />
• Only use the AC adapter supplied with your<br />
specific <strong>LaCie</strong> drive. Do not use a power<br />
supply from another <strong>LaCie</strong> drive or another<br />
manufacturer. Using any other power cable or<br />
power supply may cause damage to the device<br />
and void your warranty.<br />
•<br />
A B<br />
Always remove the AC adapter before transporting<br />
your <strong>LaCie</strong> drive. Failure to remove<br />
the adapter may result in damage to your drive<br />
and will void your warranty.<br />
TeChNICAl NOTe: If you are using the<br />
<strong>LaCie</strong> Serial ATA PCI Card to connect your<br />
<strong>LaCie</strong> d2 <strong>Quadra</strong> <strong>Hard</strong> <strong>Drive</strong> to your computer,<br />
you can draw power from the PCI card<br />
to operate your hard drive. Please refer to the<br />
<strong>LaCie</strong> Serial ATA PCI Card User Manual for<br />
guidelines and instructions.<br />
eSATA<br />
off<br />
auto<br />
on<br />
C<br />
4. On the back of the drive, turn on the drive by<br />
flipping the power switch to ON or AUTO (drive<br />
powers on/hibernates automatically; available only<br />
for USB/FireWire connections).<br />
•<br />
•<br />
•<br />
TeChNICAl NOTe:<br />
On/Off/Auto Power Switch:<br />
The AUTO position allows the drive to be powered<br />
on and off automatically with your computer<br />
(works with USB and FireWire connection only).<br />
If the system’s power fan supports it, the <strong>LaCie</strong> d2<br />
<strong>Quadra</strong> will spin down while in the power save<br />
mode. The d2 <strong>Quadra</strong> will then take several seconds<br />
to spin up to full power. Use this position<br />
when energy efficiency and quiet drive operation<br />
are priorities.<br />
The ON position is ideal for network configurations<br />
and allows quick access to your data. You<br />
must use the On switch to power on your drive<br />
when connected via eSATA.<br />
The OFF position is ideal for protecting your d2<br />
<strong>Quadra</strong> against viruses. The Off mode also isolates<br />
your hard drive from incorrect operation, protecting<br />
your data when your d2 <strong>Quadra</strong> is not in use.
<strong>LaCie</strong> d2 <strong>Quadra</strong><br />
Installing Your <strong>LaCie</strong> <strong>Hard</strong> <strong>Drive</strong><br />
Quadruple Interface <strong>Hard</strong> <strong>Drive</strong> page<br />
3.2.a. Connecting the USB 2.0 Interface Cable<br />
1.<br />
2.<br />
3.<br />
Connect the Power supply cable (page 15) and turn<br />
on the <strong>LaCie</strong> d2 <strong>Quadra</strong> <strong>Hard</strong> <strong>Drive</strong> by flipping the<br />
power switch to ON or AUTO (drive powers on/<br />
hibernates automatically; available only for USB/<br />
FireWire connections).<br />
Connect the Hi-Speed USB 2.0 cable into the Hi-<br />
Speed USB 2.0 port on the back of the <strong>LaCie</strong> d2<br />
<strong>Quadra</strong> <strong>Hard</strong> <strong>Drive</strong> (A).<br />
Attach the other end of the interface cable to an<br />
available USB port on your computer (B).<br />
FW4OO<br />
FW8OO FW8OO USB 2.O<br />
4 .Windows Users:<br />
You must format the drive before it will mount in<br />
your My Computer folder. See page 31, Formatting<br />
and Partitioning Your <strong>LaCie</strong> d2 <strong>Quadra</strong> <strong>Hard</strong> <strong>Drive</strong>,<br />
for more details.<br />
Mac Users:<br />
The drive is pre-formatted for Mac use and should<br />
appear on your desktop.<br />
TeChNICAl NOTe: For more information on<br />
USB connections, see the following pages:<br />
• Page 11, Cables and Connectors<br />
•<br />
Page 37, USB Questions & Answers<br />
A<br />
eSATA<br />
off<br />
auto<br />
on<br />
TeChNICAl NOTe: To achieve Hi-Speed<br />
USB 2.0 transfer rates, you have to be connected<br />
to a Hi-Speed USB 2.0 port on your computer.<br />
Otherwise, you will be limited to USB 1.1 data<br />
transfer rates.<br />
B
<strong>LaCie</strong> d2 <strong>Quadra</strong><br />
Installing Your <strong>LaCie</strong> <strong>Hard</strong> <strong>Drive</strong><br />
Quadruple Interface <strong>Hard</strong> <strong>Drive</strong> page<br />
3.2.b. Connecting the FireWire 400 Interface Cable<br />
1.<br />
2.<br />
3.<br />
Connect the power supply cable (page 15) and turn<br />
on the <strong>LaCie</strong> d2 <strong>Quadra</strong> <strong>Hard</strong> <strong>Drive</strong> by flipping the<br />
power switch to ON or AUTO (drive powers on/<br />
hibernates automatically; available only for USB/<br />
FireWire connections).<br />
Connect the FireWire 400 cable into the FireWire<br />
400 port on the back of the <strong>LaCie</strong> d2 <strong>Quadra</strong> <strong>Hard</strong><br />
<strong>Drive</strong> (A).<br />
Attach the other end of the interface cable to an<br />
available FireWire 400 port on your computer (B).<br />
A<br />
FW4OO<br />
FW8OO FW8OO USB 2.O<br />
4 .Windows Users:<br />
You must format the drive before it will mount in<br />
your My Computer folder. See page 31, Formatting<br />
and Partitioning Your <strong>LaCie</strong> d2 <strong>Quadra</strong> <strong>Hard</strong> <strong>Drive</strong>,<br />
for more details.<br />
Mac Users:<br />
The drive is pre-formatted for Mac use and should<br />
appear on your desktop.<br />
TeChNICAl NOTe: For more information on<br />
FireWire connections, see the following pages:<br />
• Page 11, Cables and Connectors<br />
•<br />
Page 35, FireWire Questions & Answers<br />
eSATA<br />
off<br />
auto<br />
on<br />
TeChNICAl NOTe: For information on<br />
daisy-chaining using the FireWire interface, see<br />
page 20, Connecting Multiple Devices.<br />
B
<strong>LaCie</strong> d2 <strong>Quadra</strong><br />
Installing Your <strong>LaCie</strong> <strong>Hard</strong> <strong>Drive</strong><br />
Quadruple Interface <strong>Hard</strong> <strong>Drive</strong> page<br />
3.2.c. Connecting the FireWire 800 Interface Cable<br />
1.<br />
2.<br />
3.<br />
Connect the power supply cable (page 15) and turn<br />
on the <strong>LaCie</strong> d2 <strong>Quadra</strong> <strong>Hard</strong> <strong>Drive</strong> by flipping the<br />
power switch to ON or AUTO (drive powers on/<br />
hibernates automatically; available only for USB/<br />
FireWire connections).<br />
Connect the FireWire 800 cable into the FireWire<br />
800 port on the back of the <strong>LaCie</strong> d2 <strong>Quadra</strong> <strong>Hard</strong><br />
<strong>Drive</strong> (A).<br />
Attach the other end of the interface cable to an<br />
available FireWire 800 port on your computer (B).<br />
FW4OO<br />
FW8OO FW8OO USB 2.O<br />
4 .Windows Users:<br />
You must format the drive before it will mount in<br />
your My Computer folder. See page 31, Formatting<br />
and Partitioning Your <strong>LaCie</strong> d2 <strong>Quadra</strong> <strong>Hard</strong> <strong>Drive</strong>,<br />
for more details.<br />
Mac Users:<br />
The drive is pre-formatted for Mac use and should<br />
appear on your desktop.<br />
TeChNICAl NOTe: For more information on<br />
FireWire connections, see the following pages:<br />
• Page 12, Cables and Connectors<br />
•<br />
Page 35, FireWire Questions & Answers<br />
A B<br />
eSATA<br />
off<br />
auto<br />
on<br />
TeChNICAl NOTe: For information on<br />
daisy-chaining using the FireWire interface, see<br />
page 20, Connecting Multiple Devices.
<strong>LaCie</strong> d2 <strong>Quadra</strong><br />
Installing Your <strong>LaCie</strong> <strong>Hard</strong> <strong>Drive</strong><br />
Quadruple Interface <strong>Hard</strong> <strong>Drive</strong> page<br />
3.2.d. Connecting the eSATA Interface Cable<br />
1.<br />
2.<br />
3.<br />
4.<br />
Connect the power supply cable (page 15) and turn<br />
on the <strong>LaCie</strong> d2 <strong>Quadra</strong> <strong>Hard</strong> <strong>Drive</strong> by flipping the<br />
power switch to ON (the AUTO position is available<br />
only for USB/FireWire connections).<br />
If you plan to connect the eSATA interface cable to<br />
a <strong>LaCie</strong> eSATA PCI-X card port, make sure that<br />
the card has been installed completely and correctly.<br />
Refer to the card’s User Manual for details.<br />
Connect the eSATA cable into the eSATA port on<br />
the back of the <strong>LaCie</strong> d2 <strong>Quadra</strong> <strong>Hard</strong> <strong>Drive</strong> (A).<br />
Attach the other end of the interface cable to an<br />
available eSATA port on your computer (B).<br />
FW4OO<br />
FW8OO FW8OO USB 2.O<br />
4 .Windows Users:<br />
You must format the drive before it will mount in<br />
your My Computer folder. See page 31, Formatting<br />
and Partitioning Your <strong>LaCie</strong> d2 <strong>Quadra</strong> <strong>Hard</strong> <strong>Drive</strong>,<br />
for more details.<br />
Mac Users:<br />
The drive is pre-formatted for Mac use and should<br />
appear on your desktop.<br />
TeChNICAl NOTe: For more information on<br />
eSATA connections, see the following pages:<br />
• Page 13, Cables and Connectors<br />
•<br />
Page 39, eSATA Questions & Answers<br />
eSATA<br />
A<br />
off<br />
auto<br />
on<br />
B
<strong>LaCie</strong> d2 <strong>Quadra</strong><br />
Installing Your <strong>LaCie</strong> <strong>Hard</strong> <strong>Drive</strong><br />
Quadruple Interface <strong>Hard</strong> <strong>Drive</strong> page 0<br />
3.3. Connecting Multiple Devices<br />
With both FireWire 400 and FireWire 800 interfaces,<br />
it is possible to connect another hard drive or digital<br />
video camera directly to the <strong>LaCie</strong> d2 <strong>Quadra</strong> (this<br />
connection is called “daisy-chaining”).<br />
To daisy-chain devices, you must be using the same<br />
interface (FireWire). Your computer will not recognize<br />
the daisy-chained device if the interfaces are mixed, i.e. a<br />
FireWire device attached to a drive that is connected to<br />
the computer via the Hi-Speed USB 2.0 interface.<br />
1. Connect your <strong>LaCie</strong> d2 <strong>Quadra</strong>’s power supply and<br />
host computer interface by following the steps on<br />
page 15 and on 17 (FireWire 400) or 18 (FireWire<br />
800) (A/B).<br />
2. To attach a digital video camera*:<br />
a. Using the iLink/DV cable (sold separately), connect<br />
the 4-pin end of the cable to the 4-pin port on<br />
your digital camera.<br />
b. Connect the 6-pin end of the iLink/DV cable to<br />
the 6-pin FireWire port on the back of the <strong>LaCie</strong><br />
<strong>Hard</strong> drive (C).<br />
To attach a FireWire peripheral:<br />
a. Connect the FireWire 400 or 800 cable into<br />
an available FireWire 400 or 800 port on your<br />
FireWire peripheral.<br />
b. Attach the other end of the FireWire 400 or 800<br />
cable to an available FireWire 400 or 800 port on<br />
the <strong>LaCie</strong> d2 <strong>Quadra</strong> (C).<br />
3. The digital camera should now appear under My<br />
Computer (Windows users) or on the desktop (Mac<br />
users).<br />
A<br />
FW4OO<br />
FW8OO FW8OO USB 2.O<br />
eSATA<br />
off<br />
auto<br />
on<br />
C<br />
ImpOrTANT INfO: You can not have the<br />
FireWire and USB interfaces connected at the<br />
same time. If you would like to switch between<br />
interfaces, you must follow the steps on page 21,<br />
Switching Interfaces.<br />
■ Daisy-Chain Configurations<br />
•<br />
•<br />
•<br />
FireWire 400 device connected directly to the<br />
<strong>LaCie</strong> d2 <strong>Quadra</strong>, which is connected to the<br />
computer via the FireWire 800 port.<br />
iLink/DV device connected directly to the <strong>LaCie</strong><br />
d2 <strong>Quadra</strong>, which is connected to the computer<br />
via the FireWire 800 port.<br />
FireWire 800 device connected directly to the<br />
<strong>LaCie</strong> d2 <strong>Quadra</strong>, which is connected to the<br />
computer via the FireWire 800 port.<br />
TeChNICAl NOTe: When you daisy-chain<br />
using a mix of interfaces (FireWire 400 and<br />
FireWire 800) the resultant speed will be limited<br />
to the lowest common denominator (FireWire<br />
400 speeds).<br />
* Some cameras do not support this configuration or may<br />
downgrade your <strong>LaCie</strong> d2 <strong>Quadra</strong>’s performance<br />
B
<strong>LaCie</strong> d2 <strong>Quadra</strong><br />
Installing Your <strong>LaCie</strong> <strong>Hard</strong> <strong>Drive</strong><br />
Quadruple Interface <strong>Hard</strong> <strong>Drive</strong> page<br />
3.4. Disconnecting Your <strong>LaCie</strong> d2 <strong>Quadra</strong> <strong>Hard</strong> <strong>Drive</strong><br />
FireWire, eSATA and USB external devices feature<br />
“plug & play” connectivity, which means that your drive<br />
can be connected and disconnected while the computer<br />
is running. To prevent failures, however, it is important<br />
you follow these steps when disconnecting your <strong>LaCie</strong><br />
d2 <strong>Quadra</strong>.<br />
■ Windows Users<br />
1.<br />
2.<br />
3.<br />
From the System Tray (located in the lower<br />
right-hand side of your screen), click the Eject<br />
icon (a small green arrow over a hardware image).<br />
A message will appear, detailing the devices that<br />
the Eject icon controls, i.e. “Safely remove...”.<br />
Click on this prompt.<br />
You will be then given this message: “Safe to<br />
Remove <strong>Hard</strong>ware” (or similar). It is now safe to<br />
disconnect the device.<br />
3.5. Switching Interfaces<br />
FireWire, eSATA and USB external devices feature<br />
“plug & play” connectivity, which means that your drive<br />
can be connected and disconnected while the computer<br />
is running. To prevent failures, however, it is important<br />
to unmount your drive before switching interfaces.<br />
See chapter 3.4. Disconnecting Your <strong>LaCie</strong> d2 <strong>Quadra</strong><br />
<strong>Hard</strong> <strong>Drive</strong>, for the unmounting procedure.<br />
■ Mac Users<br />
1. Drag the hard drive icon to the trash.<br />
2. The drive can now be disconnected.
<strong>LaCie</strong> d2 <strong>Quadra</strong><br />
<strong>LaCie</strong> Shortcut Button<br />
Quadruple Interface <strong>Hard</strong> <strong>Drive</strong> page<br />
3.6. <strong>LaCie</strong> Shortcut Button<br />
The <strong>LaCie</strong> Shortcut Button allows you to use your<br />
<strong>LaCie</strong> hard drive to perform a variety of automated<br />
tasks on your computer. Instantly back up your work<br />
files with EMC® Retrospect® Express, open a family<br />
budget spreadsheet, or launch your most commonlyused<br />
applications simply by pushing the blue button on<br />
the front of your drive.<br />
<strong>LaCie</strong> Shortcut Button will help you to customize<br />
the Button to perform the action of your choice. Setup<br />
is easy – just install the software and push the Button on<br />
your <strong>LaCie</strong> hard drive to set up the button action.<br />
■ 3.6.1. Software Installation<br />
To install <strong>LaCie</strong> Shortcut Button and EMC Retrospect<br />
Express:<br />
1.<br />
Insert the installation CD into your computer’s<br />
CD-ROM drive.<br />
2. Double-click the CD icon.<br />
3. Follow the on-screen instructions.<br />
❖<br />
❖<br />
Mac Users<br />
EMC Retrospect Express is installed in the<br />
Applications folder.<br />
<strong>LaCie</strong> Shortcut Button appears in System<br />
Preferences (see section 3.6.3, Changing Button<br />
Settings).<br />
TEChnICal noTE: eSATA bus is not compatible<br />
with <strong>LaCie</strong> Shortcut Button. To use <strong>LaCie</strong><br />
Shortcut Button, connect your <strong>LaCie</strong> hard drive to<br />
your computer via USB or FireWire.<br />
IMporTanT InFo: For instructions on using<br />
EMC Retrospect Express, please see the EMC<br />
Retrospect Express user manual, installed with the<br />
application.<br />
TEChnICal noTE: EMC Retrospect Express<br />
and <strong>LaCie</strong> Shorcut Button must be uninstalled<br />
separately. Uninstalling EMC Retrospect<br />
Express does not uninstall <strong>LaCie</strong> Shortcut Button.<br />
Windows Users<br />
TEChnICal noTE: eSATA bus is not compatible<br />
with <strong>LaCie</strong> Shortcut Button. To use <strong>LaCie</strong><br />
❖Shortcut<br />
EMC Button, Retrospect connect Express your <strong>LaCie</strong> is installed hard drive in to<br />
your C:/Program computer Files. via USB or FireWire.<br />
❖<br />
<strong>LaCie</strong> Shortcut Button appears in the Control<br />
Panel (see section 3.6.3, Changing Button Settings).
<strong>LaCie</strong> d2 <strong>Quadra</strong><br />
<strong>LaCie</strong> Shortcut Button<br />
Quadruple Interface <strong>Hard</strong> <strong>Drive</strong> page<br />
■ 3.6.2. Setup<br />
You can set up the Button to automatically back up<br />
data from your computer to your <strong>LaCie</strong> hard drive or to<br />
perform a custom action.<br />
1.<br />
2.<br />
Make sure your <strong>LaCie</strong> hard drive is connected to your<br />
computer and turned on and then push the button on<br />
the front of the drive. The <strong>LaCie</strong> Shortcut Button<br />
Welcome screen appears. Click OK.<br />
The <strong>LaCie</strong> Shortcut Button main window opens. See<br />
Fig. 3.6.2.A (Mac) and 3.6.2.B (Windows).<br />
■ Mac Interface<br />
Fig. 3.6.2.A<br />
<strong>Drive</strong> List – Displays all compatible <strong>LaCie</strong> drives<br />
currently connected to your computer.<br />
Settings and Information – Displays and modifies<br />
<strong>LaCie</strong> Shortcut Button preferences for the selected<br />
drive. Also displays drive information.<br />
Show in system tray – Check this box to display<br />
the <strong>LaCie</strong> Shortcut Button icon in the system tray<br />
(Windows only).<br />
IMporTanT InFo: Pushing the button<br />
launches setup only once. After setup, pushing the<br />
button will launch the action you specify in setup.<br />
■ Windows Interface<br />
Fig. 3.6.2.B
<strong>LaCie</strong> d2 <strong>Quadra</strong><br />
<strong>LaCie</strong> Shortcut Button<br />
Quadruple Interface <strong>Hard</strong> <strong>Drive</strong> page<br />
■ Set up EMC Retrospect Express<br />
3.<br />
4.<br />
5.<br />
Select the drive you want to modify from the drive<br />
list.<br />
“EMC Retrospect Express” is selected by default.<br />
Click OK. See A in Fig. 3.6.2.C and 3.6.2.D.<br />
EMC Retrospect Express launches. Use EMC Retrospect<br />
Express to make settings for the backup you<br />
want to perform each time you push the <strong>LaCie</strong> Button.<br />
After you have configured EMC Retrospect Express,<br />
each time you push the Button, EMC Retrospect<br />
Express will automatically perform the backup operation<br />
specified in setup. To change the backup operation,<br />
launch EMC Retrospect Express and change settings.<br />
■ Set up a Custom Action<br />
3.<br />
4.<br />
5.<br />
6.<br />
Select the drive you want to modify from the drive<br />
list.<br />
To use a custom action, click the “Please choose a<br />
custom action...” radio button. See B in Fig. 3.6.2.C<br />
and 3.6.2.D.<br />
Click the Choose... button and navigate to the application,<br />
document or script you want to launch<br />
with the Button. Click Open.<br />
A new icon and name are displayed for the selected<br />
application, document or script. Click Apply. Click<br />
OK.<br />
■ Disable the Button<br />
3.<br />
4.<br />
Select the drive you want to modify from the drive<br />
list.<br />
To disable the Button for this drive, select “No action.”<br />
See C in Fig. 3.6.2.C amd 3.6.2. D.<br />
Windows users, if the system tray icon is activated,<br />
the alert in Fig. 3.6.2.E will appear when the button is<br />
pushed.<br />
IMporTanT InFo: Please consult the EMC<br />
Retrospect Express user manual for informations<br />
on creating and modifying backups.<br />
Fig. 3.6.2.C<br />
Fig. 3.6.2.D<br />
Fig. 3.6.2.E
<strong>LaCie</strong> d2 <strong>Quadra</strong><br />
<strong>LaCie</strong> Shortcut Button<br />
Quadruple Interface <strong>Hard</strong> <strong>Drive</strong> page<br />
■ 3.6.3. Changing Button Settings<br />
■ Mac Users<br />
To change the action assigned to a Button, open<br />
<strong>LaCie</strong> Shortcut Button by clicking on the <strong>LaCie</strong> Shortcut<br />
Button icon in System Preferences (Apple Menu ><br />
System Preferences…). See Fig. 3.6.3.A.<br />
Select the Settings tab and follow the instructions in<br />
section 3.6.2 beginning with step 3 of the type of action<br />
you want to activate.<br />
■ Windows Users<br />
To change the action assigned to a Button, open<br />
<strong>LaCie</strong> Shortcut Button by clicking on the <strong>LaCie</strong> Shortcut<br />
Button icon in the Control Panel (Start > Settings ><br />
Control Panel). See Fig. 3.6.3.B.<br />
Select the Settings tab and follow the instructions in<br />
section 3.6.2 beginning with step 3 of the type of action<br />
you want to activate.<br />
Fig. 3.6.3.A<br />
Fig. 3.6.3.B
<strong>LaCie</strong> d2 <strong>Quadra</strong><br />
<strong>LaCie</strong> Shortcut Button<br />
Quadruple Interface <strong>Hard</strong> <strong>Drive</strong> page<br />
■ 3.6.4. <strong>Drive</strong> Detection<br />
At launch, <strong>LaCie</strong> Shortcut Button will search for<br />
<strong>LaCie</strong> Shortcut Button-compatible drives and display<br />
them in the drive list. See A in Fig. 3.6.4.A (Mac) and<br />
3.6.4.B (Windows).<br />
If no drives can be detected on the USB or FireWire<br />
bus, the list will display “No drives connected.” See B in<br />
Fig. 3.6.4.A (Mac) and 3.6.4.B (Windows). Check your<br />
drive’s connections and make sure it is turned on. If the<br />
problem persists, see section 4, Troubleshooting.<br />
Fig. 3.6.4.A<br />
TEChnICal noTE: eSATA bus is not compatible<br />
with <strong>LaCie</strong> Shortcut Button. To use <strong>LaCie</strong><br />
Shortcut Button, connect your <strong>LaCie</strong> hard drive to<br />
your computer via USB or FireWire.<br />
Fig. 3.6.4.B
<strong>LaCie</strong> d2 <strong>Quadra</strong><br />
<strong>LaCie</strong> Shortcut Button<br />
Quadruple Interface <strong>Hard</strong> <strong>Drive</strong> page<br />
■ Windows Connection Alerts<br />
Windows Users Only:<br />
The <strong>LaCie</strong> Shortcut Button icon in the system tray<br />
displays a connection message when a button-enabled<br />
<strong>LaCie</strong> drive is connected or disconnected from the<br />
computer. See Fig. 3.6.4.C.<br />
To remove the <strong>LaCie</strong> Shortcut Button icon from the<br />
system tray, uncheck the “Show in system tray” check<br />
box on the <strong>LaCie</strong> Shortcut Button main window. See<br />
Fig. 3.6.4.D.<br />
Fig. 3.6.4.C<br />
Fig. 3.6.4.D
<strong>LaCie</strong> d2 <strong>Quadra</strong><br />
<strong>LaCie</strong> Shortcut Button<br />
Quadruple Interface <strong>Hard</strong> <strong>Drive</strong> page<br />
■ 3.6.5. Information<br />
The Information tab of <strong>LaCie</strong> Shortcut Button displays<br />
basic details of the drive selected in the drive list.<br />
Items on the Information tab are not editable. See Fig.<br />
3.6.5.A (Mac) and 3.6.5.B (Windows).<br />
■ 3.6.6. Updates<br />
The software version number of the <strong>LaCie</strong> Shortcut<br />
Button is displayed below the drive list. To search for<br />
new updates, go to www.lacie.com/support.<br />
Fig. 3.6.5.A<br />
Fig. 3.6.5.B<br />
Fig. 3.6.6
<strong>LaCie</strong> d2 <strong>Quadra</strong><br />
<strong>LaCie</strong> Shortcut Button<br />
Quadruple Interface <strong>Hard</strong> <strong>Drive</strong> page<br />
■ 3.6.7. Troubleshooting – Mac<br />
Problem Solution<br />
<strong>Drive</strong> is connected, but<br />
“No drives connected”<br />
message appears in the<br />
drive list.<br />
Nothing happens when<br />
the button is pushed.<br />
“The action [“action<br />
name”] can’t be launched”<br />
error message when the<br />
button is pushed.<br />
■ 3.6.8. Troubleshooting – Windows<br />
Check both ends of the FireWire or USB cable to make sure they are fully seated in their<br />
respective ports. Try disconnecting the cables, waiting 10 seconds, and then reconnecting<br />
them. If the drive is still not recognized, restart your computer and try again.<br />
noTE: eSATA bus is not compatible with <strong>LaCie</strong> Shortcut Button. To use <strong>LaCie</strong> Shortcut<br />
Button, connect your <strong>LaCie</strong> hard drive to your computer via USB or FireWire.<br />
Make sure the drive is connected to your computer. See above.<br />
Launch <strong>LaCie</strong> Shortcut Button from System Preferences.<br />
❖ Make sure the drive appears in the drive list.<br />
❖<br />
Problem Solution<br />
<strong>Drive</strong> is connected, but<br />
“No drives connected”<br />
message appears in the<br />
drive list.<br />
Nothing happens when<br />
the button is pushed.<br />
“File not found. Renew<br />
custom action selection.”<br />
error message when the<br />
button is pushed.<br />
Make sure that the “No action” button is off. If it is on, select the EMC Retrospect Express<br />
action or a custom action.<br />
If the application, document or script you defined as the custom action has been moved<br />
from its location at the time you defined the action, <strong>LaCie</strong> Shortcut Button will not be able<br />
to locate or launch it. Either redefine the action by clicking Choose... to select the application,<br />
document or script in its new location or return it to its original location.<br />
Check both ends of the FireWire or USB cable to make sure they are fully seated in their<br />
respective ports. Try disconnecting the cables, waiting 10 seconds, and then reconnecting<br />
them. If the drive is still not recognized, restart your computer and try again.<br />
noTE: eSATA bus is not compatible with <strong>LaCie</strong> Shortcut Button. To use <strong>LaCie</strong> Shortcut<br />
Button, connect your <strong>LaCie</strong> hard drive to your computer via USB or FireWire.<br />
Make sure the drive is connected to your computer. See above.<br />
Launch the <strong>LaCie</strong> Shortcut Button by double-clicking on the <strong>LaCie</strong> Shortcut Button<br />
system tray icon or from Control Panel > <strong>LaCie</strong> Shortcut Button.<br />
❖ Make sure the drive appears in the drive list.<br />
❖<br />
Make sure that the “No action” button is off. If it is on, select the EMC Retrospect Express<br />
action or a custom action.<br />
If the application, document or script you defined as the custom action has been moved<br />
from its location at the time you defined the action, <strong>LaCie</strong> Shortcut Button will not be able<br />
to locate or launch it. Redefine the action by clicking Choose... to select the application,<br />
document or script in its new location.
<strong>LaCie</strong> d2 <strong>Quadra</strong><br />
Helpful Information<br />
Quadruple Interface <strong>Hard</strong> <strong>Drive</strong> page 0<br />
4. Helpful Information<br />
Your <strong>LaCie</strong> d2 <strong>Quadra</strong> <strong>Hard</strong> <strong>Drive</strong> is formatted in<br />
HFS+. This is the most efficient format for use with your<br />
Mac. If you would like to share this hard drive with PC<br />
users, you will have to reformat your <strong>LaCie</strong> d2 <strong>Quadra</strong><br />
<strong>Hard</strong> <strong>Drive</strong>.<br />
■ What is Formatting?<br />
Formatting a disk consists of the following: the operating<br />
system erases all of the bookkeeping information<br />
on the disk, tests the disk to make sure that all of<br />
the sectors are reliable, marks bad sectors (i.e., those that<br />
are scratched) and creates internal address tables that it<br />
later uses to locate information.<br />
■ File System Formats<br />
There are essentially three different file system formats:<br />
NTFS, FAT 32, and Mac OS Extended (HFS+).<br />
See the following chart for more information.<br />
Use NTFS if... Use HFS+ if...<br />
...you will be using the drive only under Windows 2000 or Windows<br />
XP (performance will generally be greater when compared<br />
to FAT 32). This file system is compatible in read only mode<br />
with Mac OS 10.3 and higher.<br />
Use FAT 32 if...<br />
...you will be using your drive between both Windows and Mac<br />
OS 9.x or 10.x; or sharing the drive between Windows 2000, XP,<br />
and 98 SE. Maximum single file size: 4GB.<br />
■ Partitioning Your <strong>LaCie</strong> d2 <strong>Quadra</strong> <strong>Hard</strong> <strong>Drive</strong><br />
After you’ve formatted the drive, you will have the<br />
opportunity to divide the hard drive into sections, called<br />
partitions. A partition is a section of the hard drive’s<br />
storage capacity that is created to contain files and data.<br />
For instance, you could create three partitions on your<br />
drive: one partition for your Office documents, one for<br />
your backup, and one for your multimedia files.<br />
TeChNICAl NOTe: FAT 32 is recommended<br />
for sharing a hard drive with Windows<br />
98 SE and Mac OS users. However<br />
keep in mind that the FAT 32 format will<br />
slow down your hard drive and single file<br />
size is limited to 4 GB.<br />
...you will be using the drive on Macs only; performance will<br />
generally be greater when compared to FAT 32. This file system<br />
is NOT compatible with Windows OS.<br />
For more information, please refer to page 31, Formatting And<br />
Partitioning Your <strong>LaCie</strong> <strong>Hard</strong> <strong>Drive</strong>.
<strong>LaCie</strong> d2 <strong>Quadra</strong><br />
Helpful Information<br />
Quadruple Interface <strong>Hard</strong> <strong>Drive</strong> page<br />
4.1. Formatting and Partitioning Your <strong>LaCie</strong> d2 <strong>Quadra</strong> <strong>Hard</strong> <strong>Drive</strong><br />
Once you have setup your <strong>LaCie</strong> d2 <strong>Quadra</strong> <strong>Hard</strong><br />
<strong>Drive</strong>, you can reformat it to suit your needs.<br />
■ Windows Users<br />
Windows 2000 and XP – Use the Disk Management<br />
Utility, which is native to the operating system.<br />
Formatting Using Windows 2000 and Windows XP<br />
The process of formatting a drive on a computer<br />
running Windows 2000 or Windows XP consists of<br />
two steps: (1) installing a signature on the drive, and<br />
(2) formatting the drive. These steps will erase anything<br />
that is on the disk.<br />
1.<br />
Connect the drive to the computer via the interface<br />
port.<br />
2. Right click My Computer and click Manage.<br />
3.<br />
4.<br />
5.<br />
6.<br />
7.<br />
From the Computer Management window, select<br />
Disk Management (located below the Storage<br />
group).<br />
If the Initialize and Convert Disk Wizard window<br />
appears, click Cancel.<br />
Windows will list the hard drives that are installed<br />
on the system. Locate the drive that is represented<br />
by the icon. Right click the icon and select<br />
Initialize.<br />
In the box to the right that says Unallocated, right<br />
click and select New Partition...<br />
In the first page of the New Partition Wizard, click<br />
Next.<br />
Disk management utility<br />
Disk management utility
<strong>LaCie</strong> d2 <strong>Quadra</strong><br />
Helpful Information<br />
Quadruple Interface <strong>Hard</strong> <strong>Drive</strong> page<br />
8. Click Next.<br />
9. Click Next.<br />
10. Click Next.<br />
11. Click Next.<br />
12. In this window, you have the option of selecting the<br />
Quick Format option. This allows a much faster<br />
format; however, this will disallow Disk Management<br />
to check the drive for errors (recommended).<br />
Click Next.<br />
13. Click Finish to begin the format process.<br />
14. Your drive is ready for use and should now appear in<br />
your My Computer.<br />
ImpOrTANT INfO: Please refer to page 30,<br />
Helpful Information, for a more detailed comparison<br />
of the various file system formats.<br />
Disk management utility<br />
Disk management utility<br />
(drive ready for use)
<strong>LaCie</strong> d2 <strong>Quadra</strong><br />
Helpful Information<br />
Quadruple Interface <strong>Hard</strong> <strong>Drive</strong> page<br />
■ Mac Users<br />
Mac OS 10.x will use the Apple Disk Utility application,<br />
which is native to the operating system.<br />
Formatting Using Mac OS 10.x<br />
1. Connect the drive to the computer via one of its interfaces<br />
and turn on the drive by pressing the blue<br />
button.<br />
2. Go to the Menu Bar, and open Go.<br />
3. From the Go menu, click on Applications.<br />
4.<br />
5.<br />
6.<br />
7.<br />
8.<br />
9.<br />
In the Applications menu, open the Utilities folder,<br />
and then double-click Disk Utility from the Utilities<br />
folder.<br />
The Disk Utility window will open. In the left side<br />
of the window will be a list of the available hard disk<br />
drives. You should see a volume that represents your<br />
internal hard drive, and one labeled <strong>LaCie</strong> <strong>Hard</strong><br />
<strong>Drive</strong>.<br />
From the Volume Scheme: button, choose the number<br />
of partitions you want to divide the drive into by<br />
clicking on the pull down menu starting with Current<br />
(Mac OS 10.x gives you the option of dividing<br />
the drive into at most 8 partitions). You can customize<br />
the size of the partitions by using the slide bar<br />
between the partitions in the Volume Scheme: area.<br />
In the Volume Information section, create a name<br />
for each partition, choose the volume format (Mac<br />
OS Extended, Mac OS Standard or UNIX File System)<br />
and the volume size.<br />
Once you have finalized the volume format, number<br />
of partitions, size and options, click OK. The following<br />
message will appear: Warning! Saving the new<br />
volume will erase all existing volumes. This can<br />
NOT be undone. Are you sure you want to do that?<br />
Click Partition to continue.<br />
Mac OS 10.x will automatically setup the disk with<br />
the partitions and volume format you selected, and<br />
your new drive will be available for use.<br />
ImpOrTANT INfO: Following these<br />
steps will erase anything that is on the hard<br />
drive. Therefore, if you have information<br />
that you want to protect or continue to use,<br />
backup this information before performing<br />
these steps.<br />
Disk management utility (Mac)<br />
ImpOrTANT INfO: Please refer to<br />
page 30, Helpful Information, for a more<br />
detailed comparison of the various file system<br />
formats.<br />
ImpOrTANT INfO: Apple recommends<br />
that unless you have a specific reason<br />
to use the UNIX File System (UFS), you<br />
should use the Mac OS Extended format<br />
since it provides a more familiar experience<br />
to Macintosh users.
<strong>LaCie</strong> d2 <strong>Quadra</strong><br />
Helpful Information<br />
Quadruple Interface <strong>Hard</strong> <strong>Drive</strong> page<br />
4.2. Interface Comparisons<br />
Deciding which interface to use, whether it be Hi-<br />
Speed USB 2.0, FireWire 400, FireWire 800 or eSATA<br />
can be a complicated decision. Depending on the inter-<br />
Computer With only USB 1.1 Ports<br />
Computer With Hi-Speed USB 2.0, FireWire 400 And FireWire 800 Ports<br />
faces your computer has, your decision should be based<br />
on the following:<br />
If your computer is only equipped with a USB port, your decision is fairly simple: connect via the USB cable provided<br />
with your drive. Hi-Speed USB 2.0 is backward compatible and can be used in USB 1.1 ports. Again, you will be limited<br />
to USB 1.1 speeds and performance.<br />
Computer With Hi-Speed USB 2.0 and FireWire 400 Ports<br />
If your computer is equipped with a Hi-Speed USB 2.0 port and a FireWire port, you will get noticeably better performance<br />
by using the FireWire connection. Compared to Hi-Speed USB 2.0, FireWire has higher sustained data transfer<br />
rates, a feature especially important for audio and video editors. Also, Hi-Speed USB 2.0 will not allow you to daisy-chain<br />
multiple hard drives to your computer.<br />
If your computer is equipped with these three interfaces, you have several options to consider. The key decision in this<br />
equation is, again, speed. FireWire 800 effectively offers twice the bandwidth of both Hi-Speed USB 2.0 and FireWire<br />
400. So, if you are running bandwidth-intensive applications, such as digital audio, video or graphics, FireWire 800 is your<br />
clear choice.<br />
Computer With Above Interfaces Plus eSATA Ports<br />
In a single drive configuration, eSATA and FireWire 800 connections will provide similar transfer rates for your d2<br />
<strong>Quadra</strong>. FireWire 800, however, allows for longer interface cables and offers the possibility of daisy-chaining with other<br />
FireWire devices. The advantage eSATA has over FireWire 800 is that, when several d2 drives are connected to your<br />
computer in a RAID0 configuration, FireWire 800 will limit the connection to 100MB/s, while eSATA 1.5Gbits/s can<br />
theoretically transfer at up to 150 MB/s. See chapter 7. eSATA Questions and Answers, for more information.<br />
Another alternative is to purchase a FireWire 400,<br />
FireWire 800, Hi-Speed USB 2.0 or eSATA host<br />
adapter card that you would install into a PCI, PCI-X<br />
or PCI-Express slot on your computer, thereby allowing<br />
your computer to take advantage of the performances<br />
that these interfaces have to offer. Contact your <strong>LaCie</strong><br />
reseller or <strong>LaCie</strong> Customer Support for information<br />
about PCI, PC, PCI-X or PCI-Express Cards, or visit<br />
our website: www.lacie.com.
<strong>LaCie</strong> d2 <strong>Quadra</strong><br />
FireWire Questions & Answers<br />
Quadruple Interface <strong>Hard</strong> <strong>Drive</strong> page<br />
5. FireWire Questions & Answers<br />
■ What Does IEEE 1394 Mean?<br />
IEEE (the Institute of Electrical and Electronics<br />
Engineers) refers to the engineering corps that developed<br />
the 1394th standard, defining the high-performance<br />
serial input/output (I/O) bus used to connect<br />
peripheral devices. There are now two standards:<br />
IEEE 1394a, which refers to the original standard<br />
adopted in 1995, and IEEE 1394b, which refers to the<br />
new standard, adopted in 2002.<br />
■<br />
•<br />
•<br />
•<br />
•<br />
What Is The Relationship Between IEEE<br />
1394, FireWire, iLink And DV?<br />
These four names all refer to the same interface:<br />
IEEE 1394 is the term commonly used in the computer<br />
industry.<br />
FireWire is the brand name used by Apple.<br />
iLink is the brand name used by Sony for both consumer<br />
electronics and personal computers.<br />
DV is short for “Digital Video,” and is used as the<br />
logo for the interface on most video camcorders.<br />
■ What Are The FireWire Interface Benefits?<br />
The FireWire interface is a fast, cross-platform serial<br />
bus, and is ideal for digital audio, video and graphic<br />
applications that demand plenty of bandwidth. Both<br />
versions of FireWire offer Plug & Play connectivity, so<br />
all you have to do is plug in your drive and you’re ready<br />
to go. They also allow up to 63 devices to be connected<br />
via a single bus and offer peer-to-peer connectivity,<br />
enabling multiple computers and FireWire devices to<br />
be connected at the same time. FireWire also supports<br />
both isochronous and asynchronous capabilities, meaning<br />
that it can guarantee real-time data delivery, so there<br />
is no danger of inaccurately ordered or delayed frames.<br />
■<br />
What Is The Difference Between FireWire<br />
400 And FireWire 800?<br />
Essentially, the main difference between the two interfaces<br />
is speed. FireWire 800 effectively doubles the<br />
bandwidth of the original FireWire 400 interface. The<br />
new FireWire 800 interface offers truly impressive results,<br />
with speeds up to 800Mb/s for a single bus, and<br />
even greater for several buses in RAID 0 configurations.<br />
Other key advancements include the support of increased<br />
cabling distances and a newly enhanced arbitration<br />
architecture.<br />
Utilizing cables constructed of professional-grade<br />
glass optical fiber, when both devices are connected via<br />
a FireWire 800 hub, FireWire 800 can burst data across<br />
100 meters of cable.<br />
The new arbitration scheme greatly improves on the<br />
existing architecture by incorporating advanced 8B10B<br />
data encoding (based on codes used by Gigabit Ethernet<br />
and Fibre Channel), which reduces signal distortion,<br />
and also improves the arbitration time by prepping the<br />
arbitration while the current data packet is being sent,<br />
so that data is sent as soon as the current transmission<br />
is completed.<br />
■ What Are The Ideal Uses For FireWire?<br />
FireWire helped fuel a revolution for digital content<br />
creators, and was awarded a 2001 Primetime Emmy Engineering<br />
Award by the Academy of Television Arts &<br />
Sciences for its contribution. Due to its high bandwidth<br />
and support of both isochronous and asynchronous data<br />
delivery, FireWire has found a very successful place in<br />
both the computer and consumer electronics industries.<br />
Whether connecting game consoles, personal video<br />
recorders, home stereo equipment, digital TVs, hard<br />
drives, CD/DVD-RW drives, printers, scanners, tape
<strong>LaCie</strong> d2 <strong>Quadra</strong><br />
FireWire Questions & Answers<br />
Quadruple Interface <strong>Hard</strong> <strong>Drive</strong> page<br />
drives or other digital hardware equipment, FireWire is<br />
well suited to handle all these requirements.<br />
For those working with digital video, the new standard<br />
will enable new bandwidth-intensive applications,<br />
such as multiple-stream, uncompressed, standard-definition<br />
video.<br />
■<br />
Will FireWire 400 Devices Run Faster When<br />
Connected To A FireWire 800 Port?<br />
Unfortunately, this is not the case. In order to attain<br />
FireWire 800 speeds, both the device and port have<br />
to be FireWire 800 enabled. For instance, an external<br />
hard drive with a FireWire 800 9-pin connection will<br />
only reach FireWire 800 transfer rates when it is connected<br />
to a FireWire 800 9-pin host bus adapter card<br />
via a properly certified FireWire 800 9-pin to 9-pin beta<br />
cable.<br />
When a FireWire 400 device is connected to a<br />
FireWire 800 port, the FireWire 400 device will only<br />
operate at the original FireWire 400 speeds.<br />
■<br />
Will FireWire 800 Devices Work On<br />
FireWire 400 Ports And Vice Versa?<br />
The new standard was designed to be backwards<br />
compatible, meaning that FireWire 800 devices will still<br />
operate via the original FireWire 400 port. However,<br />
to connect a FireWire 800 device to a FireWire 400<br />
port, a specific adapter cable must be used. Two types of<br />
FireWire 400 ports exist: 6-pin and 4-pin. For FireWire<br />
800 devices to work, they must be connected by placing<br />
the 9-pin end of the FireWire cable into the FireWire<br />
800 port of the device, and the opposite 6-pin or 4-pin<br />
end into the FireWire 400 port.<br />
The same holds true for FireWire 400 devices being<br />
connected to a FireWire 800 host port. The 4-pin or 6pin<br />
end of the FireWire cable must be connected to the<br />
FireWire 400 port of the device, and the 9-pin end must<br />
be connected to the FireWire 800 port.<br />
When FireWire 400 and FireWire 800 devices are<br />
mixed, all transfer rates revert to the original FireWire<br />
400 speed.<br />
■<br />
What Do I Do If My Computer Does Not<br />
Have A FireWire Port?<br />
Most computers manufactured today incorporate<br />
at least one FireWire port. If your computer does not<br />
have a native port, you can install one by adding a PCI<br />
or PCMCIA host bus adapter card. Please contact your<br />
computer supply specialist for a specific card that will<br />
work with your system.<br />
For more information about PCI cards, please visit:<br />
www.lacie.com/addons
<strong>LaCie</strong> d2 <strong>Quadra</strong><br />
USB Questions & Answers<br />
Quadruple Interface <strong>Hard</strong> <strong>Drive</strong> page<br />
6. USB Questions & Answers<br />
■ What Are The USB Interface Benefits?<br />
•<br />
•<br />
•<br />
•<br />
•<br />
■<br />
Cross-platform: Use your USB peripherals on both<br />
Mac and Windows platforms.<br />
“Hot Swappable”: No need to shut down or restart<br />
your computer when adding or removing a USB device.<br />
Plug it in and it’s ready to use.<br />
Automatic configuration: Once your device is connected,<br />
your computer recognizes the device and automatically<br />
configures the necessary software.<br />
Daisy-Chaining: with USB ports on your computer,<br />
you can connect up to 127 peripherals using hubs.<br />
Easy Installation: One standardized port and plug<br />
combination makes it simple to connect.<br />
What Is The Difference Between USB And<br />
Hi-Speed USB 2.0?<br />
The main difference is speed. The original version<br />
of the interface is capable of throughput up to<br />
12Mb/s. Hi-Speed USB 2.0 supports data speeds up to<br />
480 Mb/s, making it 40 times faster than its predecessor.<br />
This increased bandwidth translates into higher performance<br />
in demanding applications requiring high transfer<br />
rates.<br />
■ What Are The Ideal Uses For USB?<br />
USB is perfect for more traditional connections such<br />
as keyboards, mice, joysticks and scanners. These types<br />
of devices don’t require fast data transfer rates, and operate<br />
very successfully at the slower speeds.<br />
■<br />
What Are The Ideal Applications For<br />
Hi-Speed USB 2.0?<br />
Digital cameras, CD/DVD drives, hard drives and<br />
scanners will all benefit from the added bandwidth and<br />
performance gains of the new implementation of the<br />
USB standard. Hi-Speed USB 2.0 provides the necessary<br />
fast data transfer rates that today’s devices require,<br />
and combines the earlier specifications so older devices<br />
that operated under the original USB standards will still<br />
work with Hi-Speed USB 2.0.<br />
■<br />
Will USB Devices Run Faster When Connected<br />
To A Hi-Speed USB 2.0 Bus?<br />
Unfortunately, no. The Hi-Speed USB 2.0 specification<br />
is specifically written to allow developers to design<br />
higher speed peripherals that can take advantage of the<br />
extra bandwidth. USB devices, though, will still operate<br />
at 12Mb/s at full-speed and 1.5Mb/s at low-speed on a<br />
Hi-Speed USB 2.0 bus. Even though USB devices won’t<br />
run any faster, they can work alongside Hi-Speed USB<br />
2.0 devices on the same bus. However, if you plug in a<br />
Hi-Speed USB 2.0 device to a USB bus, the speed of<br />
the Hi-Speed USB 2.0 device will decrease to 12Mb/s.<br />
■ What Is A USB Hub?<br />
Technically, you can connect up to 127 devices to a<br />
single USB bus. For more than two devices, though, you<br />
must make new connections using a peripheral called<br />
a “hub.” A hub, which you hook up directly to a USB<br />
connector on your computer, usually has 4 or 7 output<br />
connections enabling you to connect the same number<br />
of peripherals. One of the hub’s main functions is to regenerate<br />
signals that lose strength as they are transmitted<br />
via the USB cable. By connecting yet another hub to<br />
a connector on the existing hub, you can then plug in a<br />
new set of peripherals etc, up to a maximum of 127.<br />
Some hubs have no power supply and others are<br />
self-powered. When you choose a hub, opt for the selfpowered<br />
variety, as they have their own AC adapter.<br />
The most powerful hubs provide 0.5A of power to each
<strong>LaCie</strong> d2 <strong>Quadra</strong><br />
USB Questions & Answers<br />
Quadruple Interface <strong>Hard</strong> <strong>Drive</strong> page<br />
port.<br />
If you buy a hub, make sure that it supports per-port<br />
switching. This function prevents the entire chain of peripherals<br />
from freezing up if one of them is not working<br />
properly or is down.<br />
■<br />
Will Hi-Speed USB 2.0 Devices Work On<br />
USB Hubs And Vice Versa?<br />
You can use your Hi-Speed USB 2.0 devices with<br />
USB hubs, but the peripherals will be limited to USB<br />
performance levels.<br />
There are Hi-Speed USB 2.0 hubs that are able to<br />
communicate in three modes: high-speed (480Mb/s),<br />
full-speed (12Mb/s), and low-speed (1.5Mb/s). Hi-<br />
Speed USB 2.0 is backwards compatible, so you will<br />
be able to connect USB devices to Hi-Speed USB 2.0<br />
hubs; however, the USB devices will still maintain their<br />
normal performance levels (i.e. 12 Mb/s).<br />
In order to achieve the fast data transfer rates of Hi-<br />
Speed USB 2.0, you must connect your Hi-Speed USB<br />
2.0 device directly to a Hi-Speed USB 2.0 port on either<br />
a computer or hub.<br />
For more information about the USB interface,<br />
please visit: www.lacie.com/technologies<br />
•<br />
•<br />
TeChNICAl NOTe:<br />
Avoid using USB connectors found on certain peripherals<br />
such as keyboards. These are passive (or<br />
passthrough) connectors that lead to power loss<br />
and unstable operation.<br />
Only use USB cables shorter than 5 meters (approximately<br />
15 feet). Using longer cables may<br />
cause the peripherals to malfunction due to excessive<br />
reduction in electrical signal strength.
<strong>LaCie</strong> d2 <strong>Quadra</strong><br />
eSATA Questions & Answers<br />
Quadruple Interface <strong>Hard</strong> <strong>Drive</strong> page<br />
7. eSATA Questions & Answers<br />
■ What is eSATA?<br />
Your <strong>LaCie</strong> d2 <strong>Quadra</strong> <strong>Hard</strong> <strong>Drive</strong> uses the latest<br />
in SATA technology, allowing interface (or bus) transfer<br />
rates of up to 1.5Gb/s. SATA technology was originally<br />
developed to serve as an internal interface, delivering<br />
improved performance to internal connections. Soon<br />
after, eSATA, a connector that can be used for SATA I<br />
as well as SATA II, was developed, allowing for the use<br />
of shielded cables outside the PC.<br />
eSATA technology was developed to be rugged and<br />
durable. eSATA connectors do not have the “L” shaped<br />
design of other SATA connectors. In addition, the guide<br />
features are vertically offset and reduced in size to prevent<br />
the use of unshielded internal cables in external applications.<br />
Initial Serial ATA technology removed the performance<br />
bottleneck of the Parallel ATA specification, and<br />
follows a clearly defined road map to greater and greater<br />
data transfer rates and feature improvements.<br />
Deriving its name from the way that it transmits<br />
signals, in a single stream, or serially, Serial ATA operates<br />
in a point-to-point topology. This connectivity<br />
methodology delivers the entire available interface<br />
bandwidth to each device, allowing each device to operate<br />
at its maximum throughput, and provides direct<br />
communication between the device and the system at<br />
any time, reducing arbitration delays associated with<br />
shared bus topologies.<br />
■<br />
What are the key differences between SATA I<br />
and SATA II technology?<br />
For single drive configurations, SATA I, SATA II<br />
and FireWire 800 will have about the same performance.<br />
However, in a RAID0 configuration, SATA I and SATA<br />
II will allow faster transfer rates than FireWire 800,<br />
which may limit transfer rates.<br />
■<br />
What are the features and benefits of Serial<br />
ATA and Serial ATA II?<br />
The Serial ATA specification provides several key<br />
features that will help spur widespread implementation:<br />
•<br />
•<br />
•<br />
•<br />
•<br />
•<br />
Performance: Serial ATA is a point-to-point topology,<br />
and does not have to share the bus, instead dedicating<br />
full bandwidth to the device. These dedicated<br />
links make creating a Serial ATA RAID array quick<br />
and relatively inexpensive to implement.<br />
Easy installation and configuration: There are no device<br />
IDs, termination or master/slave conflicts, and<br />
the standard supports hot-plug connectivity. <strong>Drive</strong>s<br />
can be added, upgraded or removed without having<br />
to power down the whole system.<br />
Improved reliability: Serial ATA also uses 32-bit cyclic<br />
redundancy checking (CRC) on all transfers to<br />
ensure correct data transmissions. Due to this CRC<br />
capability, Serial ATA performs protection and recovery<br />
features at multiple levels: PHY layer, link<br />
layer and transport and software layers.<br />
Command optimization: Serial ATA utilizes Native<br />
Command Queing (NCQ) and first party direct<br />
memory access (DMA) to intelligently order commands<br />
in an internal queue within the drive, without<br />
having to involve the host CPU. Judging its own<br />
drive head’s angular and rotational position, the drive<br />
selects a data transfer from the queue that will minimize<br />
both its seek and rotational latencies.<br />
Simplified structure: Serial ATA utilizes a more efficient<br />
signaling voltage (250mV vs. 5V for Parallel<br />
ATA), and much smaller, thinner and compact cables<br />
and connectors. Due to the simplified cabling (the<br />
reduction in the number of pins and wires), the number<br />
of fault possibilities decreases.<br />
Seamless integration: Serial ATA maintains register<br />
and software compatibility with Parallel ATA, and
<strong>LaCie</strong> d2 <strong>Quadra</strong><br />
eSATA Questions & Answers<br />
Quadruple Interface <strong>Hard</strong> <strong>Drive</strong> page 0<br />
should be transparent to both the BIOS and operating<br />
system. Simply add more Serial ATA links to<br />
increase the number of connectivity points in your<br />
system.<br />
■ What are the ideal uses of Serial ATA?<br />
Although the specification supports all ATA and<br />
ATAPI devices (i.e. CD, DVD, tape drives, etc.), and<br />
delivers superior performance than both Hi-Speed USB<br />
2.0 and FireWire/IEEE 1394, external Serial ATA connectors<br />
are intended for storage devices. Serial ATA<br />
works best in storage environments that require high<br />
data throughput to deliver large files quickly and efficiently,<br />
maximizing the storage systems utilization and<br />
enhancing overall productivity.<br />
Due to its performance, reliability, scalability and<br />
cost-effectiveness, Serial ATA can be implemented in a<br />
wide-range of settings, from desktop usage to network<br />
storage applications.
<strong>LaCie</strong> d2 <strong>Quadra</strong><br />
Troubleshooting<br />
Quadruple Interface <strong>Hard</strong> <strong>Drive</strong> page<br />
8. Troubleshooting<br />
In the event that your <strong>LaCie</strong> d2 <strong>Quadra</strong> <strong>Hard</strong> <strong>Drive</strong> is<br />
not working correctly, please refer to the following checklist<br />
to find out where the problem is coming from. If you<br />
have gone through all of the points on the checklist and<br />
your drive is still not working correctly, please have a look<br />
at the FAQs that are regularly published on our website –<br />
www.lacie.com.<br />
One of these FAQs may provide an answer to your<br />
specific question. You can also visit the drivers pages,<br />
where the most recent software updates will be available.<br />
If you need further assistance, please contact your<br />
<strong>LaCie</strong> reseller or <strong>LaCie</strong> Technical Support (see page 46,<br />
Contacting Customer Support for details).<br />
8.1. Mac Users<br />
Problem Question Answer<br />
The drive is not recognized<br />
by the computer.<br />
Does an icon for the drive appear<br />
on the desktop?<br />
Does your computer’s configuration<br />
meet the minimum system requirements<br />
for use with this drive?<br />
Is the drive’s power supply connected<br />
and turned on?<br />
Did you follow the correct installation<br />
steps for the specific interface<br />
and operating system.<br />
Are both ends of the FireWire,<br />
eSATA or USB cables firmly attached?<br />
■ Manual Updates<br />
<strong>LaCie</strong> is constantly striving to give you the most<br />
up-to-date, comprehensive User’s Manuals available on<br />
the market. It is our goal to provide you with a friendly,<br />
easy-to-use format that will help you quickly install and<br />
utilize the many functions of your new device.<br />
If your manual does not reflect the configurations of<br />
the product that you purchased, please check our website<br />
for the most current version available.<br />
There should be an icon for the <strong>LaCie</strong> drive on the desktop. If the<br />
drive does not appear, follow the rest of the Troubleshooting tips to<br />
isolate the problem.<br />
Check page 7, Minimum System Requirements for more information.<br />
Make sure that the power supply is properly connected (see page<br />
15, Connecting The Power Supply), that the drive has been turned<br />
on by pressing the On/Off/Auto button the back of the drive, and<br />
that the outlet the power supply is connected to is also turned on.<br />
Review the installation steps on pages 16-19, Connecting The<br />
Interface Cable.<br />
Check both ends of the FireWire, eSATA or USB cables and make<br />
sure that they are fully seated in their respective ports. Try disconnecting<br />
the cables, waiting 10 seconds, and then reconnecting them.<br />
If the drive is still not recognized, restart your computer and try<br />
again.
<strong>LaCie</strong> d2 <strong>Quadra</strong><br />
Troubleshooting<br />
Quadruple Interface <strong>Hard</strong> <strong>Drive</strong> page<br />
Problem Question Answer<br />
The drive turns on<br />
and off when you<br />
turn your computer<br />
on and off (USB and<br />
FireWire connections<br />
only).<br />
The drive is not recognized<br />
by the computer.<br />
Error messages under<br />
Mac OS 10.x.<br />
The drive is working<br />
slowly.<br />
The drive is not running<br />
noticeably faster<br />
when connected via<br />
Hi-Speed USB 2.0.<br />
This is normal. Your drive has an autoswitching power feature, which means that if your drive is connected<br />
to your computer, turning the computer on will automatically turn the drive on. Likewise, turning the<br />
computer off will automatically turn the drive off. If you wish to power off the drive while it is connected<br />
to your computer, first make sure that your computer is not accessing the drive and then follow the steps in<br />
page 21, Disconnecting Your <strong>LaCie</strong> d2 <strong>Quadra</strong> <strong>Hard</strong> <strong>Drive</strong>. After you have disconnected the drive, fkip the<br />
On/Off/Auto button on the back of the drive to turn the drive off.<br />
Have the USB, eSATA or FireWire<br />
drivers been installed correctly and<br />
enabled?<br />
Is there a conflict with other device<br />
drivers or extensions?<br />
Open Apple System Profiler and click on the Devices and Volumes<br />
tab. If your device is not listed, recheck the cables and try the<br />
other troubleshooting tips listed here.<br />
Contact <strong>LaCie</strong> Technical Support for help.<br />
Has the drive been formatted? Make sure that the drive has been formatted properly. Please see<br />
pages 31, Formatting And Partitioning Your <strong>LaCie</strong> d2 <strong>Quadra</strong><br />
<strong>Hard</strong> <strong>Drive</strong> and 30, Helpful Information for more details.<br />
Does your computer’s operating<br />
system support the file system?<br />
Did you get an “Error –50” message<br />
while copying to a FAT 32 volume?<br />
Did you get an error message telling<br />
you that the drive has been disconnected<br />
when coming out of sleep<br />
mode?<br />
Are you having problems getting<br />
your FireWire device to be recognized?<br />
Are there other USB, eSATA or<br />
FireWire devices connected to the<br />
same port or hub?<br />
Check your computer’s documentation and see pages 31, Formatting<br />
And Partitioning Your <strong>LaCie</strong> d2 <strong>Quadra</strong> <strong>Hard</strong> <strong>Drive</strong> and 30,<br />
Helpful Information for more information.<br />
When copying files or folders from Mac OS 10.x to a FAT 32 volume,<br />
certain characters cannot be copied. These characters include,<br />
but are not limited to:<br />
? < > / \ :<br />
Check your files and folders to ensure that these types of characters<br />
are not being used.<br />
Simply ignore this message. The drive will remount to the desktop.<br />
<strong>LaCie</strong> drives conserve power by spinning down when you set your<br />
computer to sleep mode, and when the computer is “woken” from<br />
sleep, it does not give the drive enough time to spin-up from its<br />
sleep mode.<br />
If you are having problems with your FireWire connection under<br />
Mac OS 10.2.x, upgrade to the latest Mac OS version.<br />
Disconnect any other USB, eSATA or FireWire devices and see if<br />
the drive’s performance increases.<br />
Are you operating in Mac OS 9.x? Apple does not support the Hi-Speed USB 2.0 standard under<br />
Mac OS 9.x. You will be limited to the slower transfer rates of the<br />
original USB standard.<br />
Are you operating in Mac OS 10.x? Apple has only recently begun incorporating native Hi-Speed USB<br />
2.0 ports in their computers. To achieve Hi-Speed USB 2.0 transfer<br />
rates, you will need to add a Hi-Speed USB 2.0 PCI or PC card to<br />
your computer.
<strong>LaCie</strong> d2 <strong>Quadra</strong><br />
Troubleshooting<br />
Quadruple Interface <strong>Hard</strong> <strong>Drive</strong> page<br />
Problem Question Answer<br />
The drive is not running<br />
noticeably faster<br />
when connected via<br />
Hi-Speed USB 2.0.<br />
System fan is not<br />
running.<br />
8.2. Windows Users<br />
Is the drive connected to a USB<br />
port on your computer, or to a USB<br />
hub?<br />
Is the drive connected to a Hi-<br />
Speed USB 2.0 port on your<br />
computer?<br />
Does your computer or operating<br />
system support Hi-Speed USB 2.0?<br />
If your drive is connected to a USB port or hub, this is normal. A<br />
Hi-Speed USB 2.0 device can only operate at Hi-Speed USB 2.0<br />
performance levels when it is connected directly to a Hi-Speed<br />
USB 2.0 port or hub. Otherwise, the Hi-Speed USB 2.0 device will<br />
operate at the slower USB transfer rates. For more information,<br />
please see page 37, USB Questions And Answers.<br />
Check to see that the Hi-Speed USB 2.0 drivers for both your host<br />
bus adapter and device have been installed correctly. If in doubt,<br />
un-install the drivers and re-install them.<br />
See page 7, Minimum System Requirements.<br />
Confirm the outlet is powered, verify power connections, and try an alternate power cable. The fan on the<br />
<strong>LaCie</strong> d2 <strong>Quadra</strong> <strong>Hard</strong> <strong>Drive</strong> does not run continuously; it is activated at certain temperatures.<br />
Your drive may not have a fan. The <strong>LaCie</strong> d2 <strong>Quadra</strong> comes in different capacities, and only the highest<br />
capacities feature a drive fan.<br />
Problem Question Answer<br />
The drive is not recognized<br />
by the computer.<br />
Has the drive been formatted? Make sure that the drive has been formatted properly. Please see<br />
pages 31, Formatting And Partitioning Your <strong>LaCie</strong> d2 <strong>Quadra</strong><br />
<strong>Hard</strong> <strong>Drive</strong> and 30, Helpful Information for details.<br />
Does your computer’s operating<br />
system support the file system?<br />
Is there an icon for the drive in My<br />
Computer?<br />
Does your computer’s configuration<br />
meet the minimum system requirements<br />
for use with this drive?<br />
Is the drive’s power supply connected<br />
and turned on?<br />
Did you follow the correct installation<br />
steps for the specific interface<br />
and operating system.<br />
Check your computer’s documentation and see pages 31, Formatting<br />
And Partitioning Your <strong>LaCie</strong> d2 <strong>Quadra</strong> <strong>Hard</strong> <strong>Drive</strong> and 30,<br />
Helpful Information for details.<br />
Go into My Computer and look for an icon and drive letter assigned<br />
to the <strong>LaCie</strong> drive. If the drive does not appear, follow the<br />
rest of the Troubleshooting tips to isolate the problem.<br />
Check page 7, Minimum System Requirements for more information.<br />
Make sure that the power supply is properly connected (see page<br />
15, Connecting The Power Supply), that the drive has been turned<br />
on by flipping the On/Off/Auto button on the back of the drive,<br />
and that the outlet the power supply is connected to is also turned<br />
on.<br />
Review the installation steps on pages 16-19, Connecting The<br />
Interface Cable.
<strong>LaCie</strong> d2 <strong>Quadra</strong><br />
Troubleshooting<br />
Quadruple Interface <strong>Hard</strong> <strong>Drive</strong> page<br />
Problem Question Answer<br />
The drive is not recognized<br />
by the computer.<br />
The drive turns on<br />
and off when you<br />
turn your computer<br />
on and off (USB and<br />
FireWire connections).<br />
FireWire 800 does not<br />
work under Windows<br />
2000.<br />
The drive is working<br />
slowly.<br />
Are both ends of the FireWire,<br />
eSATA or USB cables firmly attached?<br />
Have the FireWire, eSATA or USB<br />
drivers been installed correctly and<br />
enabled?<br />
Is there a conflict with other device<br />
drivers or extensions?<br />
Check both ends of the FireWire or USB cables and make sure<br />
that they are fully seated in their respective ports. Try disconnecting<br />
the cables, waiting 10 seconds, and then reconnecting them. If the<br />
drive is still not recognized, restart your computer and try again.<br />
Windows 2000 Users:<br />
Go to Start Menu > Settings > Control Panel > System > <strong>Hard</strong>ware<br />
tab > Device Manager button > USB Controller or IEEE<br />
1394 Controller. Click on the + sign next to the controller icon,<br />
and you should see your device listed.<br />
Windows XP Users:<br />
Go to Start Menu > Control Panel > Performance and Maintenance<br />
> System > <strong>Hard</strong>ware tab > Device Manager button > USB<br />
Controller or IEEE 1394 Controller. Click on the + sign next to<br />
the controller icon, and you should see your device listed.<br />
If you still can’t see your device, recheck the cables and try the other<br />
troubleshooting tips listed here.<br />
Contact <strong>LaCie</strong> Technical Support for help.<br />
This is normal. Your drive has an autoswitching power feature, which means that if your drive is connected<br />
to your computer, turning the computer on will automatically turn the drive on. Likewise, turning the computer<br />
off will automatically turn the drive off. If you wish to power off the drive while it is connected to your<br />
computer, first make sure that your computer is not accessing the drive and then follow the steps page 21,<br />
Disconnecting Your <strong>LaCie</strong> d2 <strong>Quadra</strong> <strong>Hard</strong> <strong>Drive</strong>. After you have disconnected the drive, flip the On/Off/<br />
Auto button on the back of the drive to turn the drive off.<br />
Have you installed the Windows<br />
2000 Service Pack 4?<br />
Are there other USB, eSATA or<br />
FireWire devices connected to the<br />
same port or hub?<br />
In order to operate FireWire 800 devices under Windows 2000,<br />
the Service Pack 4 update must be installed. This is a free download<br />
offered on Microsoft’s website.<br />
Disconnect any other USB, eSATA or FireWire devices and see if<br />
the drive’s performance increases.
<strong>LaCie</strong> d2 <strong>Quadra</strong><br />
Troubleshooting<br />
Quadruple Interface <strong>Hard</strong> <strong>Drive</strong> page<br />
Problem Question Answer<br />
The drive is not running<br />
noticeably faster<br />
when connected via<br />
Hi-Speed USB 2.0.<br />
The drive is not running<br />
noticeably faster<br />
when connected via<br />
Hi-Speed USB 2.0.<br />
System fan is not<br />
running.<br />
Is the drive connected to a USB<br />
port on your computer, or to a USB<br />
hub?<br />
Is the drive connected to a Hi-<br />
Speed USB 2.0 port on your<br />
computer?<br />
Does your computer or operating<br />
system support Hi-Speed USB 2.0?<br />
Are you using a certified Hi-Speed<br />
USB 2.0 cable to connect your<br />
drive?<br />
Are you using Windows 98 SE or<br />
Windows Me?<br />
If your drive is connected to a USB port or hub, this is normal. A<br />
Hi-Speed USB 2.0 device can only operate at Hi-Speed USB 2.0<br />
performance levels when it is connected directly to a Hi-Speed<br />
USB 2.0 port or hub. Otherwise, the Hi-Speed USB 2.0 device will<br />
operate at the slower USB transfer rates. For more information,<br />
please see page 37, USB Questions And Answers.<br />
Check to see that the Hi-Speed USB 2.0 drivers for both your host<br />
bus adapter and device have been installed correctly. If in doubt,<br />
un-install the drivers and re-install them.<br />
See page 7, Minimum System Requirements.<br />
Ensure that the cable you are using has been properly certified.<br />
The Hi-Speed USB 2.0 cable that was shipped with your <strong>LaCie</strong><br />
drive has been properly certified and tested to comply with USB<br />
standards.<br />
These systems are not supported; USB will not work with either<br />
Windows 98 SE or Windows Me.<br />
Confirm the outlet is powered, verify power connections, and try an alternate power cable. The fan on the<br />
<strong>LaCie</strong> d2 <strong>Quadra</strong> <strong>Hard</strong> <strong>Drive</strong> does not run continuously; it is activated at certain temperatures.<br />
Your drive may not have a fan. The <strong>LaCie</strong> d2 <strong>Quadra</strong> comes in different capacities, and only the highest<br />
capacities feature a drive fan.
<strong>LaCie</strong> d2 <strong>Quadra</strong><br />
Contacting Customer Support<br />
Quadruple Interface <strong>Hard</strong> <strong>Drive</strong> page<br />
9. Contacting Customer Support<br />
■ Before You Contact Technical Support<br />
1.<br />
2.<br />
Read the User Manual and review the Troubleshooting<br />
section.<br />
Try to isolate the problem. If possible, make the<br />
drive the only external device on the CPU, and make<br />
sure that all of the cables are correctly and firmly attached.<br />
If you have asked yourself all of the pertinent questions<br />
in the troubleshooting checklist, and you still can’t<br />
get your <strong>LaCie</strong> drive to work properly, contact us via<br />
the contacts on page 47. Before contacting us, make sure<br />
■ Information to Include in Email Correspondence<br />
Information Where to Find Information<br />
that you are in front of your computer and that you have<br />
the following information on hand:<br />
•<br />
•<br />
•<br />
•<br />
•<br />
Your <strong>LaCie</strong> drive’s serial number<br />
Operating system and version<br />
Computer brand and model<br />
Amount of memory installed<br />
Names of any other devices installed on your<br />
computer, including CD/DVD burners<br />
1. <strong>LaCie</strong> d2 <strong>Quadra</strong> <strong>Hard</strong> <strong>Drive</strong> serial number Located on a sticker at the back of drive or on the original packaging<br />
2. <strong>LaCie</strong> d2 <strong>Quadra</strong> <strong>Hard</strong> <strong>Drive</strong> file format Mac users:<br />
Select the d2 <strong>Quadra</strong> <strong>Hard</strong> <strong>Drive</strong> icon on the desktop and press Command<br />
+ I, or press the Control key and choose Get Info.<br />
Windows users:<br />
Right click the d2 <strong>Quadra</strong> <strong>Hard</strong> <strong>Drive</strong> icon and select Properties.<br />
3. Macintosh/PC model Mac users:<br />
Click on the Apple icon in the menu bar and select About this Mac.<br />
4. Operating system version<br />
Windows users:<br />
5. Processor speed<br />
Right click My Computer and select Properties > General.<br />
6. Computer memory<br />
7. The brands and models of other internal and external<br />
peripherals installed on my computer<br />
Mac users:<br />
Click on the Apple icon in the finder bar and select About this Mac.<br />
Select More Info... The Apple System Profiler will launch and will<br />
list your internal and external peripherals.<br />
Windows users:<br />
Right click My Computer and select Properties > <strong>Hard</strong>ware.
<strong>LaCie</strong> d2 <strong>Quadra</strong><br />
Contacting Customer Support<br />
Quadruple Interface <strong>Hard</strong> <strong>Drive</strong> page<br />
9.1. <strong>LaCie</strong> Technical Support Contacts<br />
<strong>LaCie</strong> Asia, Singapore, and Hong Kong<br />
Contact us at:<br />
http://www.lacie.com/asia/contact/<br />
<strong>LaCie</strong> Belgium<br />
Contact us at:<br />
http://www.lacie.com/be/contact/ (Français)<br />
<strong>LaCie</strong> Denmark<br />
Contact us at:<br />
http://www.lacie.com/dk/contact<br />
<strong>LaCie</strong> France<br />
Contact us at:<br />
http://www.lacie.com/fr/contact/<br />
<strong>LaCie</strong> Italy<br />
Contact us at:<br />
http://www.lacie.com/it/contact/<br />
<strong>LaCie</strong> Netherlands<br />
Contact us at:<br />
http://www.lacie.com/nl/contact/<br />
<strong>LaCie</strong> Spain<br />
Contact us at:<br />
http://www.lacie.com/es/contact/<br />
<strong>LaCie</strong> Switzerland<br />
Contact us at:<br />
http://www.lacie.com/chfr/contact/ (Français)<br />
<strong>LaCie</strong> Ireland<br />
Contact us at:<br />
http://www.lacie.com/ie/contact/<br />
<strong>LaCie</strong> International<br />
Contact us at:<br />
http://www.lacie.com/intl/contact/<br />
<strong>LaCie</strong> Australia<br />
Contact us at:<br />
http://www.lacie.com/au/contact/<br />
<strong>LaCie</strong> Canada<br />
Contact us at:<br />
http://www.lacie.com/caen/contact/ (English)<br />
<strong>LaCie</strong> Finland<br />
Contact us at:<br />
http://www.lacie.com/fi/contact/<br />
<strong>LaCie</strong> Germany<br />
Contact us at:<br />
http://www.lacie.com/de/contact/<br />
<strong>LaCie</strong> Japan<br />
Contact us at:<br />
http://www.lacie.com/jp/contact/<br />
<strong>LaCie</strong> Norway<br />
Contact us at:<br />
http://www.lacie.com/no/contact/<br />
<strong>LaCie</strong> Sweden<br />
Contact us at:<br />
http://www.lacie.com/se/contact<br />
<strong>LaCie</strong> United Kingdom<br />
Contact us at:<br />
http://www.lacie.com/uk/support/request/<br />
<strong>LaCie</strong> USA<br />
Contact us at:<br />
http://www.lacie.com/contact/
<strong>LaCie</strong> d2 <strong>Quadra</strong><br />
Warranty Information<br />
Quadruple Interface <strong>Hard</strong> <strong>Drive</strong> page<br />
10. Warranty Information<br />
<strong>LaCie</strong> warrants your drive against any defect in material<br />
and workmanship, under normal use, for the period<br />
designated on your warranty certificate. In the event<br />
this product is found to be defective within the warranty<br />
period, <strong>LaCie</strong> will, at its option, repair or replace the<br />
defective drive. This warranty is void if:<br />
•<br />
•<br />
•<br />
•<br />
•<br />
•<br />
•<br />
The drive was operated/stored in abnormal use or<br />
maintenance conditions;<br />
The drive is repaired, modified or altered, unless such<br />
repair, modification or alteration is expressly authorized<br />
in writing by <strong>LaCie</strong>;<br />
The drive was subjected to abuse, neglect, lightning<br />
strike, electrical fault, improper packaging or accident;<br />
The drive was installed improperly;<br />
The serial number of the drive is defaced or missing;<br />
The broken part is a replacement part such as a pickup<br />
tray, etc.<br />
The tamper seal on the drive casing is broken.<br />
<strong>LaCie</strong> and its suppliers accept no liability for any<br />
loss of data during the use of this device, or for any of<br />
the problems caused as a result.<br />
<strong>LaCie</strong> will not, under any circumstances, be liable<br />
for direct, special or consequential damages such as, but<br />
not limited to, damage or loss of property or equipment,<br />
loss of profits or revenues, cost of replacement goods,<br />
or expense or inconvenience caused by service interruptions.<br />
Any loss, corruption or destruction of data while using<br />
a <strong>LaCie</strong> drive is the sole responsibility of the user,<br />
and under no circumstances will <strong>LaCie</strong> be held liable for<br />
the recovery or restoration of this data.<br />
Under no circumstances will any person be entitled<br />
to any sum greater than the purchase price paid for the<br />
drive.<br />
To obtain warranty service, call <strong>LaCie</strong> Technical<br />
Support. You will be asked to provide your <strong>LaCie</strong><br />
product’s serial number, and you may be asked to furnish<br />
proof of purchase to confirm that the drive is still under<br />
warranty.<br />
All drives returned to <strong>LaCie</strong> must be securely packaged<br />
in their original box and shipped with postage prepaid.<br />
ImpOrTANT INfO: Register online for free<br />
technical support: www.lacie.com/register
<strong>LaCie</strong> d2 <strong>Quadra</strong><br />
Glossary<br />
Quadruple Interface <strong>Hard</strong> <strong>Drive</strong> page<br />
Glossary<br />
Asynchronous – Data transfer method where the data is<br />
transferred independently of other processes. With this<br />
transfer method, the intervals between transmissions<br />
can vary, and data can be resent if it is initially missed.<br />
Backup – (1) The act of creating at least one additional<br />
copy of data onto a different (and safe) storage device<br />
from where it can be retrieved at a later time if needed.<br />
(2) A copy of a file, directory, or volume on a separate<br />
storage device from the original, for the purposes of retrieval<br />
in case the original is erased, damaged, or destroyed.<br />
Bit – The smallest measure of computerized data, either<br />
a 1 or a 0. Eight bits equal one byte, or one character.<br />
Block – A very small section of the storage media comprised<br />
of one or more sectors. A block is the smallest<br />
amount of space allocated on a drive for data storage. By<br />
default, a sector of data consists of 512 bytes.<br />
Buffer – RAM cache that is faster than the data that is<br />
being delivered. Buffers are used so data may be stored<br />
and delivered to the receiving item as it is needed.<br />
Bus – Electronic links that enable data to flow between<br />
the processor, RAM and extension cables (peripherals).<br />
Byte – A sequence of adjacent binary digits, or bits, considered<br />
as a unit, 8 bits in length. There are 8 bits in 1<br />
byte. See also MB (Megabyte) or GB (Gigabyte).<br />
Cache, -ing – This is an area of electronic storage (usually<br />
RAM) set aside to store frequently used data from<br />
electromechanical storage (hard drives, floppy disks,<br />
CD/DVD-ROM, tape cartridges, etc.) Therefore, storing<br />
frequently used data in RAM can enhance your<br />
system’s overall response to disk-intensive operations<br />
significantly.<br />
Configuration – When talking about a PC, configuration<br />
is understood to be the sum of the internal and<br />
external components of the system, including memory,<br />
disk drives, the keyboard, the video subsystem and other<br />
peripherals, such as the mouse, modem or printer. The<br />
configuration also implies software: the operating system<br />
and various device managers (drivers), as well as<br />
hardware settings and options set by the user via configuration<br />
files.<br />
Controller – This is a component or an electronic card<br />
(referred to in this case as a “controller card,” such as<br />
PCI or PCMCIA cards) that enables a computer to<br />
communicate with or manage certain peripherals. The<br />
controller manages the operation of the peripheral associated<br />
with it, and links the PC bus to the peripheral via<br />
a ribbon cable inside the PC. An external controller is<br />
an expansion card which fills one of the free slots inside<br />
your PC and which enables a peripheral (CD-ROM<br />
drive, scanner or printer, for instance) to be connected<br />
to the computer.<br />
Cross-platform – Term that refers to a device that is<br />
able to be operated by both Mac and Windows operating<br />
systems.<br />
Data Stream – The flow of data that accomplishes a task,<br />
usually related to moving data from storage to computer<br />
RAM or between storage devices.<br />
Digital – Discrete information that can be broken down<br />
to zero or one bits.<br />
<strong>Drive</strong>r (peripheral manager) – A software component<br />
that enables the computer system to communicate with<br />
a peripheral. Most peripherals will not operate correctly<br />
– if at all – if the appropriate drivers are not installed on<br />
the system.<br />
File System – Links the physical map of a disc to its<br />
logical structure. Thanks to the file system, users and<br />
computers can easily display path, directories and files<br />
recorded onto the disc.<br />
Firmware – Permanent or semi-permanent instructions
<strong>LaCie</strong> d2 <strong>Quadra</strong><br />
Glossary<br />
Quadruple Interface <strong>Hard</strong> <strong>Drive</strong> page 0<br />
and data programmed directly into the circuitry of a<br />
programmable read-only memory or an electronicallyerasable,<br />
programmable read-only memory chip. Used<br />
for controlling the operation of the computer or tape<br />
drive. Distinct from the software, which is stored in random<br />
access memory and can be altered.<br />
Folder – A list created on a disk to store files. Creating<br />
folders and sub-folders enables you to organize the storage<br />
of your files in a logical, hierarchical manner so that<br />
you can find and manage them more easily.<br />
Format, -ting, -ted – This is a process where a device<br />
is prepared to record data. In this process, the hard disk<br />
writes special information onto its own recording surfaces<br />
into areas (blocks) that are ready to accept user<br />
data. Since this operation causes all current user data<br />
stored on the hard disk to be lost, this is an infrequent<br />
operation that usually only happens at the factory that<br />
created the hard disk. It is unusual for something to<br />
happen to a hard disk that requires the end-user to initially<br />
perform this operation.<br />
GB (GigaByte) – This value is normally associated with<br />
data storage capacity. Basically, it means a thousand million<br />
or a billion bytes. In fact, it equals 1,073,741,824<br />
bytes (or 1,024 x 1,024 x 1,024).<br />
<strong>Hard</strong>ware – Physical components of a computer system,<br />
including the computer itself and peripherals such<br />
as printers, modems, mice, etc.<br />
Host Bus Adapter (HBA) – A printed circuit board<br />
that installs in a standard microcomputer and an interface<br />
between the device controller and the computer.<br />
Also called a controller.<br />
Initialize, -ed, Initialization – After a hard drive (or<br />
other storage device) is formatted and partitioned, some<br />
special data needs to be written to it that helps the Mac<br />
and Windows create files and save data. The process is<br />
called initialization. This process, like formatting, causes<br />
all user data on the storage device to be lost.<br />
Interface – The protocol data transmitters, data receivers,<br />
logic and wiring that link one piece of computer<br />
equipment to another, such as a hard drive to an adapter<br />
or an adapter to a system bus. Protocol means a set of<br />
rules for operating the physical interface, such as: do not<br />
read or write before the drive is ready.<br />
I/O (Input/Output) – Refers to an operation, program<br />
or device whose purpose is to enter data into or to extract<br />
data from a computer.<br />
Isochronous – Data transfer method that ensures that<br />
data flows continuously and at a steady rate. These transfers<br />
provide guaranteed transmission opportunities at<br />
defined intervals.<br />
Kb (Kilobit) – Equivalent to 1,000 bits.<br />
Kb/s – Kilobits per second. 480Kb/s is equal to 60KB/<br />
s.<br />
KB (KiloByte) – Basically, this means 1,000 bytes, but it<br />
is actually 1,024 bytes.<br />
KB/s – Kilobytes per second. A means of measuring<br />
throughput.<br />
Mb (Megabit) – Equivalent to 1,000,000 bits.<br />
Mb/s – Megabits per second. A means of measuring<br />
throughput. 480Mb/s is equal to 60MB/s.<br />
MB (Megabyte) – Basically means one million bytes,<br />
but is actually 1,024 Kilobytes or 1,024 x 1,024 bytes,<br />
which equals 1,048,576 bytes.<br />
MB/s – Megabytes per second. A means of measuring<br />
throughput.<br />
Media – The material or device used to store information<br />
in a storage subsystem, such as a tape cartridge, CD,<br />
DVD or disk drive.<br />
Operating System (OS) – Software that controls the<br />
assignment and use of hardware resources such as memory,<br />
processor time, disk space and peripherals. An operating<br />
system is the basis on which software (applications)<br />
run. Windows, Mac OS and UNIX are among<br />
the most common.<br />
Overwrite – To write data on top of existing data thus
<strong>LaCie</strong> d2 <strong>Quadra</strong><br />
Glossary<br />
Quadruple Interface <strong>Hard</strong> <strong>Drive</strong> page<br />
erasing the original data.<br />
Partition, -ing – After formatting, the hard drive is not<br />
yet ready to store files. It must be divided into sections<br />
that will contain special information required for a Mac<br />
or PC to operate and other sections that will contain the<br />
files. This process of dividing up the hard drive is called<br />
partitioning. A partition is just one section of the hard<br />
drive that will contain either special data put there by<br />
Silverlining or other files and data.<br />
Peripheral – A generic term applied to printers, scanners,<br />
mice, keyboards, serial ports, graphics cords, disk<br />
drives and other computer subsystems. This type of peripheral<br />
often relies on its own control software, known<br />
as a peripheral driver.<br />
Port, hardware – A connection component (SCSI port,<br />
for example) that enables a microprocessor to communicate<br />
with a compatible peripheral.<br />
Port, software – A memory address that identifies the<br />
physical circuit used to transfer information between a<br />
microprocessor and a peripheral.<br />
RAM (Random Access Memory) – Generally referred<br />
to as a computer’s “memory.” An integrated circuit<br />
memory chip that allows information to be stored and<br />
retrieved by a microprocessor or controller. The information<br />
can be stored or accessed in any order, and all<br />
storage locations are equally accessible.<br />
Seek Time – The amount of time (in thousandths of a<br />
second, or milliseconds) that it takes a hard drive’s read/<br />
write head to move to a specific location on the disk.<br />
Average seek, then, is the average of a large number of<br />
random samplings all over the disk. Seek time is CPU<br />
independent, meaning that seek time is the same for a<br />
disk drive, whether it is attached to a computer or not.<br />
Software – In a nutshell, software is a set of instructions<br />
for the computer. A set of instructions to perform<br />
a particular task is called a program. There are two<br />
main types of software: system software (an operating<br />
system such as Mac OS or Windows) which controls<br />
the operation of the computer and application software<br />
(programs such as Word or Excel) which enable users<br />
to perform tasks such as word processing, spreadsheet<br />
creation, graphics, etc.<br />
Storage – In computers, any equipment in which information<br />
may be kept. PCs generally use disk units and<br />
other external storage media (diskettes, CD-ROMs,<br />
magnetic disks, etc.) for permanent storage of information.<br />
Striping – Spreading data evenly over multiple disk<br />
drives to enhance performance. Data striping can be<br />
performed on a bit, byte or block basis for optimum application<br />
performance.<br />
Transfer Rate – The rate at which the drive sends and<br />
receives data from the controller. Transfer rates for reading<br />
data from the disk drive may not be the same as the<br />
transfer rate for writing data to the disk drive. Transfer<br />
rates are CPU dependent, meaning that regardless of<br />
how great a transfer rate your drive is capable of, the<br />
actual transfer rate can only be as fast as the slowest of<br />
your hard drive and computer.<br />
Volume – A desktop mountable storage area, may be a<br />
partition of a hard drive, a removable disk or a cartridge.<br />
Typically measured in Megabytes or Gigabytes.<br />
Utility – Software designed to perform maintenance<br />
tasks on the system or its components. Examples include<br />
backup programs, programs to retrieve files and<br />
data on disk, programs for preparing (or formatting) a<br />
disk or and resource editors.