PE22 / ELC - eta plus electronic GmbH
PE22 / ELC - eta plus electronic GmbH
PE22 / ELC - eta plus electronic GmbH

You also want an ePaper? Increase the reach of your titles
YUMPU automatically turns print PDFs into web optimized ePapers that Google loves.
4 Operation of <strong>ELC</strong> page 21<br />
4 Operation of <strong>ELC</strong><br />
4.1 Initial operation<br />
• The operative parameters of the <strong>ELC</strong>, such as the scope of the trigger pulse when<br />
switching on the lamp, are set by the manufacturer.<br />
• You must always ensure that the correct lamp type is used (see chapter 6) and that all<br />
wireing is properly connected!<br />
4.2 Switching on the <strong>ELC</strong><br />
• The <strong>ELC</strong> is switched on by applying the operating voltage and the 24V supply.<br />
4.3 Activating the safety circuits<br />
• Activate the safety relay<br />
• Apply the initialisation signal<br />
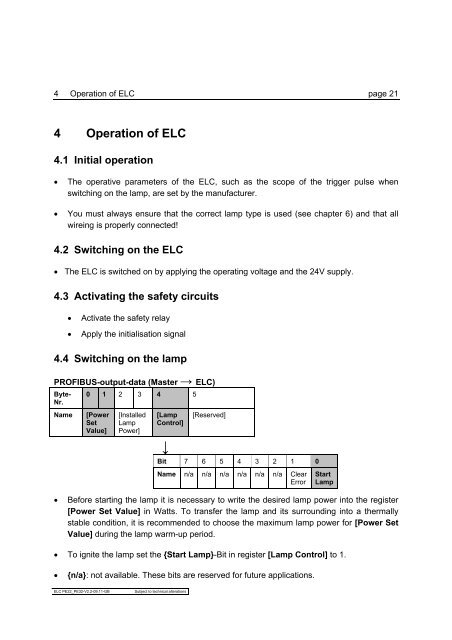
4.4 Switching on the lamp<br />
PROFIBUS-output-data (Master → <strong>ELC</strong>)<br />
Byte-<br />
Nr.<br />
0 1 2 3 4 5<br />
Name [Power<br />
Set<br />
Value]<br />
[Installed<br />
Lamp<br />
Power]<br />
[Lamp<br />
Control]<br />
↓<br />
<strong>ELC</strong> <strong>PE22</strong>_PE32-V2.2-09.11-GB Subject to technical alterations<br />
[Reserved]<br />
Bit 7 6 5 4 3 2 1 0<br />
Name n/a n/a n/a n/a n/a n/a Clear<br />
Error<br />
Start<br />
Lamp<br />
• Before starting the lamp it is necessary to write the desired lamp power into the register<br />
[Power Set Value] in Watts. To transfer the lamp and its surrounding into a thermally<br />
stable condition, it is recommended to choose the maximum lamp power for [Power Set<br />
Value] during the lamp warm-up period.<br />
• To ignite the lamp set the {Start Lamp}-Bit in register [Lamp Control] to 1.<br />
• {n/a}: not available. These bits are reserved for future applications.