Student Guide to MyAACC (PDF) - Anne Arundel Community College
Student Guide to MyAACC (PDF) - Anne Arundel Community College
Student Guide to MyAACC (PDF) - Anne Arundel Community College
- TAGS
- myaacc
- arundel
- www.aacc.edu

Create successful ePaper yourself
Turn your PDF publications into a flip-book with our unique Google optimized e-Paper software.
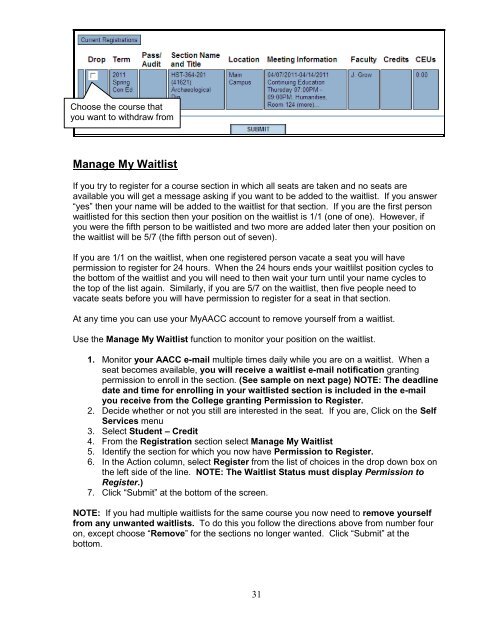
Choose the course that<br />
you want <strong>to</strong> withdraw from<br />
Manage My Waitlist<br />
If you try <strong>to</strong> register for a course section in which all seats are taken and no seats are<br />
available you will get a message asking if you want <strong>to</strong> be added <strong>to</strong> the waitlist. If you answer<br />
“yes” then your name will be added <strong>to</strong> the waitlist for that section. If you are the first person<br />
waitlisted for this section then your position on the waitlist is 1/1 (one of one). However, if<br />
you were the fifth person <strong>to</strong> be waitlisted and two more are added later then your position on<br />
the waitlist will be 5/7 (the fifth person out of seven).<br />
If you are 1/1 on the waitlist, when one registered person vacate a seat you will have<br />
permission <strong>to</strong> register for 24 hours. When the 24 hours ends your waitlilst position cycles <strong>to</strong><br />
the bot<strong>to</strong>m of the waitlist and you will need <strong>to</strong> then wait your turn until your name cycles <strong>to</strong><br />
the <strong>to</strong>p of the list again. Similarly, if you are 5/7 on the waitlist, then five people need <strong>to</strong><br />
vacate seats before you will have permission <strong>to</strong> register for a seat in that section.<br />
At any time you can use your <strong>MyAACC</strong> account <strong>to</strong> remove yourself from a waitlist.<br />
Use the Manage My Waitlist function <strong>to</strong> moni<strong>to</strong>r your position on the waitlist.<br />
1. Moni<strong>to</strong>r your AACC e-mail multiple times daily while you are on a waitlist. When a<br />
seat becomes available, you will receive a waitlist e-mail notification granting<br />
permission <strong>to</strong> enroll in the section. (See sample on next page) NOTE: The deadline<br />
date and time for enrolling in your waitlisted section is included in the e-mail<br />
you receive from the <strong>College</strong> granting Permission <strong>to</strong> Register.<br />
2. Decide whether or not you still are interested in the seat. If you are, Click on the Self<br />
Services menu<br />
3. Select <strong>Student</strong> – Credit<br />
4. From the Registration section select Manage My Waitlist<br />
5. Identify the section for which you now have Permission <strong>to</strong> Register.<br />
6. In the Action column, select Register from the list of choices in the drop down box on<br />
the left side of the line. NOTE: The Waitlist Status must display Permission <strong>to</strong><br />
Register.)<br />
7. Click “Submit” at the bot<strong>to</strong>m of the screen.<br />
NOTE: If you had multiple waitlists for the same course you now need <strong>to</strong> remove yourself<br />
from any unwanted waitlists. To do this you follow the directions above from number four<br />
on, except choose “Remove” for the sections no longer wanted. Click “Submit” at the<br />
bot<strong>to</strong>m.<br />
31