HP Officejet Pro K550
HP Officejet Pro K550
HP Officejet Pro K550

You also want an ePaper? Increase the reach of your titles
YUMPU automatically turns print PDFs into web optimized ePapers that Google loves.
English<br />
Español Português Français<br />
6<br />
3<br />
1<br />
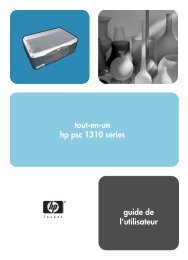
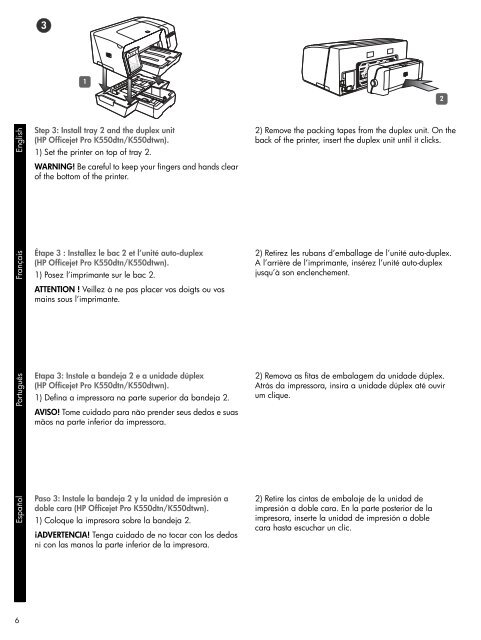
Step 3: Install tray 2 and the duplex unit<br />
(<strong>HP</strong> <strong>Officejet</strong> <strong>Pro</strong> <strong>K550</strong>dtn/<strong>K550</strong>dtwn).<br />
1) Set the printer on top of tray 2.<br />
WARNING! Be careful to keep your fingers and hands clear<br />
of the bottom of the printer.<br />
Étape 3 : Installez le bac 2 et l’unité auto-duplex<br />
(<strong>HP</strong> <strong>Officejet</strong> <strong>Pro</strong> <strong>K550</strong>dtn/<strong>K550</strong>dtwn).<br />
1) Posez l’imprimante sur le bac 2.<br />
ATTENTION ! Veillez à ne pas placer vos doigts ou vos<br />
mains sous l’imprimante.<br />
Etapa 3: Instale a bandeja 2 e a unidade dúplex<br />
(<strong>HP</strong> <strong>Officejet</strong> <strong>Pro</strong> <strong>K550</strong>dtn/<strong>K550</strong>dtwn).<br />
1) Defina a impressora na parte superior da bandeja 2.<br />
AVISO! Tome cuidado para não prender seus dedos e suas<br />
mãos na parte inferior da impressora.<br />
Paso 3: Instale la bandeja 2 y la unidad de impresión a<br />
doble cara (<strong>HP</strong> <strong>Officejet</strong> <strong>Pro</strong> <strong>K550</strong>dtn/<strong>K550</strong>dtwn).<br />
1) Coloque la impresora sobre la bandeja 2.<br />
¡ADVERTENCIA! Tenga cuidado de no tocar con los dedos<br />
ni con las manos la parte inferior de la impresora.<br />
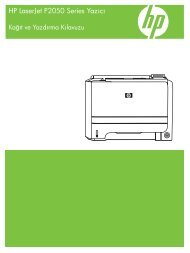
2) Remove the packing tapes from the duplex unit. On the<br />
back of the printer, insert the duplex unit until it clicks.<br />
2) Retirez les rubans d’emballage de l’unité auto-duplex.<br />
A l’arrière de l’imprimante, insérez l’unité auto-duplex<br />
jusqu’à son enclenchement.<br />
2) Remova as fitas de embalagem da unidade dúplex.<br />
Atrás da impressora, insira a unidade dúplex até ouvir<br />
um clique.<br />
2) Retire las cintas de embalaje de la unidad de<br />
impresión a doble cara. En la parte posterior de la<br />
impresora, inserte la unidad de impresión a doble<br />
cara hasta escuchar un clic.<br />
2