
You also want an ePaper? Increase the reach of your titles
YUMPU automatically turns print PDFs into web optimized ePapers that Google loves.
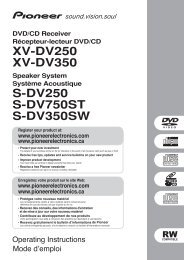
MULTI-ZONE<br />
CONTROL ON/OFF<br />
ENTER<br />
PORTABLE<br />
MASTER<br />
VOLUME<br />
03<br />
Connecting up<br />
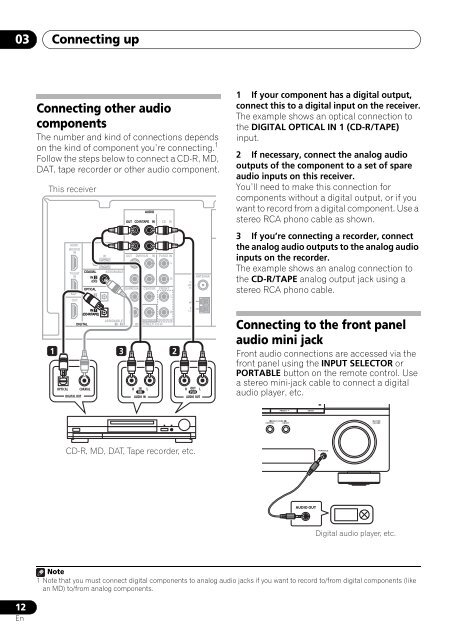
Connecting other audio<br />
components<br />
The number and kind of connections depends<br />
on the kind of component you’re connecting. 1<br />
Follow the steps below to connect a CD-R, MD,<br />
DAT, tape recorder or other audio component.<br />
This receiver<br />
HDMI<br />
BD/DVD<br />
IN<br />
TV/SAT<br />
IN<br />
OUT<br />
IN<br />
COAXIAL<br />
IN 12<br />
(CD)<br />
OPTICAL<br />
IN 2<br />
(DVR/VCR)<br />
IR<br />
ASSIGNABLE<br />
OUT<br />
CD-R/TAPE<br />
OUT<br />
DVR/VCR<br />
AUDIO<br />
IN<br />
IN<br />
SURROUND CENTER<br />
CD<br />
TV/SAT IN<br />
L<br />
FRONT<br />
IN<br />
L<br />
R<br />
R<br />
L<br />
ANTENNA<br />
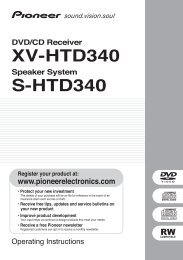
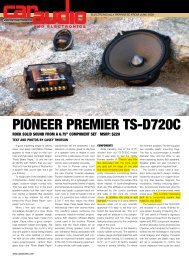
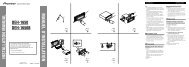
1 If your component has a digital output,<br />
connect this to a digital input on the receiver.<br />
The example shows an optical connection to<br />
the DIGITAL OPTICAL IN 1 (CD-R/TAPE)<br />
input.<br />
2 If necessary, connect the analog audio<br />
outputs of the component to a set of spare<br />
audio inputs on this receiver.<br />
You’ll need to make this connection for<br />
components without a digital output, or if you<br />
want to record from a digital component. Use a<br />
stereo RCA phono cable as shown.<br />
3 If you’re connecting a recorder, connect<br />
the analog audio outputs to the analog audio<br />
inputs on the recorder.<br />
The example shows an analog connection to<br />
the CD-R/TAPE analog output jack using a<br />
stereo RCA phono cable.<br />
DIGITAL<br />
OPTICAL COAXIAL<br />
DIGITAL OUT<br />
IN 1<br />
(CD-R/TAPE)<br />
ASSIGNABLE<br />
1 - 2<br />
R<br />
SUBWOOFER BD/DVD IN<br />
BD/DVD MULTI CH IN<br />
1 3<br />
2<br />
R IN L<br />
REC<br />
AUDIO IN<br />
AM<br />
LOOP<br />
R OUT L<br />
PLAY<br />
AUDIO OUT<br />
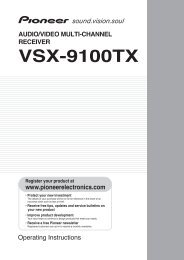
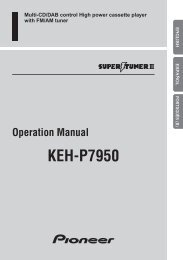
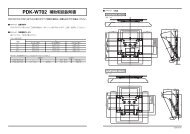
Connecting to the front panel<br />
audio mini jack<br />
Front audio connections are accessed via the<br />
front panel using the INPUT SELECTOR or<br />
PORTABLE button on the remote control. Use<br />
a stereo mini-jack cable to connect a digital<br />
audio player, etc.<br />
PRESET +<br />
CD-R, MD, DAT, Tape recorder, etc.<br />
AUDIO OUT<br />
Digital audio player, etc.<br />
Note<br />
1 Note that you must connect digital components to analog audio jacks if you want to record to/from digital components (like<br />
an MD) to/from analog components.<br />
12<br />
En