You also want an ePaper? Increase the reach of your titles
YUMPU automatically turns print PDFs into web optimized ePapers that Google loves.
Connecting up 03<br />
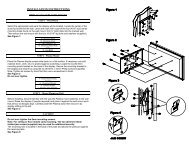
Connecting the speakers<br />
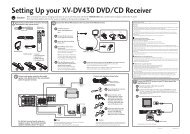
The diagram below shows a complete surround sound setup of six speakers set up in a typical<br />
configuration. For the best sound, try to follow this setup in your room as closely as possible.<br />
Make sure the positive (colored) and negative (black) terminals on the receiver match those on<br />
the speakers.<br />
Be sure to complete all connections before connecting this unit to the AC power source.<br />
Red : Front right (R) White : Front left (L) Green : Center speake<br />
Grey : Surround right (SR) Blue : Surround left (SL) Purple : Subwoofer<br />
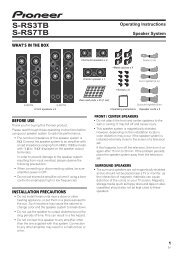
Front speaker terminals:<br />
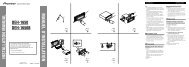
Other speaker terminals:<br />
color-coded<br />
wire<br />
1. Twist exposed wire<br />
strands together.<br />
2. Loosen terminal and<br />
insert exposed wire.<br />
3. Tighten terminal.<br />
color-coded<br />
wire<br />
1. Twist exposed wire<br />
strands together.<br />
2. Push open the tabs and<br />
insert exposed wire.<br />
3. Release the tabs.<br />
English Français Español<br />
AUDIO<br />
CD-R/TAPE IN<br />
CD<br />
IN<br />
L<br />
AUDIO<br />
ZONE2 OUT<br />
R L<br />
R<br />
FRONT<br />
L<br />
SPEAKERS A<br />
Class 2 Wiring<br />
SURROUND CENTER SUBWOOFER<br />
R<br />
L<br />
R<br />
DVR/VCR IN TV/SAT IN<br />
L<br />
R<br />
FM<br />
ANTENNA<br />
–<br />
+<br />
– +<br />
– +<br />
– +<br />
–<br />
+<br />
–<br />
+<br />
Front R.<br />
Front L. Surround R. Surround L.<br />
Center<br />
Subwoofer<br />
15<br />
En