You also want an ePaper? Increase the reach of your titles
YUMPU automatically turns print PDFs into web optimized ePapers that Google loves.
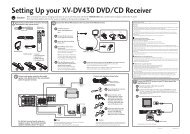
Listening to your system 05<br />
Playing other sources<br />
1 Turn on the power of the playback<br />
component.<br />
2 Turn on the power of the receiver.<br />
3 Select the source you want to playback.<br />
Use the MULTI CONTROL buttons (INPUT<br />
SELECTOR).<br />
4 Start playback of the component you<br />
selected in step 1.<br />
Choosing the input signal<br />
On this receiver, it is possible to switch the<br />
input signals for the different inputs as<br />
described below. 1<br />
1 Press SIGNAL SEL to select the input signal<br />
corresponding to the source component.<br />
When DIGITAL (C1/O1/O2) or HDMI (H) is<br />
selected and the selected audio input is not<br />
provided, A (analog) is automatically selected.<br />
Each press cycles through the following:<br />
• A – Selects the analog inputs.<br />
• DIGITAL – Selects the digital input. The<br />
coaxial 1 input is selected for C1, and the<br />
optical 1 or 2 audio input is selected for<br />
O1 or O2.<br />
• HDMI – Selects an HDMI signal. H can be<br />
selected for BD/DVD or TV/SAT input. For<br />
other inputs, HDMI cannot be selected. 2<br />
When set to DIGITAL or HDMI, 2 D lights<br />
when a Dolby Digital signal is input, and DTS<br />
lights when a DTS signal is input.<br />
When the HDMI is selected, the A and<br />
DIGITAL indicators are off (see page 18).<br />
Selecting the multichannel<br />
analog inputs<br />
If you have connected a decoder or a BD/DVD<br />
player with multichannel analog outputs to<br />
this receiver (page 10), you must select the<br />
analog multichannel inputs for surround<br />
sound. 3<br />
• Press MULTI IN on the remote control.<br />
To cancel playback from the multichannel<br />
inputs, switches to the other input signal.<br />
Using the headphone<br />
1 Insert the headphone into the PHONE<br />
jack.<br />
2 Press RECEIVER then press the SPEAKERS<br />
button to select SP OFF.<br />
The sound is heard from the headphone and no<br />
sound is heard from the speakers connected to<br />
this receiver.<br />
The listening mode when the sound is heard<br />
from the headphone can be selected only from<br />
STEREO or A.L.C..<br />
English Français Español<br />
Note<br />
1 • This receiver can only play back Dolby Digital, PCM (32 kHz to 96 kHz) and DTS (including DTS 96 kHz / 24 bit) digital signal<br />
formats. The compatible signals via the HDMI terminals are: Dolby Digital, DTS, SACD (DSD 2 ch), DVD Audio (including<br />
192 kHz), PCM (32 kHz to 192 kHz sampling frequencies). With other digital signal formats, set to A (analog) (the MULTI IN or<br />
TUNER).<br />
• You may get digital noise when a LD or CD player compatible with DTS is playing an analog signal. To prevent noise, make<br />
the proper digital connections (page 9) and set the signal input to C1/O1/O2 (DIGITAL).<br />
• Some DVD players don’t output DTS signals. For more details, refer to the instruction manual supplied with your DVD player.<br />
2 • When the HDMI option in Setting the Audio options on page 27 is set to THRU, the sound will be heard through your TV, not<br />
from this receiver.<br />
3 • During playback from the multichannel inputs, you can’t use any of the sound features/modes and only the volume and<br />
channel levels can be set.<br />
• Change the output settings of the systems with multichannel analog outputs according to the number of the speakers<br />
connected to the receiver.<br />
29<br />
En