MANUALE STUDIOS.pmd - Olimpia Splendid
MANUALE STUDIOS.pmd - Olimpia Splendid
MANUALE STUDIOS.pmd - Olimpia Splendid

You also want an ePaper? Increase the reach of your titles
YUMPU automatically turns print PDFs into web optimized ePapers that Google loves.
2.3.4<br />
I<br />
Installazione unità interna<br />
GB F D<br />
Indoor unit installation<br />
Installation unité interne<br />
Installation der Inneneinheit<br />
1. Passare i tubi attraverso il foro<br />
nella parete.<br />
1. Pass the piping through the hole in<br />
the wall.<br />
1. Passer les tubes à travers le trou<br />
percé dans le mur.<br />
1. Führen Sie die Schläuche durch<br />
die Öffnung in der Wand<br />
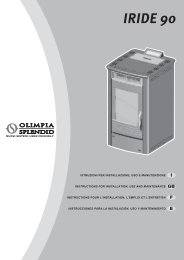
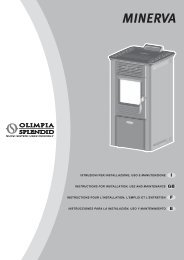
2. Mettere la staffa superiore della<br />
parte posteriore dell'unità interna<br />
(fig. 7 rif. A) sul gancio superiore<br />
della piastra di installazione (fig. 7<br />
rif. B). Muovere l'unità interna<br />
lateralmente per verificare che sia<br />
agganciata in modo sicuro.<br />
3. La connessione dei tubi può<br />
facilmente essere fatta sollevando<br />
l'unità interna con del materiale di<br />
imbottitura (fig. 7 rif. C) tra l'unità<br />
interna e la parete. Toglierla, una<br />
volta terminati gli allacciamenti.<br />
4. Spingere la parte inferiore dell'unità<br />
interna sulla parete. Muovere<br />
quindi l'unità interna lateralmente<br />
e verticalmente per verificare che<br />
sia agganciata in modo sicuro.<br />
2. Put the upper claw at the back of<br />
the indoor unit (fig. 7 rif. A) on the<br />
upper hook of the installation (fig.<br />
7 rif. B) plate, move the indoor<br />
unit from side to side to see that it<br />
is securely hooked.<br />
3. Piping can easily be made by lifting<br />
the indoor unit with a cushioning<br />
material (fig. 7 ref. C) between<br />
the indoor unit and the wall. Get it<br />
out after finish piping.<br />
4. Push the lower part of the indoor<br />
unit up on the wall, Then move<br />
the indoor unit from side to side,<br />
up and down to check if it is<br />
hooked securely.<br />
2. Mettre l'étrier supérieur du côté<br />
arrière de l'unité interne (fig. 7 réf.<br />
A) sur le crochet supérieur de la<br />
plaque d'installation (fig. 7 réf. B).<br />
Déplacer l'unité interne<br />
latéralement pour s'assurer qu'elle<br />
est accrochée de façon sûre.<br />
3. Le raccordement des tubes peut<br />
facilement être effectué en<br />
soulevant l'unité interne avec un<br />
matériau de rembourrage (fig. 7<br />
réf. C) entre l'unité interne et le<br />
mur. L'enlever une fois les<br />
raccordements terminés.<br />
4. Pousser la partie inférieure de<br />
l'unité interne sur le mur. Déplacer<br />
ensuite l'unité interne latéralement<br />
et verticalement pour s'assurer<br />
qu'elle est accrochée de façon<br />
sûre.<br />
2. Fügen Sie den oberen Bügel des<br />
hinteren Teils der Inneneinheit<br />
(Abb. 7-A) auf den oberen Haken<br />
der Installationsplatte (Abb. 7-B)<br />
Bewegen Sie die Inneneinheit<br />
seitlich um sicherzustellen, dass<br />
diese auf sichere Art eingehängt<br />
ist.<br />
3. Der Anschluss der Schläuche<br />
kann einfach erfolgen, indem die<br />
Inneneinheit mit Futtermaterial<br />
(Abb. 7-C) zwischen Inneneinheit<br />
und Wand angehoben wird.<br />
Entfernen Sie diese nach<br />
Herstellung der Anschlüsse.<br />
4. Schieben Sie den unteren Teil der<br />
Inneneinheit an die Wand Bewegen<br />
Sie die Inneneinheit seitlich und<br />
vertikal um sicherzustellen, dass<br />
diese auf sichere Art eingehängt<br />
ist.<br />
7<br />
A<br />
C<br />
B<br />
32