

Line 6 POD Studio & TonePort MIDI Setup Guide ... - zZounds.com
Line 6 POD Studio & TonePort MIDI Setup Guide ... - zZounds.com
Line 6 POD Studio & TonePort MIDI Setup Guide ... - zZounds.com

Create successful ePaper yourself
Turn your PDF publications into a flip-book with our unique Google optimized e-Paper software.
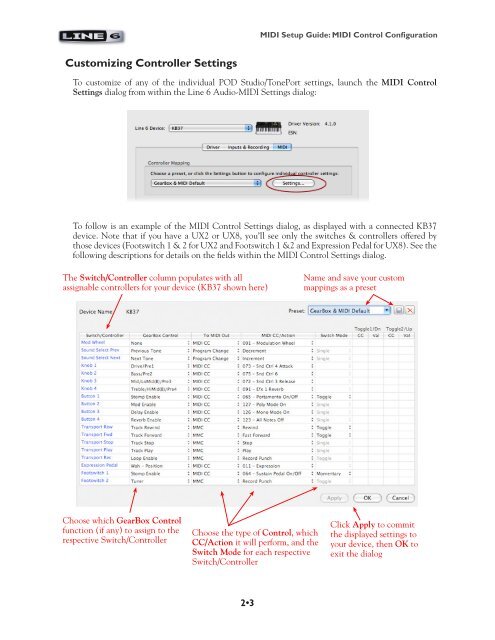
Customizing Controller Settings<br />
2•3<br />
<strong>MIDI</strong> <strong>Setup</strong> <strong>Guide</strong>: <strong>MIDI</strong> Control Configuration<br />
To customize of any of the individual <strong>POD</strong> <strong>Studio</strong>/<strong>TonePort</strong> settings, launch the <strong>MIDI</strong> Control<br />
Settings dialog from within the <strong>Line</strong> 6 Audio-<strong>MIDI</strong> Settings dialog:<br />
To follow is an example of the <strong>MIDI</strong> Control Settings dialog, as displayed with a connected KB37<br />
device. Note that if you have a UX2 or UX8, you’ll see only the switches & controllers offered by<br />
those devices (Footswitch 1 & 2 for UX2 and Footswitch 1 &2 and Expression Pedal for UX8). See the<br />
following descriptions for details on the fields within the <strong>MIDI</strong> Control Settings dialog.<br />
The Switch/Controller column populates with all<br />
assignable controllers for your device (KB37 shown here)<br />
Choose which GearBox Control<br />
function (if any) to assign to the<br />
respective Switch/Controller<br />
Choose the type of Control, which<br />
CC/Action it will perform, and the<br />
Switch Mode for each respective<br />
Switch/Controller<br />
Name and save your custom<br />
mappings as a preset<br />
Click Apply to <strong>com</strong>mit<br />
the displayed settings to<br />
your device, then OK to<br />
exit the dialog


