- Page 1 and 2:
SERVICE SERVICE MANUAL MANUAL FOR F
- Page 3 and 4:
Contents 8355 N/B MAINTENANCE 5.3 V
- Page 5 and 6:
1.1 Introduction 8355 N/B MAINTENAN
- Page 7 and 8:
1.2 System Hardware Part 8355 N/B M
- Page 9 and 10:
8355 N/B MAINTENANCE HyperTransport
- Page 11 and 12:
1.2.2 System frequency 8355 N/B MAI
- Page 13 and 14:
1.2.3 VIA K8T800+VT8235 1.2.3.1 K8T
- Page 15 and 16:
LRU replacement scheme 8355 N/B MAI
- Page 17 and 18:
8355 N/B MAINTENANCE f) Notebook-cl
- Page 19 and 20:
8355 N/B MAINTENANCE SMOOTHVISION
- Page 21 and 22:
1.2.4.1 General and Interfacing Fea
- Page 23 and 24:
8355 N/B MAINTENANCE DDC1 and DDC2c
- Page 25 and 26:
+30dB boost preamplifier for MIC in
- Page 27 and 28:
Operating System Compatibility Wind
- Page 29 and 30:
8355 N/B MAINTENANCE 1200/75bps (V.
- Page 31 and 32:
Transmit Level >-15 dBm 8355 N/B MA
- Page 33 and 34:
Arbitrated short reset Enhanced pri
- Page 35 and 36:
Instruction length: 2 or 4 bytes 83
- Page 37 and 38: Interrupts - 8355 N/B MAINTENANCE 9
- Page 39 and 40: 1.2.9 System Flash Memory (BIOS) 2
- Page 41 and 42: Dual Speed - 100 / 10 Mbps Half and
- Page 43 and 44: Secure Digital Interface 8355 N/B M
- Page 45 and 46: Supports SUSPEND# Supports PCI PME#
- Page 47 and 48: PPM for external FDD signal support
- Page 49 and 50: 8355 N/B MAINTENANCE 1.3.2 Power ON
- Page 51 and 52: 1.3.6 CMOS Battery CR2032 3V 220mAh
- Page 53 and 54: 1.4 Peripheral Components ROM Drive
- Page 55 and 56: HDD: spin down Suspend to DRAM 8355
- Page 57 and 58: 8355 N/B MAINTENANCE 1.6 Appendix 1
- Page 59 and 60: 1.7 Appendix 2: H8 Pins Definition
- Page 61 and 62: Continued to the previous table Por
- Page 63 and 64: Continued to the previous table Por
- Page 65 and 66: Continued to the previous table Ind
- Page 67 and 68: 2. System View and Disassembly 2.1
- Page 69 and 70: 2.1.5 Bottom View 1 2 CPU Cover Har
- Page 71 and 72: NOTEBOOK 8355 N/B MAINTENANCE Modul
- Page 73 and 74: 2.2.2 Keyboard Disassembly 8355 N/B
- Page 75 and 76: 8355 N/B MAINTENANCE 5. Disconnect
- Page 77 and 78: 8355 N/B MAINTENANCE 5. Disconnect
- Page 79 and 80: 8355 N/B MAINTENANCE 5. Unscrew two
- Page 81 and 82: 2.2.6 SO-DIMM Disassembly 8355 N/B
- Page 83 and 84: 8355 N/B MAINTENANCE 6. Then remove
- Page 85 and 86: 2.2.8 Inverter Board Disassembly 83
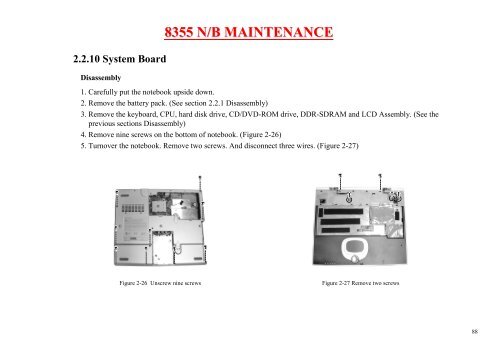
- Page 87: 2.2.9 LCD Panel Disassembly 8355 N/
- Page 91 and 92: 8355 N/B MAINTENANCE 8. Unscrew one
- Page 93 and 94: 2.2.11 Modem Card Disassembly Reass
- Page 95 and 96: Reassembly 8355 N/B MAINTENANCE 1.
- Page 97 and 98: 8355 N/B MAINTENANCE 3. Definition
- Page 99 and 100: 8355 N/B MAINTENANCE 4. Definition
- Page 101 and 102: DDR SDRAM Memory Interface Signal N
- Page 103 and 104: 8355 N/B MAINTENANCE 5.2 K8T800M(VT
- Page 105 and 106: AGP Bus Interface (Continued) Signa
- Page 107 and 108: 5.3 VT8235 South Bridge-1 V-Link In
- Page 109 and 110: 5.3 VT8235 South Bridge-3 PCI Bus I
- Page 111 and 112: UltraDMA-133 /100 /66 /33 Enhanced
- Page 113 and 114: Power Management and Event Detectio
- Page 115 and 116: 5.3 VT8235 South Bridge-9 Power and
- Page 117 and 118: 7. Maintenance Diagnostics 7.1 Intr
- Page 119 and 120: 7.2 Error Codes Code 30h 31h 32h 33
- Page 121 and 122: 7.3.2 Diagnostic Tool for PIO Port
- Page 123 and 124: P30 Power In PJ501 PL1 PL2 PL3 PF1
- Page 125 and 126: Power In +VMAIN_2951 F503 FUSE_1206
- Page 127 and 128: P23 U511 H8/F3437 11 16 8355 N/B MA
- Page 129 and 130: P2 P5 P7 P20 8.3 No Display U503 AM
- Page 131 and 132: 8.3 No Display (System Failure) ALL
- Page 133 and 134: U506 8355 N/B MAINTENANCE 8.4 AGP C
- Page 135 and 136: 8.5 External Monitor No Display 835
- Page 137 and 138: 8.6 Memory Test Error P2 8355 N/B M
- Page 139 and 140:
P22 U509 Super I/O PC87393 73 R216
- Page 141 and 142:
P13 8355 N/B MAINTENANCE 8.8 Hard D
- Page 143 and 144:
P13 1 2 8355 N/B MAINTENANCE 8.9 CD
- Page 145 and 146:
8.10 USB Test Error (1) P12 8355 N/
- Page 147 and 148:
8.10 USB Test Error USB Test Error
- Page 149 and 150:
8.11 PC-Card Socket Failure PC Card
- Page 151 and 152:
8.12 Memory-Card Socket Failure Mem
- Page 153 and 154:
8.13 IEEE1394 Test Error 1394 Test
- Page 155 and 156:
8.14 LAN Test Error LAN Test Error
- Page 157 and 158:
P13 U20 South Bridge VT8235 8.15 Au
- Page 159 and 160:
9. Spare Part List-1 Part Number De
- Page 161 and 162:
9. Spare Part List-3 Part Number De
- Page 163 and 164:
9. Spare Part List-5 Part Number De
- Page 165 and 166:
9. Spare Part List-7 Part Number De
- Page 167 and 168:
9. Spare Part List-9 Part Number De
- Page 169 and 170:
9. Spare Part List-11 Part Number D
- Page 171 and 172:
9. Spare Part List-13 Part Number D
- Page 175 and 176:
5 COVER SHEET & SCREW HOLE ClawHamm
- Page 177 and 178:
5 5 1 2 4 4 ClawHammer-Power plane(
- Page 179 and 180:
1 2 1 2 5 5 1 2 1 2 GND 4 1 2 4 1 2
- Page 181 and 182:
5 5 4 4 ATI M10-P(1/4) 3 AGP_VDDQ +
- Page 183 and 184:
5 4 ATI M10-P(3/4) 3 D C MEMA_MD0 M
- Page 185 and 186:
+5V 5 CRTGND TV CONNECTOR 5 GND GND
- Page 187 and 188:
15 HD_PDD[0..15] 5 HD_PDD[0..15] 15
- Page 189 and 190:
5 5 4 4 3 3 2 2 1 1 D D C C B B A A
- Page 191 and 192:
MINI-PCI AD21 PCI_INTD# REQ2#/GNT2#
- Page 193 and 194:
GND 5 GND R105 0603 1 2 0/NA 5 Q11
- Page 195 and 196:
5 5 4 4 AUDIO AMPLIFIER - TPA0202 3
- Page 197 and 198:
1 2 3 1 A K 1 2 1 2 1 2 5 1 2 1 2 1
- Page 199 and 200:
5 PCI PULL HIGH SB X-BUS PULL HIGH
- Page 201 and 202:
5 5 4 4 3 3 2 2 1 1 D D C C B B A A
- Page 203 and 204:
5 5 4 4 FOR M10 +1.2V&+1.0V 3 D D 2
- Page 205 and 206:
5 5 4 4 3 3 2 2 1 1 D D C C B B A A
- Page 207 and 208:
Reference Material AMD Athlon TM 6