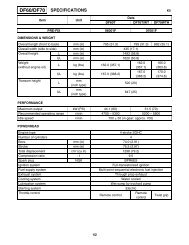
717 Engines
717 Engines
717 Engines

Create successful ePaper yourself
Turn your PDF publications into a flip-book with our unique Google optimized e-Paper software.
Remove cylinder head no. 2.<br />
If shells, sand, salt water or any other particles<br />
are present in cylinder cooling jacket, clean with<br />
a vacuum cleaner.<br />
947 DI <strong>Engines</strong><br />
Disconnect hose of RAVE valves. Remove air/fuel<br />
rail. Refer to ENGINE MANAGEMENT.<br />
Use Snap-On Torx socket E12 and unscrew cylinder<br />
head screws no. 14 following the sequence<br />
shown in the next illustration.<br />
2<br />
F12D08B<br />
6<br />
1<br />
9<br />
12<br />
7<br />
5<br />
11<br />
3<br />
10 8<br />
Remove cylinder head no. 2 and gasket no. 34.<br />
Cylinder<br />
NOTE: When removing cylinder, make sure connecting<br />
rods do not hit crankcase edge.<br />
787 RFI <strong>Engines</strong><br />
Remove air intake silencer and support, refer to<br />
AIR INTAKE.<br />
<strong>717</strong> and 787 RFI <strong>Engines</strong><br />
Remove tuned pipe and exhaust manifold, refer to<br />
EXHAUST SYSTEM.<br />
Remove screws no. 13.<br />
Remove cylinders no. 9, while making sure connecting<br />
rods do not hit crankcase edge.<br />
WARNING<br />
If screws need to be heated for removal when<br />
engine is in watercraft, fuel system pressurization<br />
must be done first. Do not use open<br />
flame; use a heat gun.<br />
NOTE: Even if only 1 cylinder needs repair, both<br />
cylinders should be lifted to allow 1-piece cylinder<br />
base gasket replacement.<br />
4<br />
Section 04 ENGINE (2-STROKE)<br />
Subsection 04 (TOP END)<br />
947 DI <strong>Engines</strong><br />
Remove cylinders screws then cylinders no. 9.<br />
Piston<br />
NOTE: All engines feature cageless piston pin<br />
bearings.<br />
<strong>717</strong> and 787 RFI <strong>Engines</strong><br />
Bring piston to Top Dead Center and install rubber<br />
pad (P/N 295 000 101) over crankcase opening.<br />
Secure with screws. Lower piston until it sits on<br />
pad.<br />
F01B0JA<br />
1. Rubber pad (P/N 295 000 101)<br />
1<br />
If the other cylinder has been removed, completely<br />
cover its opening with a clean rag.<br />
F01D43A<br />
1. Openings covered with rag and rubber pad<br />
947 DI <strong>Engines</strong><br />
Install rubber pad (P/N 290 877 032) on crankcase.<br />
Secure with screws. Lower piston to be removed<br />
until it sits on pad.<br />
smr2004-Complete Line Up 109<br />
11<br />
1