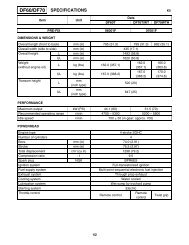
717 Engines
717 Engines
717 Engines

You also want an ePaper? Increase the reach of your titles
YUMPU automatically turns print PDFs into web optimized ePapers that Google loves.
NOTE: Crankshaft deflection cannot be correctly<br />
measured between centers of a lathe.<br />
Connecting Rod Big End Axial Play<br />
CONNECTING ROD BIG END AXIAL PLAY<br />
MODEL<br />
<strong>717</strong><br />
engines<br />
787 RFI<br />
engines<br />
947 DI<br />
engines<br />
NEW PARTS<br />
(min.) (max.)<br />
0.311 mm<br />
(.012 in)<br />
0.230 mm<br />
(.008 in)<br />
0.390 mm<br />
(.015 in)<br />
0.677 mm<br />
(.026 in)<br />
0.617 mm<br />
(.024 in)<br />
0.737 mm<br />
(.029 in)<br />
WEAR<br />
LIMIT<br />
1.2 mm<br />
(.047 in)<br />
1.2 mm<br />
(.047 in)<br />
1.2 mm<br />
(.047 in)<br />
Using a feeler gauge, measure distance between<br />
thrust washer and crankshaft counterweight.<br />
F01D1WA<br />
1<br />
2<br />
1. Measuring big end axial play<br />
2. Feeler gauge<br />
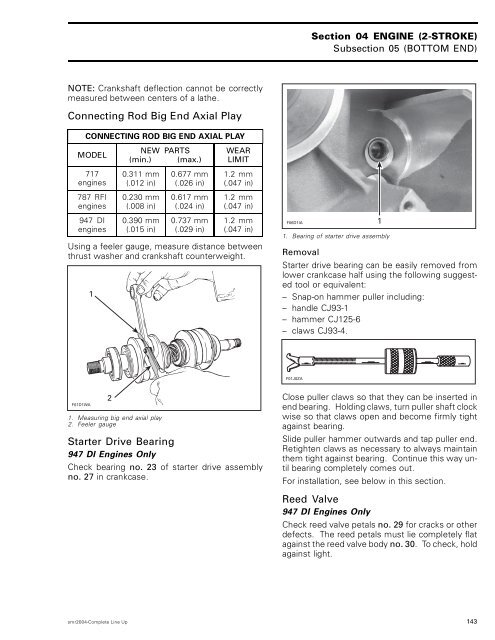
Starter Drive Bearing<br />
947 DI <strong>Engines</strong> Only<br />
Check bearing no. 23 of starter drive assembly<br />
no. 27 in crankcase.<br />
F06D1IA<br />
Section 04 ENGINE (2-STROKE)<br />
Subsection 05 (BOTTOM END)<br />
1. Bearing of starter drive assembly<br />
1<br />
Removal<br />
Starter drive bearing can be easily removed from<br />
lower crankcase half using the following suggested<br />
tool or equivalent:<br />
– Snap-onhammerpullerincluding:<br />
– handle CJ93-1<br />
– hammer CJ125-6<br />
– claws CJ93-4.<br />
F01J0ZA<br />
Closepullerclawssothattheycanbeinsertedin<br />
end bearing. Holding claws, turn puller shaft clock<br />
wise so that claws open and become firmly tight<br />
against bearing.<br />
Slide puller hammer outwards and tap puller end.<br />
Retighten claws as necessary to always maintain<br />
them tight against bearing. Continue this way until<br />
bearing completely comes out.<br />
For installation, see below in this section.<br />
Reed Valve<br />
947 DI <strong>Engines</strong> Only<br />
Check reed valve petals no. 29 for cracks or other<br />
defects. The reed petals must lie completely flat<br />
against the reed valve body no. 30. To check, hold<br />
against light.<br />
smr2004-Complete Line Up 143