

User Manual - Snap Studios
User Manual - Snap Studios
User Manual - Snap Studios

You also want an ePaper? Increase the reach of your titles
YUMPU automatically turns print PDFs into web optimized ePapers that Google loves.
23<br />
25<br />
27<br />
29<br />
31<br />
2<br />
1<br />
24<br />
26<br />
28<br />
30<br />
32<br />
10<br />
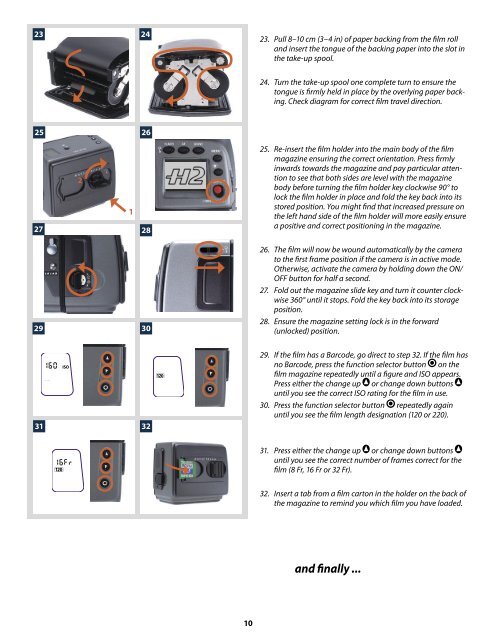
23. Pull 8–10 cm (3–4 in) of paper backing from the film roll<br />
and insert the tongue of the backing paper into the slot in<br />
the take-up spool.<br />
24. Turn the take-up spool one complete turn to ensure the<br />
tongue is firmly held in place by the overlying paper backing.<br />
Check diagram for correct film travel direction.<br />
25. Re-insert the film holder into the main body of the film<br />
magazine ensuring the correct orientation. Press firmly<br />
inwards towards the magazine and pay particular attention<br />
to see that both sides are level with the magazine<br />
body before turning the film holder key clockwise 90° to<br />
lock the film holder in place and fold the key back into its<br />
stored position. You might find that increased pressure on<br />
the left hand side of the film holder will more easily ensure<br />
a positive and correct positioning in the magazine.<br />
26. The film will now be wound automatically by the camera<br />
to the first frame position if the camera is in active mode.<br />
Otherwise, activate the camera by holding down the ON/<br />
OFF button for half a second.<br />
27. Fold out the magazine slide key and turn it counter clockwise<br />
360° until it stops. Fold the key back into its storage<br />
position.<br />
28. Ensure the magazine setting lock is in the forward<br />
(unlocked) position.<br />
29. If the film has a Barcode, go direct to step 32. If the film has<br />
no Barcode, press the function selector button on the<br />
film magazine repeatedly until a figure and ISO appears.<br />
Press either the change up or change down buttons<br />
until you see the correct ISO rating for the film in use.<br />
30. Press the function selector button repeatedly again<br />
until you see the film length designation (120 or 220).<br />
31. Press either the change up or change down buttons<br />
until you see the correct number of frames correct for the<br />
film (8 Fr, 16 Fr or 32 Fr).<br />
32. Insert a tab from a film carton in the holder on the back of<br />
the magazine to remind you which film you have loaded.<br />
and finally ...