

User Manual - Snap Studios
User Manual - Snap Studios
User Manual - Snap Studios

Create successful ePaper yourself
Turn your PDF publications into a flip-book with our unique Google optimized e-Paper software.
1<br />
A<br />
B<br />
C<br />
D<br />
E<br />
3<br />
5<br />
2<br />
4<br />
6<br />
2<br />
1<br />
30<br />
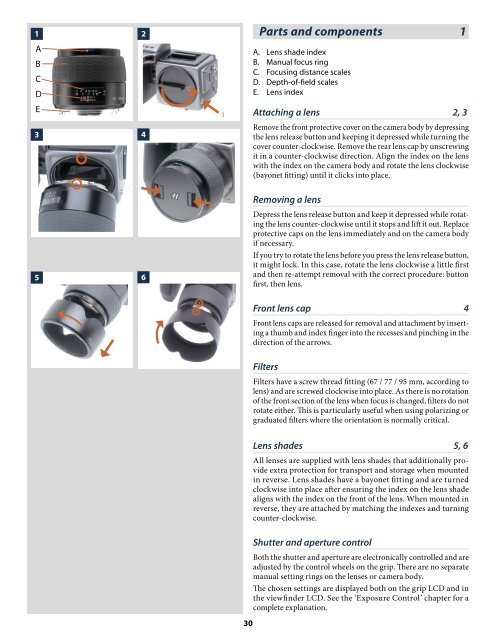
Parts and components 1<br />
A. Lens shade index<br />
B. <strong>Manual</strong> focus ring<br />
C. Focusing distance scales<br />
D. Depth-of-field scales<br />
E. Lens index<br />
Attaching a lens 2, 3<br />
Remove the front protective cover on the camera body by depressing<br />
the lens release button and keeping it depressed while turning the<br />
cover counter-clockwise. Remove the rear lens cap by unscrewing<br />
it in a counter-clockwise direction. Align the index on the lens<br />
with the index on the camera body and rotate the lens clockwise<br />
(bayonet fitting) until it clicks into place.<br />
Removing a lens<br />
Depress the lens release button and keep it depressed while rotating<br />
the lens counter-clockwise until it stops and lift it out. Replace<br />
protective caps on the lens immediately and on the camera body<br />
if necessary.<br />
If you try to rotate the lens before you press the lens release button,<br />
it might lock. In this case, rotate the lens clockwise a little first<br />
and then re-attempt removal with the correct procedure: button<br />
first, then lens.<br />
Front lens cap 4<br />
Front lens caps are released for removal and attachment by inserting<br />
a thumb and index finger into the recesses and pinching in the<br />
direction of the arrows.<br />
Filters<br />
Filters have a screw thread fitting (67 / 77 / 95 mm, according to<br />
lens) and are screwed clockwise into place. As there is no rotation<br />
of the front section of the lens when focus is changed, filters do not<br />
rotate either. This is particularly useful when using polarizing or<br />
graduated filters where the orientation is normally critical.<br />
Lens shades 5, 6<br />
All lenses are supplied with lens shades that additionally provide<br />
extra protection for transport and storage when mounted<br />
in reverse. Lens shades have a bayonet fitting and are turned<br />
clockwise into place after ensuring the index on the lens shade<br />
aligns with the index on the front of the lens. When mounted in<br />
reverse, they are attached by matching the indexes and turning<br />
counter-clockwise.<br />
Shutter and aperture control<br />
Both the shutter and aperture are electronically controlled and are<br />
adjusted by the control wheels on the grip. There are no separate<br />
manual setting rings on the lenses or camera body.<br />
The chosen settings are displayed both on the grip LCD and in<br />
the viewfinder LCD. See the ‘Exposure Control’ chapter for a<br />
complete explanation.