

User Manual - Snap Studios
User Manual - Snap Studios
User Manual - Snap Studios

Create successful ePaper yourself
Turn your PDF publications into a flip-book with our unique Google optimized e-Paper software.
1<br />
2 3<br />
4<br />
C<br />
A B<br />
24<br />
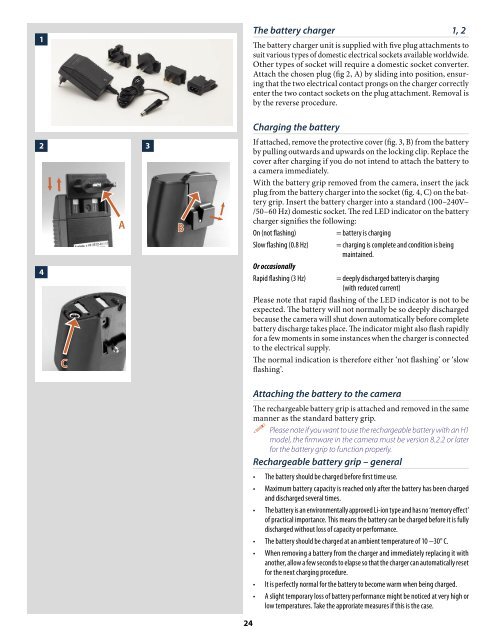
The battery charger 1, 2<br />
The battery charger unit is supplied with five plug attachments to<br />
suit various types of domestic electrical sockets available worldwide.<br />
Other types of socket will require a domestic socket converter.<br />
Attach the chosen plug (fig 2, A) by sliding into position, ensuring<br />
that the two electrical contact prongs on the charger correctly<br />
enter the two contact sockets on the plug attachment. Removal is<br />
by the reverse procedure.<br />
Charging the battery<br />
If attached, remove the protective cover (fig. 3, B) from the battery<br />
by pulling outwards and upwards on the locking clip. Replace the<br />
cover after charging if you do not intend to attach the battery to<br />
a camera immediately.<br />
With the battery grip removed from the camera, insert the jack<br />
plug from the battery charger into the socket (fig. 4, C) on the battery<br />
grip. Insert the battery charger into a standard (100–240V~<br />
/50–60 Hz) domestic socket. The red LED indicator on the battery<br />
charger signifies the following:<br />
On (not flashing) = battery is charging<br />
Slow flashing (0.8 Hz) = charging is complete and condition is being<br />
maintained.<br />
Or occasionally<br />
Rapid flashing (3 Hz) = deeply discharged battery is charging<br />
(with reduced current)<br />
Please note that rapid flashing of the LED indicator is not to be<br />
expected. The battery will not normally be so deeply discharged<br />
because the camera will shut down automatically before complete<br />
battery discharge takes place. The indicator might also flash rapidly<br />
for a few moments in some instances when the charger is connected<br />
to the electrical supply.<br />
The normal indication is therefore either ‘not flashing’ or ‘slow<br />
flashing’.<br />
Attaching the battery to the camera<br />
The rechargeable battery grip is attached and removed in the same<br />
manner as the standard battery grip.<br />
Please note if you want to use the rechargeable battery with an H1<br />
model, the firmware in the camera must be version 8.2.2 or later<br />
for the battery grip to function properly.<br />
Rechargeable battery grip – general<br />
• The battery should be charged before first time use.<br />
• Maximum battery capacity is reached only after the battery has been charged<br />
and discharged several times.<br />
• The battery is an environmentally approved Li-ion type and has no ‘memory effect’<br />
of practical importance. This means the battery can be charged before it is fully<br />
discharged without loss of capacity or performance.<br />
• The battery should be charged at an ambient temperature of 10 −30° C.<br />
• When removing a battery from the charger and immediately replacing it with<br />
another, allow a few seconds to elapse so that the charger can automatically reset<br />
for the next charging procedure.<br />
• It is perfectly normal for the battery to become warm when being charged.<br />
• A slight temporary loss of battery performance might be noticed at very high or<br />
low temperatures. Take the approriate measures if this is the case.