

User Manual - Snap Studios
User Manual - Snap Studios
User Manual - Snap Studios

You also want an ePaper? Increase the reach of your titles
YUMPU automatically turns print PDFs into web optimized ePapers that Google loves.
G H<br />
I<br />
K L<br />
J<br />
35<br />
a time-out of five seconds of non-activity, the display returns to<br />
the main screen.<br />
Changes can only be made when the settings lock switch is in the<br />
unlocked position.<br />
Film plane index F<br />
Provides a measuring point for the actual position of the film plane<br />
in the magazine. Used for calculations in critical applications.<br />
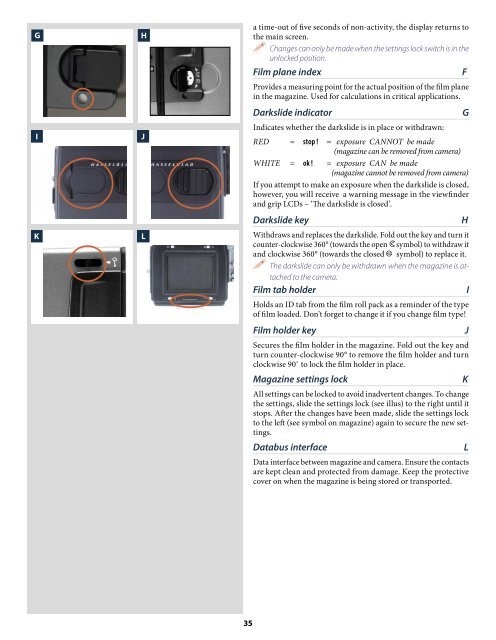
Darkslide indicator G<br />
Indicates whether the darkslide is in place or withdrawn:<br />
RED = stop ! = exposure CANNOT be made<br />
(magazine can be removed from camera)<br />
WHITE = ok ! = exposure CAN be made<br />
(magazine cannot be removed from camera)<br />
If you attempt to make an exposure when the darkslide is closed,<br />
however, you will receive a warning message in the viewfinder<br />
and grip LCDs – ‘The darkslide is closed’.<br />
Darkslide key H<br />
Withdraws and replaces the darkslide. Fold out the key and turn it<br />
counter-clockwise 360° (towards the open symbol) to withdraw it<br />
and clockwise 360° (towards the closed symbol) to replace it.<br />
The darkslide can only be withdrawn when the magazine is attached<br />
to the camera.<br />
Film tab holder I<br />
Holds an ID tab from the film roll pack as a reminder of the type<br />
of film loaded. Don’t forget to change it if you change film type!<br />
Film holder key J<br />
Secures the film holder in the magazine. Fold out the key and<br />
turn counter-clockwise 90° to remove the film holder and turn<br />
clockwise 90˚ to lock the film holder in place.<br />
Magazine settings lock K<br />
All settings can be locked to avoid inadvertent changes. To change<br />
the settings, slide the settings lock (see illus) to the right until it<br />
stops. After the changes have been made, slide the settings lock<br />
to the left (see symbol on magazine) again to secure the new settings.<br />
Databus interface L<br />
Data interface between magazine and camera. Ensure the contacts<br />
are kept clean and protected from damage. Keep the protective<br />
cover on when the magazine is being stored or transported.