

User Manual - Snap Studios
User Manual - Snap Studios
User Manual - Snap Studios

Create successful ePaper yourself
Turn your PDF publications into a flip-book with our unique Google optimized e-Paper software.
Menu charts – general<br />
Throughout this manual you will find charts to explain the steps<br />
and procedures required to alter the various settings. These<br />
charts are laid out to graphically illustrate in a simple manner<br />
how to navigate through the menus. While they include all the<br />
information that would be presented on the LCD relevant to that<br />
section, they cannot illustrate all the possible combinations of<br />
the various symbols seen on a screen at one time as that would<br />
be impractical and too confusing. If you are at all familiar with<br />
cell phone menus, for example, then the design of the layout and<br />
working practice will not be unfamiliar<br />
You should find that, in practice, working your way through a<br />
menu on the camera is a good deal simpler and more obvious<br />
than the written explanation implies!<br />
In the descriptions, various terms are used regarding menu navigation.<br />
Menus have ‘trees’, for example, which describes their imaginary<br />
graphical layout where you could trace a navigational<br />
path along its ‘branches’. Each new section, or stopping off point<br />
on the branches, seen on the LCD is called a ‘screen’. Therefore a<br />
screen is the graphical display on the LCD of where you are on the<br />
menu and represents the current state of settings.<br />
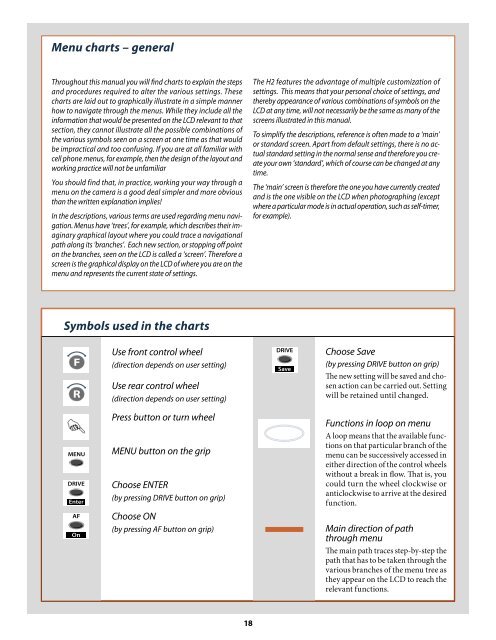
Symbols used in the charts<br />
<br />
<br />
<br />
<br />
<br />
<br />
<br />
Use front control wheel<br />
(direction depends on user setting)<br />
Use rear control wheel<br />
(direction depends on user setting)<br />
Press button or turn wheel<br />
MENU button on the grip<br />
Choose ENTER<br />
(by pressing DRIVE button on grip)<br />
Choose ON<br />
(by pressing AF button on grip)<br />
18<br />
The H2 features the advantage of multiple customization of<br />
settings. This means that your personal choice of settings, and<br />
thereby appearance of various combinations of symbols on the<br />
LCD at any time, will not necessarily be the same as many of the<br />
screens illustrated in this manual.<br />
To simplify the descriptions, reference is often made to a ‘main’<br />
or standard screen. Apart from default settings, there is no actual<br />
standard setting in the normal sense and therefore you create<br />
your own ‘standard’, which of course can be changed at any<br />
time.<br />
The ‘main’ screen is therefore the one you have currently created<br />
and is the one visible on the LCD when photographing (except<br />
where a particular mode is in actual operation, such as self-timer,<br />
for example).<br />
<br />
<br />
Choose Save<br />
(by pressing DRIVE button on grip)<br />
The new setting will be saved and chosen<br />
action can be carried out. Setting<br />
will be retained until changed.<br />
Functions in loop on menu<br />
A loop means that the available functions<br />
on that particular branch of the<br />
menu can be successively accessed in<br />
either direction of the control wheels<br />
without a break in flow. That is, you<br />
could turn the wheel clockwise or<br />
anticlockwise to arrive at the desired<br />
function.<br />
Main direction of path<br />
through menu<br />
The main path traces step-by-step the<br />
path that has to be taken through the<br />
various branches of the menu tree as<br />
they appear on the LCD to reach the<br />
relevant functions.