CL100 / CL300 Service Manual - Welch Allyn
CL100 / CL300 Service Manual - Welch Allyn
CL100 / CL300 Service Manual - Welch Allyn

Create successful ePaper yourself
Turn your PDF publications into a flip-book with our unique Google optimized e-Paper software.
CHASSIS FAN REMOVAL<br />
1. Remove 9 screws securing top cover and remove the cover. Remove 4 screws securing the fan to the back<br />
panel.<br />
2. Remove heat shrink tubing from the fan connector. Disconnect and remove the wire ties from the harness at<br />
the platform mounts. Remove the fan.<br />
3. Installation is the reverse process.<br />
LED/OVERTEMP HARNESS REMOVAL<br />
1. Remove 9 screws securing top cover and remove the cover. Remove the 5 screws securing the front bezel to<br />
the bottom chassis and pull front panel out from chassis.<br />
2. Remove the overtemp switch from the fan deflector assembly. Remove the wire tie from the overtemp switch<br />
harness at the platform.<br />
3. Using a sharp knife, remove the black RTV from the LED wires where it mounts to the front bezel. Once<br />
removed, apply acetone to the LED and the front bezel to weaken the glue bond and remove the LED from the<br />
front bezel.<br />
4. Remove the 3 wire ties and remove the harness.<br />
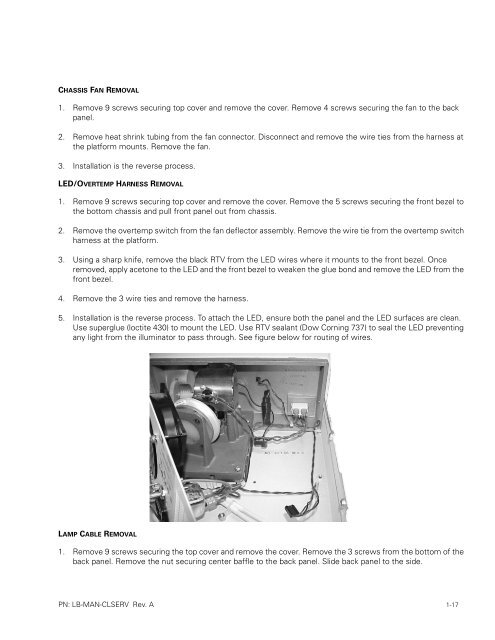
5. Installation is the reverse process. To attach the LED, ensure both the panel and the LED surfaces are clean.<br />
Use superglue (loctite 430) to mount the LED. Use RTV sealant (Dow Corning 737) to seal the LED preventing<br />
any light from the illuminator to pass through. See figure below for routing of wires.<br />
LAMP CABLE REMOVAL<br />
1. Remove 9 screws securing the top cover and remove the cover. Remove the 3 screws from the bottom of the<br />
back panel. Remove the nut securing center baffle to the back panel. Slide back panel to the side.<br />
PN: LB-MAN-CLSERV Rev. A 1-17