DUAL ®& DUAL ® SH SINGLE ®& SINGLE ® SH - Expert-CM
DUAL ®& DUAL ® SH SINGLE ®& SINGLE ® SH - Expert-CM
DUAL ®& DUAL ® SH SINGLE ®& SINGLE ® SH - Expert-CM

You also want an ePaper? Increase the reach of your titles
YUMPU automatically turns print PDFs into web optimized ePapers that Google loves.
SERVICE (cont.)<br />
BYPASS VALVE<br />
.<br />
MINUTES<br />
BUNN-O-MATIC<br />
P/N 2620- 120 VAC<br />
.<br />
MINUTES<br />
BUNN-O-MATIC<br />
P/N 2620- 120 VAC<br />
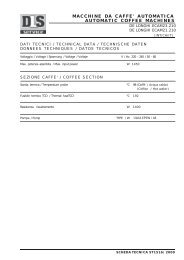
Location:<br />
The bypass valves are located on the sprayhead<br />
panel inside the hood.<br />
Test Procedures:<br />
1. Disconnect the brewer from the power source and<br />
place a server beneath the funnel.<br />
2. Check the water level in the tank to confirm that it<br />
is within 1/2" from the top of the tank.<br />
3. Connect the brewer to the power source.<br />
4. Check the bypass valve for coil action. Place the ON/<br />
OFF switch in the "ON" position, press and release<br />
the BREW switch. Listen carefully in the vicinity of<br />
the bypass valve for a "clicking" sound as the coil<br />
magnet attracts and repels the plunger.<br />
5. Disconnect the brewer from the power source.<br />
If the sound is heard as described, there may be a<br />
blockage in the bypass valve or the water line to the<br />
sprayhead. Remove the bypass valve and inspect for<br />
wear, and remove waterborne particles.<br />
If the sound is not heard as described, proceed to<br />
#6.<br />
1 gal<br />
C A U T I O N : W A R M E R S A N D S U R F A C E S A R E H O T<br />
! CAUTION HOT WATER<br />
FIG. 1 BYPASS VALVES<br />
P773<br />
Page 11<br />
6. Connect the voltmeter lead ends to the bypass valve<br />
coil terminals. Connect the brewer to the power<br />
source. With the selector switch in the 1 or 1-1/2<br />
gallon position, place "ON/OFF" Switch in the "ON"<br />
position. Press and release the brew switch. The<br />
indication must be:<br />
a.) 120 volts ac for two wire 120 volt models,<br />
three wire 120/208 volt and three wire 120/240<br />
volt models.<br />
b.) 200 to 240 volts ac for two wire 200 or 240<br />
volt models.<br />
7. Disconnect the brewer from the power source.<br />
If voltage is present as described, but no coil action is<br />
observed, nor "clicking" heard, bypass valve is defective.<br />
Replace valve and test again to verify repair.<br />
If voltage is not present as described, refer to Wiring<br />
Diagrams and check the brewer wiring harness. Also<br />
check the control board for proper operation.<br />
Removal and Replacement:<br />
1. Remove the wires from the bypass valve.<br />
2. Drain enough water from the tank so bypass valve<br />
is above the water line.<br />
3. Remove water lines from bypass valve.<br />
4. Remove the two nuts retaining the bypass valve<br />
inside the hood and remove bypass valve.<br />
5. Remove hose barb fitting and attach to new bypass<br />
valve.<br />
6. Install new bypass valve with hose barb fitting.<br />
7. Reconnect the water tubes and the wires to the<br />
bypass valve.<br />
8. Refer to Fig. 2 when reconnecting the wires.<br />
NOTE: If one of the terminals is marked "I", connect<br />
WHI/GRN wire to it.<br />
WHI/GRN to Dispense<br />
Valve<br />
WHI/VIO to Brew<br />
Selector Switch<br />
FIG. 2 BYPASS VALVE TERMINALS<br />
P774<br />
41976 031709