DUAL ®& DUAL ® SH SINGLE ®& SINGLE ® SH - Expert-CM
DUAL ®& DUAL ® SH SINGLE ®& SINGLE ® SH - Expert-CM
DUAL ®& DUAL ® SH SINGLE ®& SINGLE ® SH - Expert-CM

Create successful ePaper yourself
Turn your PDF publications into a flip-book with our unique Google optimized e-Paper software.
SERVICE (cont.)<br />
CONTROL THERMOSTAT<br />
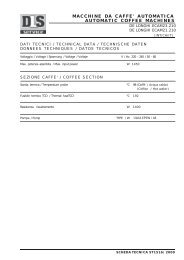
Location:<br />
The control thermostat is located inside the lower<br />
left front of the brewer on the component bracket.<br />
1. Disconnect the brewer from the power source.<br />
2. Locate the blue wire on the control thermostat.<br />
3. With a voltmeter, check the voltage across the<br />
blue wire on the control thermostat and the white<br />
insert on the two or three pole 120V, 120/208V,<br />
120/240V terminal block and the red insert on<br />
two pole 200V, 240V terminal block. Connect the<br />
brewer to the power source. The indication must<br />
be:<br />
a.) 120 volts ac for two wire 120V models, three<br />
wire 120/208 volt models and three wire 120/240<br />
volt models.<br />
b.) 200 to 240 volts ac for two wire 200 or 240<br />
volt models.<br />
4. Disconnect the brewer from the power source.<br />
If voltage is present as described, proceed to #5.<br />
If voltage is not present as described, refer to the Wiring<br />
Diagrams and check brewer wiring harness.<br />
.<br />
MINUTES<br />
BUNN-O-MATIC<br />
P/N 2620- 120 VAC<br />
.<br />
MINUTES<br />
BUNN-O-MATIC<br />
P/N 2620- 120 VAC<br />
1 1⁄2 gal<br />
1 gal<br />
1⁄2 gal<br />
READY SELECTOR<br />
ON / WARMER START<br />
C A U T I O N : W A R M E R S A N D S U R F A C E S A R E H O T<br />
! CAUTION HOT WATER<br />
1 1⁄2 gal<br />
1 gal<br />
1⁄2 gal<br />
START ON / WARMER SELECTOR READY<br />
FIG. 9 CONTROL THERMOSTAT<br />
P779<br />
Page 17<br />
5. Locate the black wires from the control thermostat.<br />
6. Gently remove the capillary bulb and grommet<br />
from the tank.<br />
7. With a voltmeter, check the voltage across the<br />
black wires of the control thermostat and the white<br />
insert on the two pole or three pole 120V, 120/208V,<br />
120/240V terminal blocks and the red insert on two<br />
pole 200V, 240V terminal blocks when the control<br />
thermostat is turned "ON" (fully clockwise). Connect<br />
the brewer to the power source. The indication<br />
must be:<br />
a.) 120 volts ac for two wire 120V models, three<br />
wire 120/208 volt models and three wire 120/240<br />
volt models.<br />
b.) 200 to 240 volts ac for two wire 200 or 240<br />
volt models.<br />
Voltage must not be indicated across these terminals<br />
when the thermostat is turned "OFF" (fully<br />
counterclockwise).<br />
8. Disconnect the brewer from the power source.<br />
If voltage is present as described, reinstall the capillary<br />
tube into the tank to the line 7" above the bulb, the<br />
control thermostat is operating properly.<br />
If voltage is not present as described, replace the<br />
thermostat.<br />
Removal and Replacement:<br />
1. Remove wires from the control thermostat.<br />
2. Remove the thermostat capillary bulb by firmly<br />
pulling up on the capillary tube at the tank lid. This<br />
will disengage the grommet from the tank lid.<br />
3. Remove the #8-32 slotted head screw holding the<br />
control thermostat to the component bracket.<br />
4. Slide the grommet to the line 7" above the bulb on<br />
the new capillary tube.<br />
5. Insert the capillary bulb through the hole in the<br />
tank lid and press the grommet firmly and evenly<br />
so that the groove in the grommet fits into the tank<br />
lid.<br />
6. Carefully bend the capillary tube so that the tube<br />
and bulb inside the tank are in the vertical position.<br />
41976 031709