DUAL ®& DUAL ® SH SINGLE ®& SINGLE ® SH - Expert-CM
DUAL ®& DUAL ® SH SINGLE ®& SINGLE ® SH - Expert-CM
DUAL ®& DUAL ® SH SINGLE ®& SINGLE ® SH - Expert-CM

You also want an ePaper? Increase the reach of your titles
YUMPU automatically turns print PDFs into web optimized ePapers that Google loves.
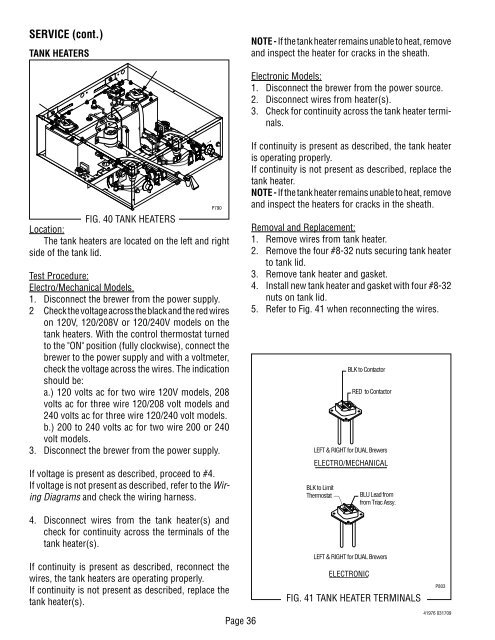
SERVICE (cont.)<br />
TANK HEATERS<br />
.<br />
MINUTES<br />
BUNN-O-MATIC<br />
P/N 2620- 120 VAC<br />
READY SELECTOR<br />
ON / WARMER START<br />
START ON / WARMER SELECTOR READY<br />
FIG. 40 TANK HEATERS<br />
Location:<br />
The tank heaters are located on the left and right<br />
side of the tank lid.<br />
Test Procedure:<br />
Electro/Mechanical Models.<br />
1. Disconnect the brewer from the power supply.<br />
2 Check the voltage across the black and the red wires<br />
on 120V, 120/208V or 120/240V models on the<br />
tank heaters. With the control thermostat turned<br />
to the "ON" position (fully clockwise), connect the<br />
brewer to the power supply and with a voltmeter,<br />
check the voltage across the wires. The indication<br />
should be:<br />
a.) 120 volts ac for two wire 120V models, 208<br />
volts ac for three wire 120/208 volt models and<br />
240 volts ac for three wire 120/240 volt models.<br />
b.) 200 to 240 volts ac for two wire 200 or 240<br />
volt models.<br />
3. Disconnect the brewer from the power supply.<br />
If voltage is present as described, proceed to #4.<br />
If voltage is not present as described, refer to the Wiring<br />
Diagrams and check the wiring harness.<br />
4. Disconnect wires from the tank heater(s) and<br />
check for continuity across the terminals of the<br />
tank heater(s).<br />
If continuity is present as described, reconnect the<br />
wires, the tank heaters are operating properly.<br />
If continuity is not present as described, replace the<br />
tank heater(s).<br />
1⁄2 gal<br />
1 1⁄2 gal<br />
1 gal<br />
1⁄2 gal<br />
1 1⁄2 gal<br />
1 gal<br />
P790<br />
Page 36<br />
NOTE - If the tank heater remains unable to heat, remove<br />
and inspect the heater for cracks in the sheath.<br />
Electronic Models:<br />
1. Disconnect the brewer from the power source.<br />
2. Disconnect wires from heater(s).<br />
3. Check for continuity across the tank heater terminals.<br />
If continuity is present as described, the tank heater<br />
is operating properly.<br />
If continuity is not present as described, replace the<br />
tank heater.<br />
NOTE - If the tank heater remains unable to heat, remove<br />
and inspect the heaters for cracks in the sheath.<br />
Removal and Replacement:<br />
1. Remove wires from tank heater.<br />
2. Remove the four #8-32 nuts securing tank heater<br />
to tank lid.<br />
3. Remove tank heater and gasket.<br />
4. Install new tank heater and gasket with four #8-32<br />
nuts on tank lid.<br />
5. Refer to Fig. 41 when reconnecting the wires.<br />
BLK to Limit<br />
Thermostat<br />
BLK to Contactor<br />
RED to Contactor<br />
LEFT & RIGHT for <strong>DUAL</strong> Brewers<br />
ELECTRO/MECHANICAL<br />
BLU Lead from<br />
from Triac Assy.<br />
LEFT & RIGHT for <strong>DUAL</strong> Brewers<br />
ELECTRONIC<br />
FIG. 41 TANK HEATER TERMINALS<br />
P803<br />
41976 031709