Hx1-Hx2 Manual-1.4.1 - Telos
Hx1-Hx2 Manual-1.4.1 - Telos
Hx1-Hx2 Manual-1.4.1 - Telos

You also want an ePaper? Increase the reach of your titles
YUMPU automatically turns print PDFs into web optimized ePapers that Google loves.
6 Troubleshooting<br />
6.1 On-board Diagnostics<br />
| 37<br />
Pressing and holding the button for 3 seconds puts the unit into a self-diagnostic mode.<br />
When the unit is in diagnostic mode, the Line Status display shows the current diagnostic state.<br />
This mode is only intended to provide status information, and to confirm if the hybrid unit is<br />
operational. NOTE: The left hybrid front panel buttons control diagnostics of both hybrids on<br />
an <strong>Hx2</strong> unit.<br />
6.1.1 Software Version<br />
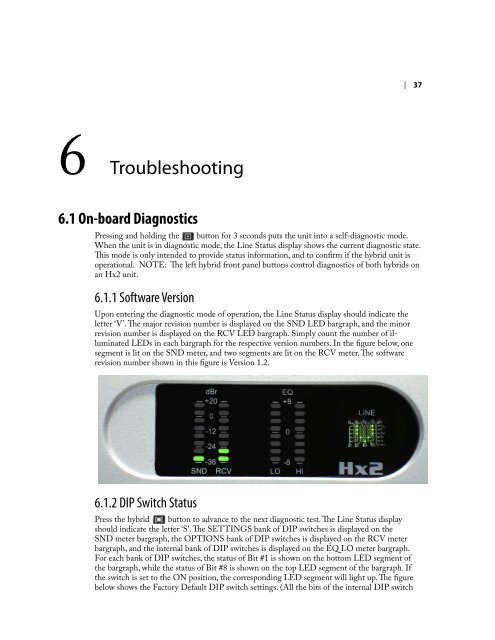
Upon entering the diagnostic mode of operation, the Line Status display should indicate the<br />
letter ‘V’. The major revision number is displayed on the SND LED bargraph, and the minor<br />
revision number is displayed on the RCV LED bargraph. Simply count the number of illuminated<br />
LEDs in each bargraph for the respective version numbers. In the figure below, one<br />
segment is lit on the SND meter, and two segments are lit on the RCV meter. The software<br />
revision number shown in this figure is Version 1.2.<br />
6.1.2 DIP Switch Status<br />
Press the hybrid button to advance to the next diagnostic test. The Line Status display<br />
should indicate the letter ‘S’. The SETTINGS bank of DIP switches is displayed on the<br />
SND meter bargraph, the OPTIONS bank of DIP switches is displayed on the RCV meter<br />
bargraph, and the internal bank of DIP switches is displayed on the EQ LO meter bargraph.<br />
For each bank of DIP switches, the status of Bit #1 is shown on the bottom LED segment of<br />
the bargraph, while the status of Bit #8 is shown on the top LED segment of the bargraph. If<br />
the switch is set to the ON position, the corresponding LED segment will light up. The figure<br />
below shows the Factory Default DIP switch settings. (All the bits of the internal DIP switch