

AUTO-CUT 300 - Victor Technologies
AUTO-CUT 300 - Victor Technologies
AUTO-CUT 300 - Victor Technologies

Create successful ePaper yourself
Turn your PDF publications into a flip-book with our unique Google optimized e-Paper software.
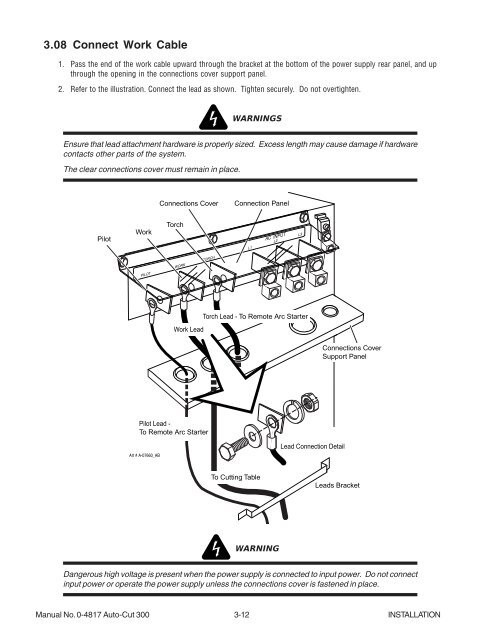
3.08 Connect Work Cable<br />
1. Pass the end of the work cable upward through the bracket at the bottom of the power supply rear panel, and up<br />
through the opening in the connections cover support panel.<br />
2. Refer to the illustration. Connect the lead as shown. Tighten securely. Do not overtighten.<br />
WARNINGS<br />
Ensure that lead attachment hardware is properly sized. Excess length may cause damage if hardware<br />
contacts other parts of the system.<br />
The clear connections cover must remain in place.<br />
Pilot<br />
Work<br />
PILOT WORK TORCH<br />
Art # A-07660_AB<br />
Connections Cover<br />
Torch<br />
Work Lead<br />
Pilot Lead -<br />
To Remote Arc Starter<br />
Connection Panel<br />
AC INPUT<br />
L1 L2 L3<br />
Torch Lead - To Remote Arc Starter<br />
To Cutting Table<br />
WARNING<br />
Lead Connection Detail<br />
Connections Cover<br />
Support Panel<br />
Leads Bracket<br />
Dangerous high voltage is present when the power supply is connected to input power. Do not connect<br />
input power or operate the power supply unless the connections cover is fastened in place.<br />
Manual No. 0-4817 Auto-Cut <strong>300</strong> 3-12 INSTALLATION


