Using Mail Merge - The Document Foundation Wiki
Using Mail Merge - The Document Foundation Wiki
Using Mail Merge - The Document Foundation Wiki

You also want an ePaper? Increase the reach of your titles
YUMPU automatically turns print PDFs into web optimized ePapers that Google loves.
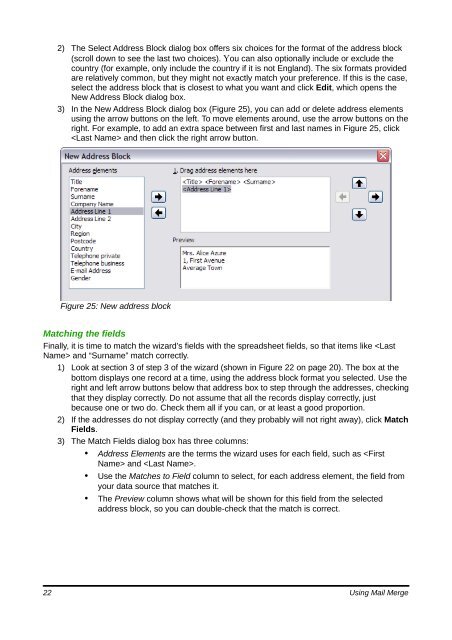
2) <strong>The</strong> Select Address Block dialog box offers six choices for the format of the address block<br />
(scroll down to see the last two choices). You can also optionally include or exclude the<br />
country (for example, only include the country if it is not England). <strong>The</strong> six formats provided<br />
are relatively common, but they might not exactly match your preference. If this is the case,<br />
select the address block that is closest to what you want and click Edit, which opens the<br />
New Address Block dialog box.<br />
3) In the New Address Block dialog box (Figure 25), you can add or delete address elements<br />
using the arrow buttons on the left. To move elements around, use the arrow buttons on the<br />
right. For example, to add an extra space between first and last names in Figure 25, click<br />
and then click the right arrow button.<br />
Figure 25: New address block<br />
Matching the fields<br />
Finally, it is time to match the wizard’s fields with the spreadsheet fields, so that items like and “Surname” match correctly.<br />
1) Look at section 3 of step 3 of the wizard (shown in Figure 22 on page 20). <strong>The</strong> box at the<br />
bottom displays one record at a time, using the address block format you selected. Use the<br />
right and left arrow buttons below that address box to step through the addresses, checking<br />
that they display correctly. Do not assume that all the records display correctly, just<br />
because one or two do. Check them all if you can, or at least a good proportion.<br />
2) If the addresses do not display correctly (and they probably will not right away), click Match<br />
Fields.<br />
3) <strong>The</strong> Match Fields dialog box has three columns:<br />
• Address Elements are the terms the wizard uses for each field, such as and .<br />
• Use the Matches to Field column to select, for each address element, the field from<br />
your data source that matches it.<br />
• <strong>The</strong> Preview column shows what will be shown for this field from the selected<br />
address block, so you can double-check that the match is correct.<br />
22 <strong>Using</strong> <strong>Mail</strong> <strong>Merge</strong>