Using Mail Merge - The Document Foundation Wiki
Using Mail Merge - The Document Foundation Wiki
Using Mail Merge - The Document Foundation Wiki

Create successful ePaper yourself
Turn your PDF publications into a flip-book with our unique Google optimized e-Paper software.
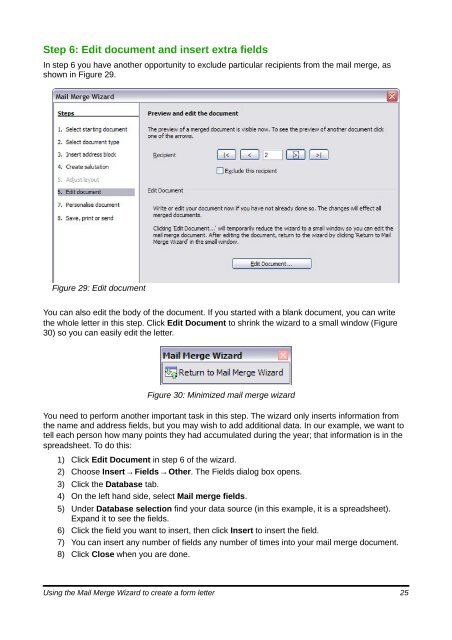
Step 6: Edit document and insert extra fields<br />
In step 6 you have another opportunity to exclude particular recipients from the mail merge, as<br />
shown in Figure 29.<br />
Figure 29: Edit document<br />
You can also edit the body of the document. If you started with a blank document, you can write<br />
the whole letter in this step. Click Edit <strong>Document</strong> to shrink the wizard to a small window (Figure<br />
30) so you can easily edit the letter.<br />
Figure 30: Minimized mail merge wizard<br />
You need to perform another important task in this step. <strong>The</strong> wizard only inserts information from<br />
the name and address fields, but you may wish to add additional data. In our example, we want to<br />
tell each person how many points they had accumulated during the year; that information is in the<br />
spreadsheet. To do this:<br />
1) Click Edit <strong>Document</strong> in step 6 of the wizard.<br />
2) Choose Insert → Fields → Other. <strong>The</strong> Fields dialog box opens.<br />
3) Click the Database tab.<br />
4) On the left hand side, select <strong>Mail</strong> merge fields.<br />
5) Under Database selection find your data source (in this example, it is a spreadsheet).<br />
Expand it to see the fields.<br />
6) Click the field you want to insert, then click Insert to insert the field.<br />
7) You can insert any number of fields any number of times into your mail merge document.<br />
8) Click Close when you are done.<br />
<strong>Using</strong> the <strong>Mail</strong> <strong>Merge</strong> Wizard to create a form letter 25