- Page 1 and 2:
WYNN User’s Guide Version 5.10 Fr
- Page 3 and 4:
Table of Contents Introduction.....
- Page 5 and 6:
Changing a Document’s Color Setti
- Page 7 and 8:
What is WYNN? Introduction WYNN (Wh
- Page 9 and 10:
What's New in WYNN WYNN has many ex
- Page 11 and 12:
• Selectable Form-Filling Mode to
- Page 13 and 14:
• Click the Help menu, and then c
- Page 15 and 16:
… OR … 1. Select an item within
- Page 17 and 18:
WYNN Single-User and Non-Network Mu
- Page 19 and 20:
WYNN Single-User and Non-Network Mu
- Page 21 and 22:
WYNN Single-User and Non-Network Mu
- Page 23 and 24:
WYNN Single-User and Non-Network Mu
- Page 25 and 26:
Network WYNN Installation Note: Thi
- Page 27 and 28:
Network WYNN Installation License S
- Page 29 and 30:
Network WYNN Installation By defaul
- Page 31 and 32:
Network WYNN Installation 5. You ma
- Page 33 and 34:
Network WYNN Installation 5. By def
- Page 35 and 36:
6. Enter the Group name ("WYNN User
- Page 37 and 38:
Network WYNN Installation 4. Select
- Page 39 and 40:
Installing WYNN on a Client Compute
- Page 41 and 42:
Installing WYNN Wizard or WYNN Read
- Page 43 and 44:
Network WYNN Installation • After
- Page 45 and 46:
2. Do one of the following: • If
- Page 47 and 48:
Creating a New Document To create a
- Page 49 and 50:
2. Select the file you want to open
- Page 51 and 52:
Opening a PDF file from within WYNN
- Page 53 and 54:
Increasing the Number of Open Docum
- Page 55 and 56:
Scanning a Page and Making a New Do
- Page 57 and 58:
Scanning and Replacing the Current
- Page 59 and 60:
Getting Started Switching Between E
- Page 61 and 62:
For example: While in Text View, yo
- Page 63 and 64:
If the Edit Note (select) command a
- Page 65 and 66:
Using the Speech Settings Command T
- Page 67 and 68:
The spacing between words increases
- Page 69 and 70:
Changing WYNN’s Voice, Language,
- Page 71 and 72:
If you want to change… Then Only
- Page 73: These settings become the current s
- Page 76 and 77: Getting to Know WYNN 70 User Interf
- Page 78 and 79: Getting to Know WYNN 72 The followi
- Page 80 and 81: Getting to Know WYNN File Managemen
- Page 82 and 83: Getting to Know WYNN 76 Button Desc
- Page 84 and 85: Getting to Know WYNN 78 Button Desc
- Page 86 and 87: Getting to Know WYNN 80 Button Desc
- Page 88 and 89: Getting to Know WYNN 82 Button Desc
- Page 90 and 91: Getting to Know WYNN 84 Button Desc
- Page 92 and 93: Getting to Know WYNN Study Tools To
- Page 94 and 95: Getting to Know WYNN 88 Button Desc
- Page 96 and 97: Getting to Know WYNN 90 Button Desc
- Page 98 and 99: Getting to Know WYNN 92 Button Desc
- Page 100 and 101: Getting to Know WYNN 94 Button Desc
- Page 102 and 103: Getting to Know WYNN 96 Button Desc
- Page 104 and 105: Getting to Know WYNN Web Toolbar 98
- Page 106 and 107: Getting to Know WYNN 100 Button Des
- Page 108 and 109: Getting to Know WYNN 102 Button Des
- Page 110 and 111: Getting to Know WYNN 104 Button Des
- Page 112 and 113: Teacher Exercise Guide 106 Importan
- Page 114 and 115: Teacher Exercise Guide 108 2. From
- Page 116 and 117: Teacher Exercise Guide 110 3. When
- Page 118 and 119: Teacher Exercise Guide 112 4. After
- Page 120 and 121: Teacher Exercise Guide 114 Scanning
- Page 122 and 123: Teacher Exercise Guide 116 Scanning
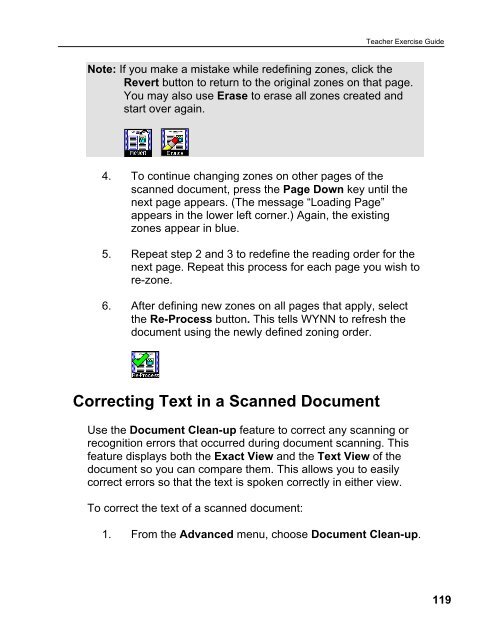
- Page 126 and 127: Teacher Exercise Guide 120 WYNN dis
- Page 128 and 129: Teacher Exercise Guide 122 • Modi
- Page 130 and 131: Teacher Exercise Guide 124 2. Chang
- Page 132 and 133: Teacher Exercise Guide 126 Note: To
- Page 134 and 135: Teacher Exercise Guide 128 5. Click
- Page 136 and 137: Teacher Exercise Guide 130 4. Selec
- Page 138 and 139: Teacher Exercise Guide 132 4. Enter
- Page 140 and 141: Teacher Exercise Guide 134 1. From
- Page 142 and 143: Teacher Exercise Guide 136 Tip: You
- Page 144 and 145: Teacher Exercise Guide 138 Adding P
- Page 146 and 147: Teacher Exercise Guide 140 Tip: If
- Page 148 and 149: Teacher Exercise Guide 142 2. In th
- Page 150 and 151: Teacher Exercise Guide 144 In the f
- Page 152 and 153: Teacher Exercise Guide 146 Custom T
- Page 154 and 155: Teacher Exercise Guide 148 The Save
- Page 156 and 157: Teacher Exercise Guide 150 3. Selec
- Page 158 and 159: Teacher Exercise Guide 152 2. In th
- Page 160 and 161: Teacher Exercise Guide 154 2. Use y
- Page 162 and 163: Teacher Exercise Guide 156 Tip: You
- Page 164 and 165: Teacher Exercise Guide 158 5. Doubl
- Page 166 and 167: Teacher Exercise Guide 160 Tip: You
- Page 168 and 169: Teacher Exercise Guide 162 2. In th
- Page 170 and 171: Teacher Exercise Guide 164 • Blac
- Page 172 and 173: Teacher Exercise Guide 166 2. Selec
- Page 174 and 175:
Student Exercise Guide This section
- Page 176 and 177:
Student Exercise Guide 170 1. Open
- Page 178 and 179:
Student Exercise Guide 172 Note: If
- Page 180 and 181:
Student Exercise Guide 174 • Clic
- Page 182 and 183:
Student Exercise Guide 176 2. Use t
- Page 184 and 185:
Student Exercise Guide 178 2. Selec
- Page 186 and 187:
Student Exercise Guide 180 WYNN hig
- Page 188 and 189:
Student Exercise Guide 182 3. Choos
- Page 190 and 191:
Student Exercise Guide 184 The prin
- Page 192 and 193:
Student Exercise Guide 186 2. Use t
- Page 194 and 195:
Student Exercise Guide 188 Note: If
- Page 196 and 197:
Student Exercise Guide 190 2. Enter
- Page 198 and 199:
Student Exercise Guide 192 1. Open
- Page 200 and 201:
Student Exercise Guide 194 2. Click
- Page 202 and 203:
Student Exercise Guide 196 2. The n
- Page 204 and 205:
Student Exercise Guide 198 3. If yo
- Page 206 and 207:
Student Exercise Guide 200 The spee
- Page 208 and 209:
Student Exercise Guide 202 If you m
- Page 210 and 211:
Student Exercise Guide 204 Edit box
- Page 212 and 213:
Student Exercise Guide 206 1. Open
- Page 215 and 216:
System Requirements The following i
- Page 217 and 218:
System Components Network WYNN Serv
- Page 219 and 220:
WYNN Shortcut Keys Speech Commands
- Page 221 and 222:
Mark-up Commands WYNN Shortcut Keys
- Page 223 and 224:
WYNN Menus This section lists each
- Page 225 and 226:
Edit Menu Commands Access Keys Outl
- Page 227 and 228:
Tools Menu Commands Access Keys Boo
- Page 229 and 230:
Window Menu (ALT+W) Window Commands
- Page 231 and 232:
Activation Options • Use another
- Page 233 and 234:
Activating by Telephone There are t
- Page 235 and 236:
Activation Options If activating us
- Page 237 and 238:
Activation Options Keep your Lockin
- Page 239 and 240:
If activating by mail, Activation O
- Page 241 and 242:
Activation Options Keep your Lockin
- Page 243 and 244:
Activating using the Activation Med
- Page 245 and 246:
File Name C:\WYNN5nw\WYNN.exe or C:
- Page 247 and 248:
Configuring Windows Firewall Activa
- Page 249 and 250:
Activating the License Server throu
- Page 251 and 252:
Quick Reference Note: The following
- Page 253 and 254:
Network Authorization Tool Descript
- Page 255 and 256:
Folder Description WYNN READER ENG
- Page 257 and 258:
2-page scan, 113 activate by fax, 2
- Page 259 and 260:
getting help, 6 Go To, 95 Go to Pag
- Page 261 and 262:
NNMU, 11, 12, 13, 16 Non-Network Mu
- Page 263 and 264:
Spell, 87 Spell Check, 97 spelling,


