fiber products
fiber products
fiber products

You also want an ePaper? Increase the reach of your titles
YUMPU automatically turns print PDFs into web optimized ePapers that Google loves.
Index<br />
Work Area<br />
Racks and<br />
Cable<br />
Management<br />
Glossary<br />
Tools<br />
and<br />
Testers<br />
Patch Cords,<br />
Plugs and<br />
Cable<br />
S210<br />
Products<br />
S110<br />
Products<br />
Protection<br />
S66<br />
Products<br />
Modular<br />
Patching<br />
Shielded<br />
Products<br />
Fiber<br />
Products<br />
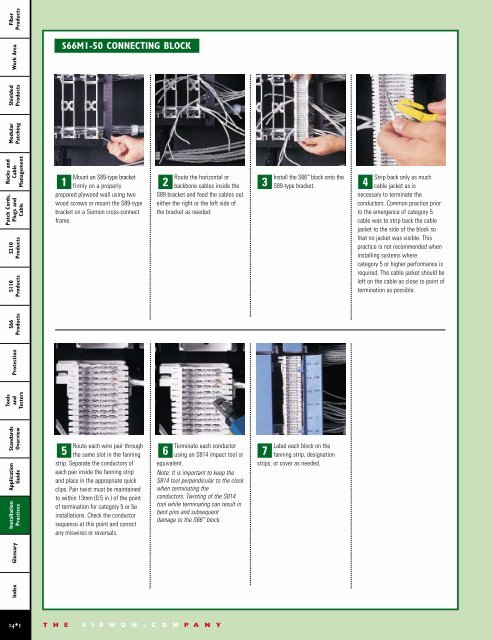
S66M1-50 CONNECTING BLOCK<br />
Mount an S89-type bracket<br />
firmly on a properly<br />
prepared plywood wall using two<br />
wood screws or mount the S89-type<br />
bracket on a Siemon cross-connect<br />
frame.<br />
Route the horizontal or<br />
backbone cables inside the<br />
S89 bracket and feed the cables out<br />
either the right or the left side of<br />
the bracket as needed.<br />
1 2 3<br />
Install the S66 block onto the<br />
S89-type bracket.<br />
Strip back only as much<br />
4 cable jacket as is<br />
necessary to terminate the<br />
conductors. Common practice prior<br />
to the emergence of category 5<br />
cable was to strip back the cable<br />
jacket to the side of the block so<br />
that no jacket was visible. This<br />
practice is not recommended when<br />
installing systems where<br />
category 5 or higher performance is<br />
required. The cable jacket should be<br />
left on the cable as close to point of<br />
termination as possible.<br />
Standards<br />
Overview<br />
Application<br />
Guide<br />
Installation<br />
Practices<br />
Route each wire pair through<br />
the same slot in the fanning<br />
strip. Separate the conductors of<br />
each pair inside the fanning strip<br />
and place in the appropriate quick<br />
clips. Pair twist must be maintained<br />
to within 13mm (0.5 in.) of the point<br />
of termination for category 5 or 5e<br />
installations. Check the conductor<br />
sequence at this point and correct<br />
any miswires or reversals.<br />
Terminate each conductor<br />
using an S814 impact tool or<br />
equivalent.<br />
Note: It is important to keep the<br />
S814 tool perpendicular to the clock<br />
when terminating the<br />
conductors. Twisting of the S814<br />
tool while terminating can result in<br />
bent pins and subsequent<br />
damage to the S66 block.<br />
5 6 7<br />
Label each block on the<br />
fanning strip, designation<br />
strips, or cover as needed.<br />
14•1<br />
T H E S I E M O N . C O M P A N Y