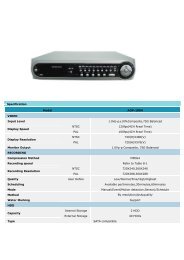
16CH Embedded Net DVR Standalone - Footprint Security
16CH Embedded Net DVR Standalone - Footprint Security
16CH Embedded Net DVR Standalone - Footprint Security

Create successful ePaper yourself
Turn your PDF publications into a flip-book with our unique Google optimized e-Paper software.
Scan Type: This is to setup the auto scan type. FULL DISPLAY (single camera full<br />
screen display, recycling for every channels), or QUAD DISPLAY (4 split window /2<br />
pages display,), or Eighth Display (as 9 split windows and 4 pages display)<br />
Scan Interval: This is to setup up the interval for auto scan. Defaulted is 3 seconds.<br />
Maximum interval time is 99 seconds.<br />
Auto Record: When auto record is set at ON (activate), when system reboot, system<br />
will automatically start recording. If this setting is OFF (disable), then user will need to<br />
press the record button manually for the system to start recording.<br />
Live Audio: When this is activated, and you had connected audio input to the<br />
correspondence cameras, you are able to have live audio monitoring when the sound<br />
is connect to a speaker.<br />
ALARM RECORD: When system not under recording mode, after activated of this<br />
function, the system will start recording after alarm triggered. Recording time is the<br />
time set between alarm intervals with 3-5seconds pre-alarm. Also input points can<br />
activate alarm records. Recording time is the signal input time.<br />
VGA-PIP: PIP (Picture in Picture) functions us use to see both record and playback<br />
images at once. When it is set at on (activate), press the bottom, there will be a<br />
sub-window showing on the VGA monitor. Then both recording and playback<br />
images can be see at the same time. Press the bottom again then the<br />
sub-window will be disappeared.<br />
Note: PIP function can only support by VGA output connects to VGA monitor. TV<br />
monitor does not support this function.<br />
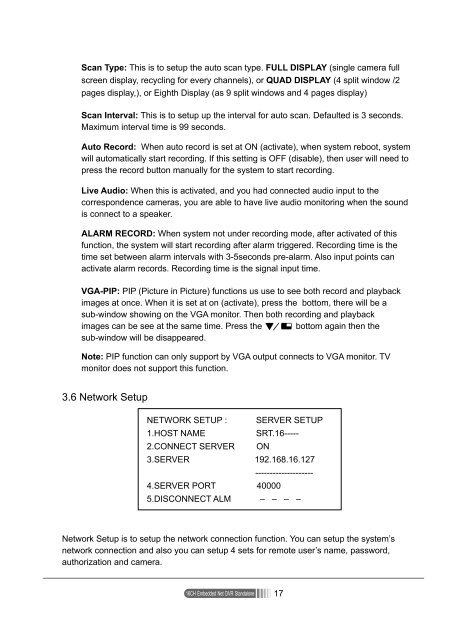
3.6 <strong>Net</strong>work Setup<br />
NETWORK SETUP : SERVER SETUP<br />
1.HOST NAME<br />
SRT.16-----<br />
2.CONNECT SERVER ON<br />
3.SERVER 192.168.16.127<br />
--------------------<br />
4.SERVER PORT 40000<br />
5.DISCONNECT ALM – – – –<br />
<strong>Net</strong>work Setup is to setup the network connection function. You can setup the system’s<br />
network connection and also you can setup 4 sets for remote user’s name, password,<br />
authorization and camera.<br />
<strong>16CH</strong> <strong>Embedded</strong> <strong>Net</strong> <strong>DVR</strong> <strong>Standalone</strong><br />
17