guide to thin section microscopy - Mineralogical Society of America
guide to thin section microscopy - Mineralogical Society of America
guide to thin section microscopy - Mineralogical Society of America

You also want an ePaper? Increase the reach of your titles
YUMPU automatically turns print PDFs into web optimized ePapers that Google loves.
Guide <strong>to</strong> Thin Section Microscopy<br />
Microscope<br />
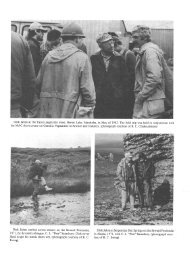
b) The particle is moving along a circular <strong>of</strong>f-centre path (Fig. 1-8,II), indicating that the<br />
objective is not centred. The rotation axis <strong>of</strong> the image has <strong>to</strong> be shifted in<strong>to</strong> the centre <strong>of</strong> the<br />
reticule. This is achieved by turning the two centering screws located in the objective casing<br />
or the nosepiece using the centring <strong>to</strong>ols commonly provided with the microscope. Older<br />
microscopes may have centring rings on the objectives (and hence no special centring <strong>to</strong>ols<br />
are required). The objectives are centred if the rotation centre <strong>of</strong> any circular particle path<br />
coincides with the crosshairs inter<strong>section</strong>. An alternative way <strong>of</strong> achieving this is <strong>to</strong> rotate the<br />
stage such that an observed particle is in the most distant <strong>of</strong>f-centre position, 180° from its<br />
position at the crosshairs inter<strong>section</strong>. By turning the centring screws, the particle is then<br />
shifted half the distance <strong>to</strong>wards the crosshairs inter<strong>section</strong> (Fig. 1-8,III).<br />
To verify that the objective is precisely centred now, the particle is shifted in<strong>to</strong> the crosshairs<br />
inter<strong>section</strong> by carefully moving the <strong>thin</strong> <strong>section</strong>. If the particle remains in its position when<br />
rotating the stage, the objective is centred (Fig. 1-8,IV). Otherwise, the centring procedure<br />
has <strong>to</strong> be repeated.<br />
All the objectives on the nosepiece have <strong>to</strong> be centred this way. Should an objective <strong>of</strong> high<br />
magnification be already centred precisely, it is even easier <strong>to</strong> centre the lower-magnification<br />
objectives. A small grain or object is positioned in the crosshairs inter<strong>section</strong> using the highmagnification<br />
objective. Then the poorly centred objective is rotated in<strong>to</strong> the optical path and<br />
the particle is moved <strong>to</strong> the crosshairs inter<strong>section</strong> using the centering devices.<br />
Caution! It is important <strong>to</strong> ensure that the nosepiece is positioned correctly on the tube and<br />
the objective in use has clicked in<strong>to</strong> place. Otherwise, centring can never be achieved (Ch.<br />
1.7). Some microscopes (e.g., Olympus) have a stage that can be centred. The stage is then<br />
centred on a single fixed objective and has <strong>to</strong> be aligned first, with that particular objective in<br />
place, before the other objectives can be centred. Any attempt <strong>to</strong> centre the objectives with<br />
the stage being <strong>of</strong>f-centre will result in a serious misalignment <strong>of</strong> the light path.<br />
What applies <strong>to</strong> all microscopes: To avoid de-centring <strong>of</strong> the objectives, they must never be<br />
<strong>to</strong>uched when changing magnification! Always grab the grooved rim <strong>of</strong> the nosepiece <strong>to</strong><br />
change between objectives.<br />
Raith, Raase & Reinhardt – February 2012<br />
Figure 1-8. Centring the objective<br />
16