Ancho Manual V69_1 Full Page for PDF.pub - QRS Music Technology
Ancho Manual V69_1 Full Page for PDF.pub - QRS Music Technology
Ancho Manual V69_1 Full Page for PDF.pub - QRS Music Technology

You also want an ePaper? Increase the reach of your titles
YUMPU automatically turns print PDFs into web optimized ePapers that Google loves.
For Technical Support Call 1-800-247-6557<br />
<strong>Ancho</strong> <strong>V69</strong>_1<br />
How Individual Recordings are Named when Saved to a CompactFlash Card<br />
The very first time that an individual recording is saved directly to the CompactFlash card <strong>Ancho</strong> creates a folder named “RECSES99”<br />
and saves the individual recording as “RECSN001. All subsequent recordings saved to “rcF”, on the same CompactFlash card, are<br />
placed in the same folder and named “RECSN002...RECSN###” up to RECSN999.<br />
Note: If there are ANY music files on the “root” of the CFLASH card <strong>Ancho</strong> will not recognize the files in the “RECSES99” folder. The nine<br />
record locations can also be saved, as a group, using the “Copy Record Memory” option of the “CompactFlash Utility”.<br />
These naming conventions are useful only when the CompactFlash card is viewed on a computer. <strong>Ancho</strong> will display these groups as “P<br />
xx” where “xx” is a number corresponding to the location of the groups on the CompactFlash card. For more in<strong>for</strong>mation see “Playing<br />
Songs from a Program Directory” under “Number Buttons”, which is located in the “Remote Control Features” section of this manual.<br />
Play a Recorded Song Using the Remote Control<br />
To play back a song from one of the nine record source locations follow steps 1 thru 3 on the preceding page<br />
to access the Record Source.<br />
At step 4, stop tapping the buttons at the desired record location, rP1 through rP9. Press Play<br />
Play a General MIDI Soundcard Instrument Using the Piano Keyboard<br />
Requires Optional PNOscan<br />
Press the Stop button to stop play.<br />
Rotate the ADJust dial to point toward the source section of the display.<br />
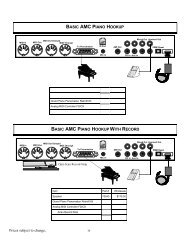
See page 54 <strong>for</strong> the connecting <strong>Ancho</strong> to the optional PNOscan Record system.<br />
0 0 4 I N 0 0 0 0 V 0 6 3<br />
Press the SELect again so that the cursor arrow begins to flash.<br />
0 0 4 I N 0 0 0 0 V 0 6 3<br />
Rotate the ADJust dial so that the “MI” source appears.<br />
M I N o I n s V 0 6 3<br />
Press the SELect button to select the MIDI Input source.<br />
If “A-Pno” does not appear, follow the instructions below “Setup <strong>Ancho</strong> Trigger the Soundcard Instruments”.<br />
0 0 0<br />
R<br />
M I A - P n o V 0 6 3<br />
<strong>Ancho</strong> is ready to trigger the internal soundcard voices from the piano keys.<br />
Use the > buttons (remote) or the NEXT/PREVIOUS (<strong>Ancho</strong>) to change the voices. See the General MIDI Sounds list.<br />
To set up <strong>for</strong> silent piano see “Silent Piano” in the Audio Configuration section of this manual.<br />
Set Up <strong>Ancho</strong> to Trigger the Soundcard Instruments<br />
0 0 0 E M I Q - R - S V 0 6 3<br />
0 0 0 E M I S E T U P V 0 6 3<br />
M A I N - V O L 0 6 3<br />
M A I N - V O L 0 6 3<br />
M I D I - S R C F - P P l a y e r<br />
M I D I - S R C F - P P l a y e r<br />
M I D I - S R C F - P P l a y e r<br />
M I D I - S R C F - P P l a y e r<br />
M I D I - S R C F - P P l a y e r<br />
0 0 0 E M I A - P n o V 0 6 3<br />
Press Stop to halt play.<br />
Rotate the ADJ Dial to display “SETUP”.<br />
Press the SEL button to enter the Setup Menu.<br />
Press SEL so that the arrow is flashing.<br />
Rotate Dial to display “MIDI-SRC”.<br />
MIDI-SRC<br />
Press SEL so the arrow is solid.<br />
Rotate the Dial to put the arrow the far right.<br />
Press SEL so that the arrow is flashing.<br />
Rotate the Dial to select “RecStrip”.<br />
Double-Click SEL to exit.<br />
Q R S M U S I C T E C H N O L O G I E S PAGE 15