- Page 2 and 3:
The Debian Administrator's Handbook
- Page 4 and 5:
3.1.3 Integration with Other Linux/
- Page 6 and 7:
6.5 Checking Package Authenticity .
- Page 8 and 9:
9.4.1 Administrating On a Web Inter
- Page 10 and 11:
11.5 Seing Up Windows Shares with S
- Page 12 and 13:
14.2 Firewall or Packet Filtering .
- Page 14 and 15:
B.2.2 The User's Home Directory . .
- Page 17 and 18:
Foreword Linux has been garnering s
- Page 19 and 20:
Book Structure Following the struct
- Page 21 and 22:
While we were obviously satisfied w
- Page 23 and 24:
Tobias Gruetzmacher, Tournier Simon
- Page 26 and 27:
Keywords Objective Means Operation
- Page 28 and 29:
1.1. What Is Debian? CULTURE Origin
- Page 30 and 31:
TOOL Installer debian-installer is
- Page 32 and 33:
COMMUNITY Upstream author, or Debia
- Page 34 and 35:
➨ http://www.opensource.org/licen
- Page 36 and 37:
1.3.1. The Debian Developers Debian
- Page 38 and 39:
with the changelog.gz file (or equi
- Page 40 and 41:
were only lile challenges at the be
- Page 42 and 43:
can always fine-tune these paramete
- Page 44 and 45:
PERSPECTIVE Debian for multimedia A
- Page 46 and 47:
Each specific service has its own s
- Page 48 and 49:
tool. Whether used in graphical or
- Page 50 and 51:
Figure 1.2 Compilation of a package
- Page 52 and 53:
their work. The next step is the in
- Page 54 and 55:
28 The Debian Administrator's Handb
- Page 56 and 57:
Keywords Falcot Corp SMB Strong Gro
- Page 58 and 59:
We have envisioned this case study
- Page 60 and 61:
Several factors have dictated this
- Page 62:
• A survey of several French serv
- Page 65 and 66:
Chapter Analyzing the Existing Setu
- Page 67 and 68:
Figure 3.1 Coexistence of Debian wi
- Page 69 and 70:
Figure 3.2 Database backups Each se
- Page 71 and 72:
HARDWARE Next-generation PC Most re
- Page 74 and 75:
Keywords Installation Partitioning
- Page 76 and 77:
BACK TO BASICS A catch-up course in
- Page 78 and 79:
copy the previously downloaded ISO
- Page 80 and 81:
of the two, and GRUB, a more modern
- Page 82 and 83:
Figure 4.3 Selecting the country 4.
- Page 84 and 85:
4.2.9. Configuring the Clock If the
- Page 86 and 87:
(swap) will be stored. This task is
- Page 88 and 89:
Figure 4.9 Guided partitioning The
- Page 90 and 91:
IN PRACTICE Shrinking a Windows par
- Page 92 and 93:
“Create a volume group”, to whi
- Page 94 and 95:
Figure 4.12 Selecting a Debian mirr
- Page 96 and 97:
accessible from the boot menu. You
- Page 98:
TIP Debian thinks of speakers of no
- Page 101 and 102:
Chapter Packaging System: Tools and
- Page 103 and 104:
Chapter 7, Solving Problems and Fin
- Page 105 and 106:
SHA1: 350a8a7a43fe182d54f3b7d73b803
- Page 107 and 108:
5.2.1.2. Conflicts: the Conflicts f
- Page 109 and 110:
Figure 5.1 Use of a Provides field
- Page 111 and 112:
name. This directory also includes
- Page 113 and 114:
postinst and similar scripts. But t
- Page 115 and 116:
-----BEGIN PGP SIGNED MESSAGE-----
- Page 117 and 118:
and a set of upstream patches contr
- Page 119 and 120:
Updating database of manual pages .
- Page 121 and 122:
which the file comes; --status pack
- Page 123 and 124:
Iceweasel is a redesign of the Mozi
- Page 125 and 126:
handles other packaging formats, es
- Page 127 and 128:
Chapter Maintenance and Updates: Th
- Page 129 and 130:
The syntax of the last field depend
- Page 131 and 132:
6.1.1.2. The Backports From backpor
- Page 133 and 134:
6.2.1. Initialization For any work
- Page 135 and 136:
6.2.3. System Upgrade Regular upgra
- Page 137 and 138:
it can be configured through severa
- Page 139 and 140:
TIP Comments in /etc/apt/ preferenc
- Page 141 and 142:
6.4. Frontends: aptitude, synaptic
- Page 143 and 144:
like aptitude has always done. It c
- Page 145 and 146:
aptitude's log will only contain a
- Page 147 and 148:
“Authentication” tab in the Sei
- Page 149 and 150:
compiled by the package maintainers
- Page 151 and 152:
Figure 6.3 Upgrading with update-ma
- Page 153 and 154:
IN PRACTICE The Falcot Corp case Fa
- Page 155 and 156:
purpose is editing. Browsing this c
- Page 157 and 158:
Chapter Solving Problems and Findin
- Page 159 and 160:
Man pages not only document program
- Page 161 and 162:
The navigation controls in the docu
- Page 163 and 164:
constraints... 7.2. Common Procedur
- Page 165 and 166:
7.2.3. Asking for Help on a Mailing
- Page 168 and 169:
Keywords Configuration Localization
- Page 170 and 171:
This chapter reviews everything inc
- Page 172 and 173:
The questions are relevant to the p
- Page 174 and 175:
to 1 Gb/s). The most widely used ca
- Page 176 and 177:
A connection by telephone modem req
- Page 178 and 179:
Network Manager knows how to handle
- Page 180 and 181:
TIP Bypassing DNS Since application
- Page 182 and 183:
8.4.3. Modifying an Existing Accoun
- Page 184 and 185:
The creation of an account populate
- Page 186 and 187:
8.7. Printer Configuration Printer
- Page 188 and 189:
Configuration of the bootloader mus
- Page 190 and 191:
oot=/dev/sda # the partition that c
- Page 192 and 193:
kernel /vmlinuz root=/dev/sda2 init
- Page 194 and 195:
The timezone, configured during ini
- Page 196 and 197:
GOING FURTHER GPS modules and other
- Page 198 and 199:
A complete list of known filesystem
- Page 200 and 201:
8.10.1. Introduction and Prerequisi
- Page 202 and 203:
the choices saved in the .config fi
- Page 204 and 205:
$ ls ../*.deb ../linux-image-2.6.32
- Page 206:
This requires, however, that lilo b
- Page 209 and 210:
Chapter Unix Services 9 Contents Sy
- Page 211 and 212:
• checking the integrity of files
- Page 213 and 214:
By default, Debian uses four differ
- Page 215 and 216:
BACK TO BASICS Client, server A sys
- Page 217 and 218:
that requires frequent connections
- Page 219 and 220:
For any connection established on t
- Page 221 and 222:
When the VNC session is closed, rem
- Page 223 and 224:
There are two ways of presenting ri
- Page 225 and 226:
Webmin is used through a web interf
- Page 227 and 228:
• news: Usenet subsystem message
- Page 229 and 230:
9.6. The inetd Super-Server Inetd (
- Page 231 and 232:
SECURITY Restricting cron or atd Yo
- Page 233 and 234:
# Restart the IRC proxy after each
- Page 235 and 236:
update the quotas in the absence of
- Page 237 and 238:
of backups can be kept in a small a
- Page 239 and 240:
The Falcot Corp administrators are
- Page 241 and 242:
• ACTION: the action correspondin
- Page 243 and 244:
ATTRS{rev}==" " ATTRS{state}=="runn
- Page 245 and 246:
ATTENTION Graphics card and standby
- Page 247 and 248:
Chapter Network10 Infrastructure Co
- Page 249 and 250:
sent through to the masqueraded con
- Page 251 and 252:
CULTURE SSL and TLS The SSL protoco
- Page 253 and 254:
crt for the public certificate, key
- Page 255 and 256:
10.2.1.2. Configuring the OpenVPN S
- Page 257 and 258:
fast. Installing an IKE daemon (for
- Page 259 and 260:
pptpd is the PPTP server for Linux.
- Page 261 and 262:
## some defaults nodefaultroute pro
- Page 263 and 264:
GOING FURTHER Optimal configuration
- Page 265 and 266:
# (/proc/sys/net/ipv6/conf/all/acce
- Page 267 and 268:
so that a security vulnerability in
- Page 269 and 270:
Example 10.12 Excerpt of /etc/bind/
- Page 271 and 272:
} option broadcast-address 192.168.
- Page 273 and 274:
10.8.2. Remote Diagnosis: nmap nmap
- Page 275 and 276:
The packet currently displayed was
- Page 277 and 278:
Chapter 11 Network Services: Postfi
- Page 279 and 280:
the ISP's SMTP server, which is alw
- Page 281 and 282:
alias_database = hash:/etc/aliases
- Page 283 and 284:
virtual_mailbox_base = /var/mail/vh
- Page 285 and 286:
The last two rules reject any messa
- Page 287 and 288:
The reject_unlisted_recipient rule
- Page 289 and 290:
failed messages later), especially
- Page 291 and 292:
# Unfiltered addresses postmaster@f
- Page 293 and 294:
Note that the SASL database was cre
- Page 295 and 296:
Apache is a modular server, and man
- Page 297 and 298:
# New log format including (virtual
- Page 299 and 300:
11.2.3.2. Restricting Access The Al
- Page 301 and 302:
➨ http://www.falcot.com/cgi-bin/a
- Page 303 and 304:
RPC services register to a director
- Page 305 and 306:
option, which disables this behavio
- Page 307 and 308: The package also proposes identifyi
- Page 309 and 310: 1 5 Specifies the character set and
- Page 311 and 312: username = user password = password
- Page 313 and 314: 11.6.3. Configuring a Filter squid
- Page 315 and 316: objectClass: dcObject objectClass:
- Page 317 and 318: Question Answer LDAP server Uniform
- Page 319 and 320: and so on). The answer to the “co
- Page 321 and 322: go into deeper detail for some conc
- Page 323 and 324: Chapter Advanced12 Administration C
- Page 325 and 326: CULTURE Independent or inexpensive?
- Page 327 and 328: RAID-5 RAID-5 addresses the asymmet
- Page 329 and 330: Filesystem label= OS type: Linux Bl
- Page 331 and 332: there will be a synchronization pha
- Page 333 and 334: [...] Update Time : Thu Sep 30 15:5
- Page 335 and 336: Fortunately, these lines can be gen
- Page 337 and 338: # pvdisplay "/dev/sdb2" is a new ph
- Page 339 and 340: Allocation inherit Read ahead secto
- Page 341 and 342: # cat /etc/fstab [...] /dev/vg_crit
- Page 343 and 344: [...] # df -h /srv/base/ Filesystem
- Page 345 and 346: • The remaining partitions, sda7
- Page 347 and 348: that gets started) is known as dom0
- Page 349 and 350: or Mandriva). Other methods include
- Page 351 and 352: # xm list Name ID Mem VCPUs State T
- Page 353 and 354: known as control groups, by which d
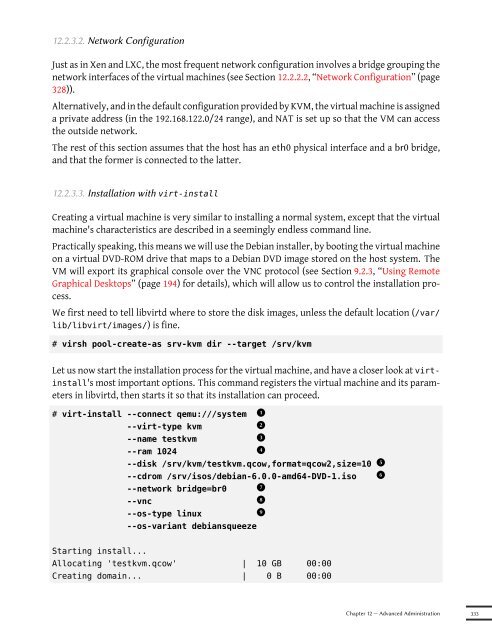
- Page 355 and 356: into a separate switch, with the co
- Page 357: done. INIT: Entering runlevel: 3 St
- Page 361 and 362: is accessible from all interfaces;
- Page 363 and 364: We will only give a rough overview
- Page 365 and 366: • from the network; preseeding th
- Page 367 and 368: 12.3.3. Simple-CDD: The All-In-One
- Page 369 and 370: 12.4. Monitoring Monitoring is a ge
- Page 371 and 372: Finally, when a plugin is invoked w
- Page 373 and 374: According to its type, each object
- Page 375 and 376: check_command } define service{ use
- Page 378 and 379: Keywords Workstation Graphical desk
- Page 380 and 381: 13.1. Configuring the X11 Server Th
- Page 382 and 383: oth versions are available in Squee
- Page 384 and 385: contains commented examples. Last,
- Page 386 and 387: Figure 13.2 The KDE desktop Since t
- Page 388 and 389: Evolution is the GNOME email client
- Page 390 and 391: Strictly speaking, Debian Squeeze c
- Page 392 and 393: The next versions of these applicat
- Page 394 and 395: 13.4.4.3. Collaborative Work With F
- Page 396: The Windows partition must first be
- Page 399 and 400: Chapter Security14 Contents Definin
- Page 401 and 402: ut the other elements should also b
- Page 403 and 404: • INPUT: concerns packets whose d
- Page 405 and 406: Other actions, particularly those c
- Page 407 and 408: Figure 14.2 Fwbuilder's main window
- Page 409 and 410:
• those that qualify a message as
- Page 411 and 412:
14.3.3.1. Auditing Packages: debsum
- Page 413 and 414:
The chkrootkit and rkhunter package
- Page 415 and 416:
Figure 14.3 Security contexts and U
- Page 417 and 418:
The aptitude install selinux-basics
- Page 419 and 420:
# semanage login -a -s user_u rhert
- Page 421 and 422:
# myapp executable will have: # lab
- Page 423 and 424:
GOING FURTHER The m4 macro language
- Page 425 and 426:
Message avc:denied { read write } p
- Page 427 and 428:
➨ http://en.wikipedia.org/wiki/SQ
- Page 429 and 430:
features imply a increased risk of
- Page 431 and 432:
confronted with these unfortunate c
- Page 433 and 434:
sure of actually fixing it; otherwi
- Page 435 and 436:
(...) ** 2004-11-29-19:50:49: DCC S
- Page 437 and 438:
Chapter Creating a Debian15 Package
- Page 439 and 440:
editor shows us that dch really did
- Page 441 and 442:
15.2. Building your First Package 1
- Page 443 and 444:
particular case, library, is useful
- Page 445 and 446:
The interpretation of such a rule i
- Page 447 and 448:
ALTERNATIVE apt-ftparchive If mini-
- Page 449 and 450:
a huge problem as soon as the error
- Page 451 and 452:
EXTRA Lightweight process for “De
- Page 453 and 454:
not yet gone through the new mainta
- Page 455 and 456:
Chapter Debian's16 Conclusion: Futu
- Page 457:
16.3. Future of this Book We would
- Page 460 and 461:
These objectives necessarily involv
- Page 462 and 463:
A.7. Damn Small Linux This distribu
- Page 464 and 465:
$ pwd /home/rhertzog $ cd Desktop $
- Page 466 and 467:
tmpfs 514208 269136 245072 53% /dev
- Page 468 and 469:
B.3.1. The Deepest Layer: the Hardw
- Page 470 and 471:
B.4. Some Tasks Handled by the Kern
- Page 472 and 473:
B.4.3. Shared Functions Since a num
- Page 474 and 475:
comes back when the execution of th
- Page 476 and 477:
• the standard C library (glibc),
- Page 478 and 479:
alternative, 356 am-utils, 173 aman
- Page 480 and 481:
Collins, Ben, 12 command line inter
- Page 482 and 483:
edquota, 209 eGroupware, 366 EHLO,
- Page 484 and 485:
in-addr.arpa, 241 Includes, Apache
- Page 486 and 487:
lspci, 444 lspcmcia, 444 lsusb, 444
- Page 488 and 489:
hardware acceleration, 190 openswan
- Page 490 and 491:
ead, right, 196 README.Debian, 11,
- Page 492 and 493:
suite, office, 368 super-server, 20
- Page 494:
Z Zabbix, 343 Zacchiroli, Stefano,