- Page 1 and 2:
LFD DISPLAY User Manual ME32C ME40C
- Page 3 and 4:
Table of contents Main Screen Layou
- Page 5 and 6:
Table of contents AllShare Play Wha
- Page 7 and 8:
Chapter 01 Before Using the Product
- Page 9 and 10:
Storage Due to the characteristics
- Page 11 and 12:
Do not install the product on an un
- Page 13 and 14:
Do not use or keep combustible spra
- Page 15 and 16:
Chapter 02 Preparations Checking th
- Page 17 and 18:
Checking the Components -- Contact
- Page 19 and 20:
Parts ―― The colour and shape o
- Page 21 and 22:
POWER Reverse Side ―― The colou
- Page 23 and 24:
Remote Control ―― Using other d
- Page 25 and 26:
Adjusting the OSD with the Remote C
- Page 27 and 28:
Before Installing the Product (Inst
- Page 29 and 30:
Installing the Wall Mount Preparing
- Page 31 and 32:
Remote Control (RS232C) •• Pin
- Page 33 and 34:
•• Connector : RJ45 Direct LAN
- Page 35 and 36:
Control Codes Viewing control state
- Page 37 and 38:
Input source control 0x24 HDMI2_PC
- Page 39 and 40:
PIP On/Off control •• Function
- Page 41 and 42:
Video Wall On •• Function Turn
- Page 43 and 44:
Wall_SNo: Product Number code assig
- Page 45 and 46:
POWER POWER Connecting to a PC •
- Page 47 and 48:
POWER Connection Using an DP Cable
- Page 49 and 50:
Changing the Resolution on Windows
- Page 51 and 52:
POWER POWER Connection Using an HDM
- Page 53 and 54:
Connecting the network box (Sold se
- Page 55 and 56:
Changing the Input source Source So
- Page 57 and 58:
MDC Program Installation/Uninstalla
- Page 59 and 60:
POWER Using MDC via Ethernet Enter
- Page 61 and 62:
Connection Management Connection ma
- Page 63 and 64:
Auto Set ID Auto Set ID feature ass
- Page 65 and 66:
Command Retry This feature is used
- Page 67 and 68:
Main Screen Layout 1 6 1 Menu Bar C
- Page 69 and 70:
User Login User Settings •• Add
- Page 71 and 72:
MPEG Noise Filter Reduces MPEG nois
- Page 73 and 74:
Advanced Settings Dynamic Contrast
- Page 75 and 76:
Format •• Select the format to
- Page 77 and 78:
Security Safety Lock •• Lock th
- Page 79 and 80:
Holiday Management Holiday Manageme
- Page 81 and 82:
Safety Screen The Safety Screen fun
- Page 83 and 84:
Tool Settings Security •• Panel
- Page 85 and 86:
Monitor Window A window appears sho
- Page 87 and 88:
Group Management Creating Groups Cr
- Page 89 and 90:
Renaming Groups 1 Select a group na
- Page 91 and 92:
Troubleshooting Guide -- This progr
- Page 93 and 94:
Chapter 05 Screen Adjustment Config
- Page 95 and 96:
Screen Adjustment MENUm → Picture
- Page 97 and 98:
Position Screen Adjustment Picture
- Page 99 and 100:
Resolution Select Screen Adjustment
- Page 101 and 102:
Advanced Settings MENUm → Picture
- Page 103 and 104:
Advanced Settings White Balance 10p
- Page 105 and 106:
Picture Options MENUm → Picture
- Page 107 and 108:
Picture Options HDMI Black Level Fi
- Page 109 and 110:
Chapter 06 Sound Adjustment Configu
- Page 111 and 112:
Speaker Settings MENUm → Sound
- Page 113 and 114:
Chapter 07 Network Network Settings
- Page 115 and 116:
3 On the dialog that appears, click
- Page 117 and 118:
How to set up manually 1 Go to the
- Page 119 and 120:
Soft AP AllShare Settings MENU m
- Page 121 and 122:
Time MENUm → System → Time →
- Page 123 and 124:
Time On Timer Off Timer Holiday Man
- Page 125 and 126:
Rotate menu MENUm → System → Ro
- Page 127 and 128:
Security MENUm → System → Secur
- Page 129 and 130:
Auto Protection Time MENUm → Syst
- Page 131 and 132:
Screen Burn Protection Pixel Shift
- Page 133 and 134:
Ticker MENUm → System → Ticker
- Page 135 and 136:
Video Wall Video Wall · Format ·
- Page 137 and 138:
General MENUm → System → Genera
- Page 139 and 140:
General Sound Feedback Auto Power S
- Page 141 and 142:
Anynet+ (HDMI-CEC) Anynet+ (HDMI-CE
- Page 143 and 144:
Problem The connected device is not
- Page 145 and 146:
Magic Clone MENUm → System → Ma
- Page 147 and 148:
Chapter 09 Support Software Update
- Page 149 and 150:
AllShare Play MENU m → Support
- Page 151 and 152:
Compatible devices with AllShare Pl
- Page 153 and 154:
Connecting to a PC over a network P
- Page 155 and 156:
Using the Basic AllShare Play Featu
- Page 157 and 158:
My list MENUm → Support → Conte
- Page 159 and 160:
Photos MENUm → Support → Conten
- Page 161 and 162:
Videos / Photos / Music Play Option
- Page 163 and 164:
Supported Subtitle and AllShare Pla
- Page 165 and 166:
File Extension Container Video Code
- Page 167 and 168:
Contents File Extension Container V
- Page 169 and 170:
Flash •• Compatible with Flash
- Page 171 and 172:
Approving a connected device from t
- Page 173 and 174:
MagicInfo Lite 2 Select Network sch
- Page 175 and 176:
USB Device Auto Play MagicInfo Lite
- Page 177 and 178:
4 Select Contents to specify the co
- Page 179 and 180:
3 Select Edit. Edit Time 12:00 am~
- Page 181 and 182:
Viewing the details of a Local sche
- Page 183 and 184:
Content manager 2 Select the conten
- Page 185 and 186:
Settings Settings Server Network Se
- Page 187 and 188:
When Content is Running Viewing the
- Page 189 and 190: Chapter 12 MagicInfo Premium S - -
- Page 191 and 192: Flash Power Point PDF •• Compat
- Page 193 and 194: Network Schedule Multiframe Playbac
- Page 195 and 196: Approving a connected device from t
- Page 197 and 198: MagicInfo Premium S 2 Select Networ
- Page 199 and 200: Internal Auto Play Network schedule
- Page 201 and 202: 4 Select Contents to specify the co
- Page 203 and 204: 3 Select Edit. Edit Time 12:00 am~
- Page 205 and 206: Viewing the details of a Local sche
- Page 207 and 208: Template Manager 2 Select Create in
- Page 209 and 210: 5 Select sound or background music.
- Page 211 and 212: Deleting content 1 Select Content m
- Page 213 and 214: Default content duration Specify th
- Page 215 and 216: Changing the settings for the conte
- Page 217 and 218: Video •• 3D video is not suppor
- Page 219 and 220: MagicInfo Videowall S MENUm → Sup
- Page 221 and 222: Chapter 14 Troubleshooting Guide Re
- Page 223 and 224: Screen issue The screen is not clea
- Page 225 and 226: Sound issue There is no sound. Chec
- Page 227 and 228: Other issue The product smells like
- Page 229 and 230: Q & A Refer to the user manual for
- Page 231 and 232: Chapter 15 Specifications 1 Size Ge
- Page 233 and 234: ―― Plug-and-Play This monitor c
- Page 235 and 236: Preset Timing Modes -- Horizontal F
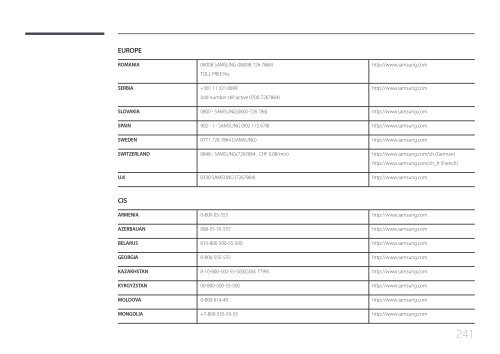
- Page 237 and 238: Chapter 16 Appendix Contact SAMSUNG
- Page 239: LATIN AMERICA PUERTO RICO 1-800-682
- Page 243 and 244: ASIA PACIFIC PHILIPPINES 1-800-10-S
- Page 245 and 246: AFRICA SOUTH AFRICA 0860-SAMSUNG (7
- Page 247 and 248: WEEE Correct Disposal of This Produ
- Page 249 and 250: Prevention of Afterimage Burn-in Bl
- Page 251 and 252: Licence Manufactured under licence