4 / 8 Channel D1 Realtime H.264 DVR - Maplin Electronics
4 / 8 Channel D1 Realtime H.264 DVR - Maplin Electronics
4 / 8 Channel D1 Realtime H.264 DVR - Maplin Electronics

Create successful ePaper yourself
Turn your PDF publications into a flip-book with our unique Google optimized e-Paper software.
English<br />
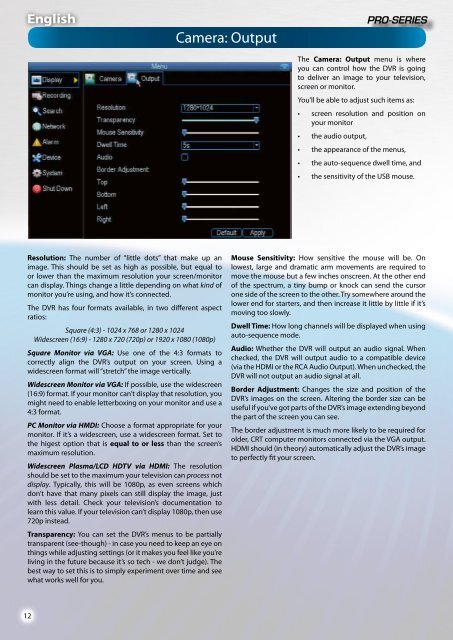
Camera: Output<br />
The Camera: Output menu is where<br />
you can control how the <strong>DVR</strong> is going<br />
to deliver an image to your television,<br />
screen or monitor.<br />
You’ll be able to adjust such items as:<br />
• screen resolution and position on<br />
your monitor<br />
• the audio output,<br />
• the appearance of the menus,<br />
• the auto-sequence dwell time, and<br />
• the sensitivity of the USB mouse.<br />
Resolution: The number of “little dots” that make up an<br />
image. This should be set as high as possible, but equal to<br />
or lower than the maximum resolution your screen/monitor<br />
can display. Things change a little depending on what kind of<br />
monitor you’re using, and how it’s connected.<br />
The <strong>DVR</strong> has four formats available, in two different aspect<br />
ratios:<br />
Square (4:3) - 1024 x 768 or 1280 x 1024<br />
Widescreen (16:9) - 1280 x 720 (720p) or 1920 x 1080 (1080p)<br />
Square Monitor via VGA: Use one of the 4:3 formats to<br />
correctly align the <strong>DVR</strong>’s output on your screen. Using a<br />
widescreen format will “stretch” the image vertically.<br />
Widescreen Monitor via VGA: If possible, use the widescreen<br />
(16:9) format. If your monitor can’t display that resolution, you<br />
might need to enable letterboxing on your monitor and use a<br />
4:3 format.<br />
PC Monitor via HMDI: Choose a format appropriate for your<br />
monitor. If it’s a widescreen, use a widescreen format. Set to<br />
the higest option that is equal to or less than the screen’s<br />
maximum resolution.<br />
Widescreen Plasma/LCD HDTV via HDMI: The resolution<br />
should be set to the maximum your television can process not<br />
display. Typically, this will be 1080p, as even screens which<br />
don’t have that many pixels can still display the image, just<br />
with less detail. Check your television’s documentation to<br />
learn this value. If your television can’t display 1080p, then use<br />
720p instead.<br />
Transparency: You can set the <strong>DVR</strong>’s menus to be partially<br />
transparent (see-though) - in case you need to keep an eye on<br />
things while adjusting settings (or it makes you feel like you’re<br />
living in the future because it’s so tech - we don’t judge). The<br />
best way to set this is to simply experiment over time and see<br />
what works well for you.<br />
Mouse Sensitivity: How sensitive the mouse will be. On<br />
lowest, large and dramatic arm movements are required to<br />
move the mouse but a few inches onscreen. At the other end<br />
of the spectrum, a tiny bump or knock can send the cursor<br />
one side of the screen to the other. Try somewhere around the<br />
lower end for starters, and then increase it little by little if it’s<br />
moving too slowly.<br />
Dwell Time: How long channels will be displayed when using<br />
auto-sequence mode.<br />
Audio: Whether the <strong>DVR</strong> will output an audio signal. When<br />
checked, the <strong>DVR</strong> will output audio to a compatible device<br />
(via the HDMI or the RCA Audio Output). When unchecked, the<br />
<strong>DVR</strong> will not output an audio signal at all.<br />
Border Adjustment: Changes the size and position of the<br />
<strong>DVR</strong>’s images on the screen. Altering the border size can be<br />
useful if you’ve got parts of the <strong>DVR</strong>’s image extending beyond<br />
the part of the screen you can see.<br />
The border adjustment is much more likely to be required for<br />
older, CRT computer monitors connected via the VGA output.<br />
HDMI should (in theory) automatically adjust the <strong>DVR</strong>’s image<br />
to perfectly fit your screen.<br />
12