4 / 8 Channel D1 Realtime H.264 DVR - Maplin Electronics
4 / 8 Channel D1 Realtime H.264 DVR - Maplin Electronics
4 / 8 Channel D1 Realtime H.264 DVR - Maplin Electronics

You also want an ePaper? Increase the reach of your titles
YUMPU automatically turns print PDFs into web optimized ePapers that Google loves.
English<br />
Alarm: Motion<br />
If you’re planning to use Motion<br />
Detection as the primary (or sole)<br />
recording mode for the <strong>DVR</strong>, you must<br />
ensure it’s properly configured.<br />
If the motion detection sensitivity is<br />
too sensitive, then the <strong>DVR</strong> will record<br />
too frequently or continually - any<br />
benefit of motion detection will be<br />
lost.<br />
If the motion detection sensitivity is<br />
not sensitive enough, then the <strong>DVR</strong><br />
will not record when it should and<br />
may not record anything at all.<br />
We think that motion detection is the<br />
best way to get your <strong>DVR</strong> to operate<br />
almost autonomously for long periods<br />
of time (typically weeks to months)<br />
without you having to worry about<br />
losing old footage.<br />
However, it is VITAL that it’s<br />
configured correctly!<br />
How Motion Detection Works<br />
The way that the <strong>DVR</strong> looks for motion is quite straight forward<br />
- it’s a process where it compares one frame (that is, a single<br />
image taken approximately a 25th/30th of a second from the<br />
previous image) with the next. A certain amount of “difference”<br />
between these two “frames” is interpreted as motion.<br />
As a result, the <strong>DVR</strong> is able to detect when there is a change<br />
in the picture. However, this does not necessarily need to be<br />
something moving in the frame. For example, a light being<br />
turned on or off, a lightning flash or even the sun coming out<br />
momentarily on a cloudy day might be enough to trigger the<br />
motion detection on the <strong>DVR</strong>. However, as these events last<br />
only a moment (and are relatively rare) they will only create<br />
a few very short redundant clips, which will not take up too<br />
much space or pose a problem with scanning through footage.<br />
This method of motion detection can, however, become<br />
problematic when using wireless cameras. As wireless<br />
technology is susceptible to interference, the static and image<br />
distortion common to wireless systems is often enough to<br />
trigger the motion detection inadvertently.<br />
As a result, we strongly advise against using wireless<br />
cameras with any of our motion sensitive recording<br />
equipment, and advise the use of hard wired cameras. If<br />
you simply must use wireless technology, we advise using<br />
digital wireless technology as this technology is much more<br />
resistant to interference from other wireless equipment and<br />
environmental causes. However, any wireless technology,<br />
digital or otherwise, has serious limitations when combined<br />
with motion detection.<br />
For a similar reason, don’t use PTZ systems and motion<br />
detection simultaneously. The <strong>DVR</strong> will interpret the<br />
camera moving as ‘motion’ and record. This is particularly true<br />
when using Cruise Mode - as the camera is moving almost<br />
continually, so too is the <strong>DVR</strong> recording almost continually!<br />
24<br />
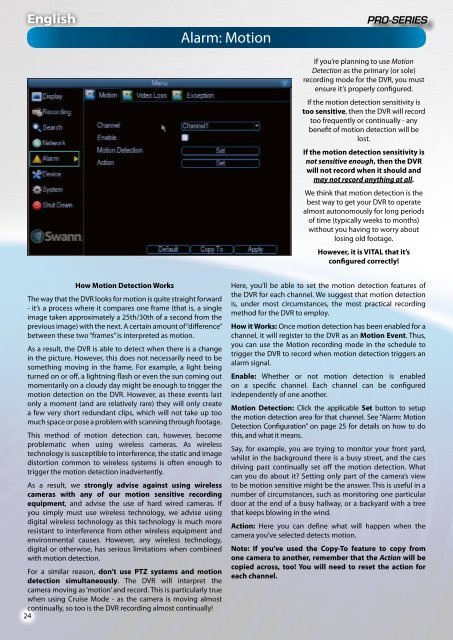
Here, you’ll be able to set the motion detection features of<br />
the <strong>DVR</strong> for each channel. We suggest that motion detection<br />
is, under most circumstances, the most practical recording<br />
method for the <strong>DVR</strong> to employ.<br />
How it Works: Once motion detection has been enabled for a<br />
channel, it will register to the <strong>DVR</strong> as an Motion Event. Thus,<br />
you can use the Motion recording mode in the schedule to<br />
trigger the <strong>DVR</strong> to record when motion detection triggers an<br />
alarm signal.<br />
Enable: Whether or not motion detection is enabled<br />
on a specific channel. Each channel can be configured<br />
independently of one another.<br />
Motion Detection: Click the applicable Set button to setup<br />
the motion detection area for that channel. See “Alarm: Motion<br />
Detection Configuration” on page 25 for details on how to do<br />
this, and what it means.<br />
Say, for example, you are trying to monitor your front yard,<br />
whilst in the background there is a busy street, and the cars<br />
driving past continually set off the motion detection. What<br />
can you do about it? Setting only part of the camera’s view<br />
to be motion sensitive might be the answer. This is useful in a<br />
number of circumstances, such as monitoring one particular<br />
door at the end of a busy hallway, or a backyard with a tree<br />
that keeps blowing in the wind.<br />
Action: Here you can define what will happen when the<br />
camera you’ve selected detects motion.<br />
Note: If you’ve used the Copy-To feature to copy from<br />
one camera to another, remember that the Action will be<br />
copied across, too! You will need to reset the action for<br />
each channel.