4 / 8 Channel D1 Realtime H.264 DVR - Maplin Electronics
4 / 8 Channel D1 Realtime H.264 DVR - Maplin Electronics
4 / 8 Channel D1 Realtime H.264 DVR - Maplin Electronics
Create successful ePaper yourself
Turn your PDF publications into a flip-book with our unique Google optimized e-Paper software.
English<br />
Remote Access: Login<br />
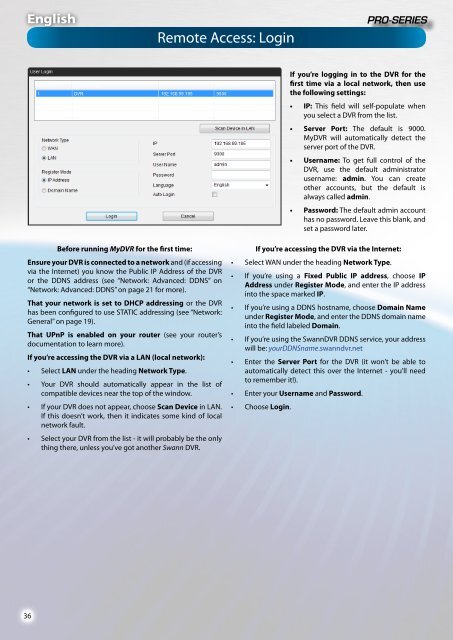
If you’re logging in to the <strong>DVR</strong> for the<br />
first time via a local network, then use<br />
the following settings:<br />
• IP: This field will self-populate when<br />
you select a <strong>DVR</strong> from the list.<br />
• Server Port: The default is 9000.<br />
My<strong>DVR</strong> will automatically detect the<br />
server port of the <strong>DVR</strong>.<br />
• Username: To get full control of the<br />
<strong>DVR</strong>, use the default administrator<br />
username: admin. You can create<br />
other accounts, but the default is<br />
always called admin.<br />
• Password: The default admin account<br />
has no password. Leave this blank, and<br />
set a password later.<br />
Before running My<strong>DVR</strong> for the first time:<br />
Ensure your <strong>DVR</strong> is connected to a network and (if accessing<br />
via the Internet) you know the Public IP Address of the <strong>DVR</strong><br />
or the DDNS address (see “Network: Advanced: DDNS” on<br />
“Network: Advanced: DDNS” on page 21 for more).<br />
That your network is set to DHCP addressing or the <strong>DVR</strong><br />
has been configured to use STATIC addressing (see “Network:<br />
General” on page 19).<br />
That UPnP is enabled on your router (see your router’s<br />
documentation to learn more).<br />
If you’re accessing the <strong>DVR</strong> via a LAN (local network):<br />
• Select LAN under the heading Network Type.<br />
• Your <strong>DVR</strong> should automatically appear in the list of<br />
compatible devices near the top of the window.<br />
• If your <strong>DVR</strong> does not appear, choose Scan Device in LAN.<br />
If this doesn’t work, then it indicates some kind of local<br />
network fault.<br />
• Select your <strong>DVR</strong> from the list - it will probably be the only<br />
thing there, unless you’ve got another Swann <strong>DVR</strong>.<br />
If you’re accessing the <strong>DVR</strong> via the Internet:<br />
• Select WAN under the heading Network Type.<br />
• If you’re using a Fixed Public IP address, choose IP<br />
Address under Register Mode, and enter the IP address<br />
into the space marked IP.<br />
• If you’re using a DDNS hostname, choose Domain Name<br />
under Register Mode, and enter the DDNS domain name<br />
into the field labeled Domain.<br />
• If you’re using the Swann<strong>DVR</strong> DDNS service, your address<br />
will be: yourDDNSname.swanndvr.net<br />
• Enter the Server Port for the <strong>DVR</strong> (it won’t be able to<br />
automatically detect this over the Internet - you’ll need<br />
to remember it!).<br />
• Enter your Username and Password.<br />
• Choose Login.<br />
36


