Owner's Manual
Owner's Manual
Owner's Manual

Create successful ePaper yourself
Turn your PDF publications into a flip-book with our unique Google optimized e-Paper software.
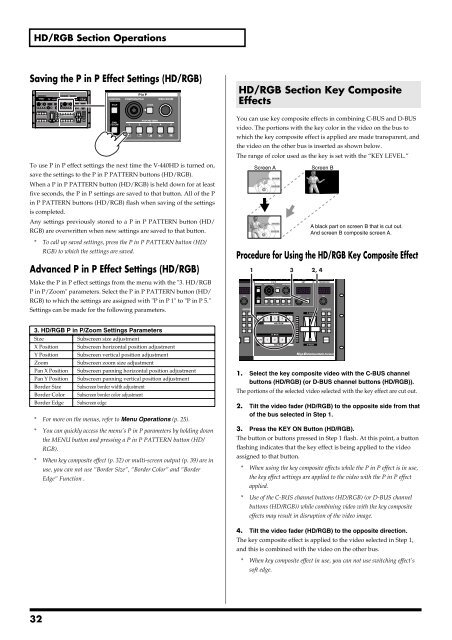
HD/RGB Section Operations<br />
Saving the P in P Effect Settings (HD/RGB)<br />
To use P in P effect settings the next time the V-440HD is turned on,<br />
save the settings to the P in P PATTERN buttons (HD/RGB).<br />
When a P in P PATTERN button (HD/RGB) is held down for at least<br />
five seconds, the P in P settings are saved to that button. All of the P<br />
in P PATTERN buttons (HD/RGB) flash when saving of the settings<br />
is completed.<br />
Any settings previously stored to a P in P PATTERN button (HD/<br />
RGB) are overwritten when new settings are saved to that button.<br />
* To call up saved settings, press the P in P PATTERN button (HD/<br />
RGB) to which the settings are saved.<br />
Advanced P in P Effect Settings (HD/RGB)<br />
HD/RGB Section Key Composite<br />
Effects<br />
You can use key composite effects in combining C-BUS and D-BUS<br />
video. The portions with the key color in the video on the bus to<br />
which the key composite effect is applied are made transparent, and<br />
the video on the other bus is inserted as shown below.<br />
The range of color used as the key is set with the “KEY LEVEL.”<br />
Procedure for Using the HD/RGB Key Composite Effect<br />
1<br />
Screen A<br />
3<br />
Screen B<br />
A black part on screen B that is cut out.<br />
And screen B composite screen A.<br />
2, 4<br />
Make the P in P effect settings from the menu with the "3. HD/RGB<br />
P in P/Zoom" parameters. Select the P in P PATTERN button (HD/<br />
RGB) to which the settings are assigned with "P in P 1" to "P in P 5."<br />
Settings can be made for the following parameters.<br />
3. HD/RGB P in P/Zoom Settings Parameters<br />
Size<br />
Subscreen size adjustment<br />
X Position Subscreen horizontal position adjustment<br />
Y Position Subscreen vertical position adjustment<br />
Zoom<br />
Subscreen zoom size adjustment<br />
Pan X Position Subscreen panning horizontal position adjustment<br />
Pan Y Position Subscreen panning vertical position adjustment<br />
Border Size Subscreen border width adjustment<br />
Border Color Subscreen border color adjustment<br />
Border Edge Subscreen edge<br />
* For more on the menus, refer to Menu Operations (p. 25).<br />
* You can quickly access the menu’s P in P parameters by holding down<br />
the MENU button and pressing a P in P PATTERN button (HD/<br />
RGB).<br />
* When key composite effect (p. 32) or multi-screen output (p. 39) are in<br />
use, you can not use “Border Size“, “Border Color“ and “Border<br />
Edge“ Function .<br />
1. Select the key composite video with the C-BUS channel<br />
buttons (HD/RGB) (or D-BUS channel buttons (HD/RGB)).<br />
The portions of the selected video selected with the key effect are cut out.<br />
2. Tilt the video fader (HD/RGB) to the opposite side from that<br />
of the bus selected in Step 1.<br />
3. Press the KEY ON Button (HD/RGB).<br />
The button or buttons pressed in Step 1 flash. At this point, a button<br />
flashing indicates that the key effect is being applied to the video<br />
assigned to that button.<br />
* When using the key composite effects while the P in P effect is in use,<br />
the key effect settings are applied to the video with the P in P effect<br />
applied.<br />
* Use of the C-BUS channel buttons (HD/RGB) (or D-BUS channel<br />
buttons (HD/RGB)) while combining video with the key composite<br />
effects may result in disruption of the video image.<br />
4. Tilt the video fader (HD/RGB) to the opposite direction.<br />
The key composite effect is applied to the video selected in Step 1,<br />
and this is combined with the video on the other bus.<br />
* When key composite effect in use, you can not use switching effect’s<br />
soft edge.<br />
32