Basic Stamp 2 Robot Programming - ISL
Basic Stamp 2 Robot Programming - ISL
Basic Stamp 2 Robot Programming - ISL
Create successful ePaper yourself
Turn your PDF publications into a flip-book with our unique Google optimized e-Paper software.
6-26 Chapter Six<br />
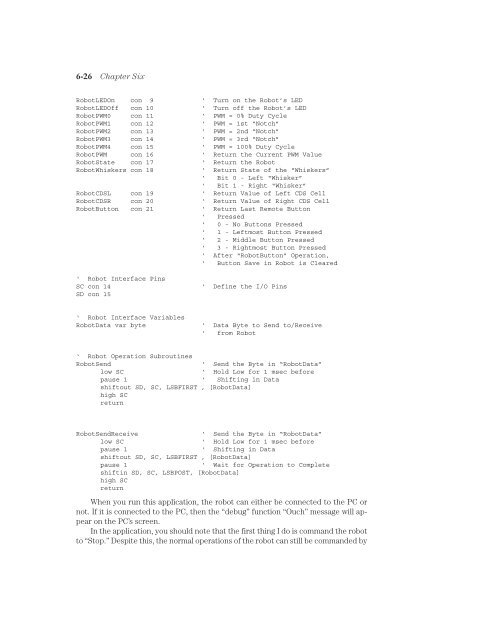
<strong>Robot</strong>LEDOn con 9 ‘ Turn on the <strong>Robot</strong>’s LED<br />
<strong>Robot</strong>LEDOff con 10 ‘ Turn off the <strong>Robot</strong>’s LED<br />
<strong>Robot</strong>PWM0 con 11 ‘ PWM = 0% Duty Cycle<br />
<strong>Robot</strong>PWM1 con 12 ‘ PWM = 1st “Notch”<br />
<strong>Robot</strong>PWM2 con 13 ‘ PWM = 2nd “Notch”<br />
<strong>Robot</strong>PWM3 con 14 ‘ PWM = 3rd “Notch”<br />
<strong>Robot</strong>PWM4 con 15 ‘ PWM = 100% Duty Cycle<br />
<strong>Robot</strong>PWM con 16 ‘ Return the Current PWM Value<br />
<strong>Robot</strong>State con 17 ‘ Return the <strong>Robot</strong><br />
<strong>Robot</strong>Whiskers con 18<br />
‘ Return State of the “Whiskers”<br />
‘ Bit 0 - Left “Whisker”<br />
‘ Bit 1 - Right “Whisker”<br />
<strong>Robot</strong>CDSL con 19 ‘ Return Value of Left CDS Cell<br />
<strong>Robot</strong>CDSR con 20 ‘ Return Value of Right CDS Cell<br />
<strong>Robot</strong>Button con 21 ‘ Return Last Remote Button<br />
‘ Pressed<br />
‘ 0 - No Buttons Pressed<br />
‘ 1 - Leftmost Button Pressed<br />
‘ 2 - Middle Button Pressed<br />
‘ 3 - Rightmost Button Pressed<br />
‘ After “<strong>Robot</strong>Button” Operation,<br />
‘ Button Save in <strong>Robot</strong> is Cleared<br />
‘ <strong>Robot</strong> Interface Pins<br />
SC con 14<br />
SD con 15<br />
‘ Define the I/O Pins<br />
‘ <strong>Robot</strong> Interface Variables<br />
<strong>Robot</strong>Data var byte<br />
‘ Data Byte to Send to/Receive<br />
‘ from <strong>Robot</strong><br />
‘ <strong>Robot</strong> Operation Subroutines<br />
<strong>Robot</strong>Send<br />
‘ Send the Byte in “<strong>Robot</strong>Data”<br />
low SC<br />
‘ Hold Low for 1 msec before<br />
pause 1 ‘ Shifting in Data<br />
shiftout SD, SC, LSBFIRST , [<strong>Robot</strong>Data]<br />
high SC<br />
return<br />
<strong>Robot</strong>SendReceive<br />
‘ Send the Byte in “<strong>Robot</strong>Data”<br />
low SC<br />
‘ Hold Low for 1 msec before<br />
pause 1<br />
‘ Shifting in Data<br />
shiftout SD, SC, LSBFIRST , [<strong>Robot</strong>Data]<br />
pause 1<br />
‘ Wait for Operation to Complete<br />
shiftin SD, SC, LSBPOST, [<strong>Robot</strong>Data]<br />
high SC<br />
return<br />
When you run this application, the robot can either be connected to the PC or<br />
not. If it is connected to the PC, then the “debug” function “Ouch” message will appear<br />
on the PC’s screen.<br />
In the application, you should note that the first thing I do is command the robot<br />
to “Stop.” Despite this, the normal operations of the robot can still be commanded by


