Basic Stamp 2 Robot Programming - ISL
Basic Stamp 2 Robot Programming - ISL
Basic Stamp 2 Robot Programming - ISL

Create successful ePaper yourself
Turn your PDF publications into a flip-book with our unique Google optimized e-Paper software.
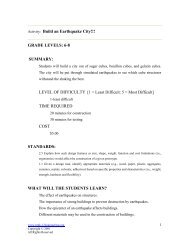
<strong>Basic</strong> <strong>Stamp</strong> 2 <strong>Robot</strong> <strong>Programming</strong> 6-9<br />
Bread<br />
Board<br />
Vss<br />
P1<br />
P3<br />
P5<br />
P7<br />
P9<br />
P11<br />
P13<br />
P15<br />
Vin<br />
AppMod<br />
Vdd<br />
Vdd<br />
Vin<br />
Vss<br />
Vss<br />
P0<br />
P1<br />
P2<br />
P3<br />
P4<br />
P5<br />
P6<br />
P7<br />
Vss<br />
P0<br />
P2<br />
P4<br />
P6<br />
P8<br />
P10<br />
P12<br />
P14<br />
Vdd<br />
Vdd<br />
Vdd<br />
Vin<br />
Vss<br />
Vss<br />
P15<br />
P14<br />
P13<br />
P12<br />
P11<br />
P10<br />
P9<br />
P8<br />
Parallax Inc<br />
Figure 6-5 Parallax breadboard<br />
“AppMod.”<br />
that comes with the AppMod board to use it with the TAB Electronics Build Your<br />
Own <strong>Robot</strong> Kit. Some parts of the robot (like the motors, their wiring, large capacitors,<br />
and the IR LEDs) will interfere with it being plugged down directly onto the robot.<br />
As an added bonus, using the extender will save a lot of wear and tear on the<br />
robot’s socket when you plug in and pull out the AppMod.<br />
Secondly, I highly recommend using the stand off that is included in the AppMod<br />
kits. You will find that the vibration caused by running the robot across the floor can<br />
result in the AppMod loosening and rising up out of the socket if it is not “battened<br />
down.” To use the included standoff with the TAB Electronics Build Your Own <strong>Robot</strong><br />
Kit, I found that I had to insert three standard metal #6 washers between the<br />
standoff and the AppMod to prevent the AppMod’s and the robot’s connectors from<br />
being damaged. Figure 6-6 shows how the AppMod is to be installed on the robot.<br />
The third issue to be concerned with when using the AppMod with the TAB Electronics<br />
Build Your Own <strong>Robot</strong> Kit is how power is supplied to the circuitry on the<br />
AppMod. In its “standard” configuration, 5 volts (“VDD”) is passed to the AppMod<br />
circuit, but in the TAB Electronics Build Your Own <strong>Robot</strong> Kit, the 5 volts that is<br />
provided for the microcontroller and sensors on the card is not passed to the AppMod<br />
socket. The three AppMod applications with functions on them have built-in 5-volt<br />
regulators to provide the power for the circuitry. The breadboard and prototype App-<br />
Mods do not have a regulator built in, which means you have to add your own.<br />
This is not terribly hard to do using the circuit shown in Figure 6-7, which requires<br />
just a 78L05 (in a TO-92 package), a 10 µF (electrolytic) capacitor, and a 0.1<br />
µF capacitor (any type). To wire it into the AppMod so that it can be used with the<br />
TAB Electronics Build Your Own <strong>Robot</strong> Kit, use the circuit shown in Figure 6-8—<br />
it should just take you a few seconds.<br />
<strong>Programming</strong> PC Setup<br />
Your PC should be running Microsoft Windows/95, Windows/98, Windows/ME,<br />
Windows/NT, or Windows/2000. If you are running MS-DOS, there is a version of the