Basic Stamp 2 Robot Programming - ISL
Basic Stamp 2 Robot Programming - ISL
Basic Stamp 2 Robot Programming - ISL

You also want an ePaper? Increase the reach of your titles
YUMPU automatically turns print PDFs into web optimized ePapers that Google loves.
6-8 Chapter Six<br />
either tool, be careful not to damage the BS2 or the surrounding components (most<br />
importantly, the IR LED that is just in front of the socket).<br />
I recommend that the BS2 is never removed from the TAB Electronics Build<br />
Your Own <strong>Robot</strong> Kit. The reason for this recommendation is the possibility of damaging<br />
either the BS2 or the robot during the operation. If you leave the BS2 in, there<br />
are some simple Null programs that you can load into the BS2 to render it inert as far<br />
as the robot is concerned. I will present these instructions to you later in this chapter.<br />
To make BS2 experimentation easier and more efficient, Parallax has specified<br />
what amounts to a simple bus for the BS2 that can be used to connect different interface<br />
products to it. This bus is known as AppMod, and to allow you to take advantage<br />
of these products, the TAB Electronics Build Your Own <strong>Robot</strong> has an AppMod<br />
socket beside the BS2, along with a hole for a standoff in the middle of the robot.<br />
As I write this (August 2001), Parallax has five different AppMod products<br />
(known as “Modules”) available:<br />
Module Price Function<br />
Sound $89 Will digitally record and playback up to 60 seconds of sound.<br />
LED Terminal $89 Four LED Alpha Numeric Digits.<br />
Compass $79 The compass is designed for use with robots to give them a sense<br />
of direction.<br />
Breadboard $24 Breadboard module for prototyping application circuits.<br />
Protoboard $19 Solderable application prototype board.<br />
The three AppMods with functions already built in (sound, LED terminal, and<br />
compass) communicate with the BS2 using the built-in serial functions. In this chapter,<br />
I will be concerned primarily with the Bread Board AppMod (the layout is shown<br />
in Figure 6-5), and I will be presenting you with an experiment that you can build on<br />
it to enhance your TAB Electronics Build Your Own <strong>Robot</strong> Kit.<br />
There are three things that you should be aware of when you want to use an<br />
AppMod with the robot. The first is that you will have to use the socket “Extender”<br />
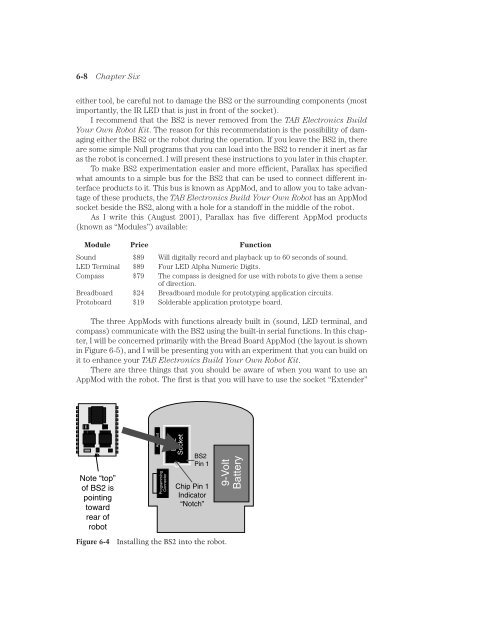
Note “top”<br />
of BS2 is<br />
pointing<br />
toward<br />
rear of<br />
robot<br />
AppMod<br />
<strong>Programming</strong><br />
Connector<br />
BS2<br />
Socket<br />
BS2<br />
Pin 1<br />
Chip Pin 1<br />
Indicator<br />
“Notch”<br />
9-Volt<br />
Battery<br />
Figure 6-4<br />
Installing the BS2 into the robot.