Low Cost Torch Height Control Install and Setup Manual - CandCNC
Low Cost Torch Height Control Install and Setup Manual - CandCNC
Low Cost Torch Height Control Install and Setup Manual - CandCNC

You also want an ePaper? Increase the reach of your titles
YUMPU automatically turns print PDFs into web optimized ePapers that Google loves.
J15<br />
Tip<br />
Volts<br />
Workclamp<br />
+ [POS]<br />
- [NEG]<br />
Electrode<br />
36 THC Sensor<br />
39<br />
REV 14<br />
Arc OK<br />
J11<br />
<strong>Torch</strong><br />
Switch J10<br />
37 38<br />
J5<br />
J4<br />
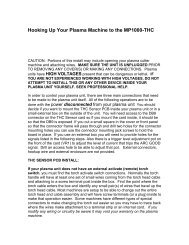
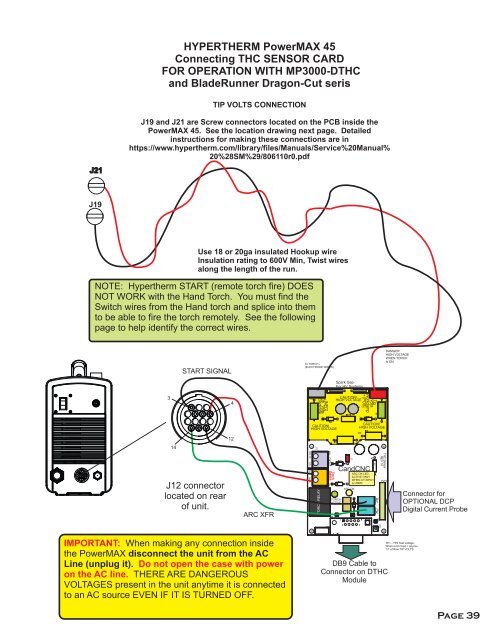
HYPERTHERM PowerMAX 45<br />
Connecting THC SENSOR CARD<br />
FOR OPERATION WITH MP3000-DTHC<br />
<strong>and</strong> BladeRunner Dragon-Cut seris<br />
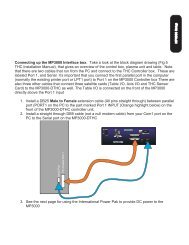
TIP VOLTS CONNECTION<br />
J21<br />
J19 <strong>and</strong> J21 are Screw connectors located on the PCB inside the<br />
PowerMAX 45. See the location drawing next page. Detailed<br />
instructions for making these connections are in<br />
https://www.hypertherm.com/library/files/<strong>Manual</strong>s/Service%20<strong>Manual</strong>%<br />
20%28SM%29/806110r0.pdf<br />
J19<br />
Use 18 or 20ga insulated Hookup wire<br />
Insulation rating to 600V Min, Twist wires<br />
along the length of the run.<br />
NOTE: Hypertherm START (remote torch fire) DOES<br />
NOT WORK with the H<strong>and</strong> <strong>Torch</strong>. You must find the<br />
Switch wires from the H<strong>and</strong> torch <strong>and</strong> splice into them<br />
to be able to fire the torch remotely. See the following<br />
page to help identify the correct wires.<br />
START SIGNAL<br />
To TORCH -<br />
(ELECTRODE WIRES)<br />
DAMGER<br />
HIGH VOLTAGE<br />
WHEN TORCH<br />
is ON<br />
3<br />
14<br />
J12 connector<br />
located on rear<br />
of unit.<br />
ARC XFR<br />
IMPORTANT: When making any connection inside<br />
the PowerMAX disconnect the unit from the AC<br />
Line (unplug it). Do not open the case with power<br />
on the AC line. THERE ARE DANGEROUS<br />
VOLTAGES present in the unit anytime it is connected<br />
to an AC source EVEN IF IT IS TURNED OFF.<br />
4<br />
12<br />
J14<br />
Tip Volts<br />
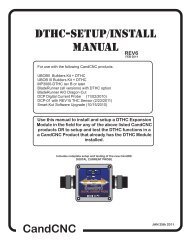
D6<br />
CAUTION!<br />
HIGH VOLTAGE<br />
TORCH RELAY<br />
Arc OK[V]<br />
VR2<br />
J1<br />
Spark Gap<br />
For HV Systems<br />
J17<br />
CAUTION!<br />
HIGH VOLTAGE<br />
R6<br />
PLUG<br />
D22<br />
D21<br />
TORCH<br />
ACTIVE<br />
1<br />
6<br />
RV1<br />
CAUTION!<br />
HIGH VOLTAGE<br />
C1<br />
R8<br />
5<br />
9<br />
D13<br />
C<strong>and</strong>CNC<br />
ARC OK<br />
C2<br />
ARC OK LED<br />
ACTIVE ONLY<br />
WHEN CT INPUT<br />
is USED.<br />
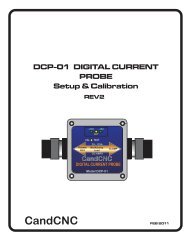
DCP<br />
DB9 Cable to<br />
Connector on DTHC<br />
Module<br />
Connector for<br />
OPTIONAL DCP<br />
Digital Current Probe<br />
TP1 - TP2 Test voltage:<br />
When torch fired = approx<br />
1/7 of Raw TIP VOLTS.<br />
Page 39