User Guide IQSocket IQSW-IP10
User Guide IQSocket IQSW-IP10
User Guide IQSocket IQSW-IP10

You also want an ePaper? Increase the reach of your titles
YUMPU automatically turns print PDFs into web optimized ePapers that Google loves.
©2011 IQtronic, Ltd<br />
2 Installation<br />
Before starting installation, please read this manual and take into account<br />
Important information section at beginning of this manual.<br />
2.1 Wiring the IQsocket <strong>IQSW</strong>-<strong>IP10</strong><br />
Wiring is intuitive, simply wire RJ-45 jack into your Ethernet network using<br />
supplied cable, then connect your electric appliance to the device’s socket and<br />
plug the <strong>IQSW</strong>-<strong>IP10</strong> into a free electric socket.<br />
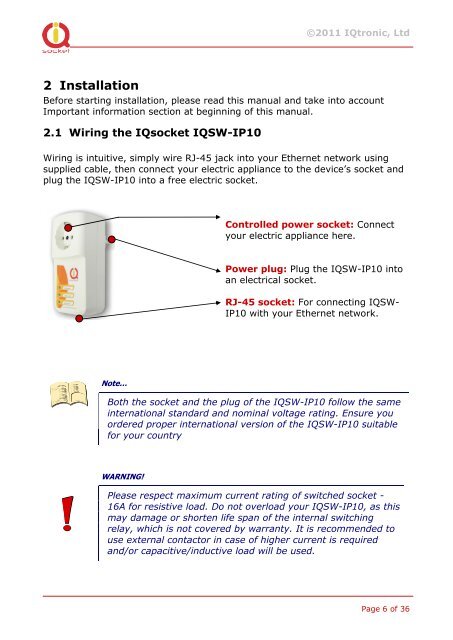
Controlled power socket: Connect<br />
your electric appliance here.<br />
Power plug: Plug the <strong>IQSW</strong>-<strong>IP10</strong> into<br />
an electrical socket.<br />
RJ-45 socket: For connecting <strong>IQSW</strong>-<br />
<strong>IP10</strong> with your Ethernet network.<br />
Note…<br />
Both the socket and the plug of the <strong>IQSW</strong>-<strong>IP10</strong> follow the same<br />
international standard and nominal voltage rating. Ensure you<br />
ordered proper international version of the <strong>IQSW</strong>-<strong>IP10</strong> suitable<br />
for your country<br />
WARNING!<br />
Please respect maximum current rating of switched socket -<br />
16A for resistive load. Do not overload your <strong>IQSW</strong>-<strong>IP10</strong>, as this<br />
may damage or shorten life span of the internal switching<br />
relay, which is not covered by warranty. It is recommended to<br />
use external contactor in case of higher current is required<br />
and/or capacitive/inductive load will be used.<br />
Page 6 of 36