Operating Instructions Non-Contact Safety Switch CET.-AR-...-CH ...
Operating Instructions Non-Contact Safety Switch CET.-AR-...-CH ...
Operating Instructions Non-Contact Safety Switch CET.-AR-...-CH ...

Create successful ePaper yourself
Turn your PDF publications into a flip-book with our unique Google optimized e-Paper software.
<strong>Operating</strong> <strong>Instructions</strong> <strong>Safety</strong> <strong>Switch</strong> <strong>CET</strong>.-<strong>AR</strong>-...-<strong>CH</strong>-...<br />
Important:<br />
Lockout mechanism (optional)<br />
ÌÌThe lockout mechanism is not a safety function.<br />
ÌÌThe correct function must be checked at regular intervals.<br />
The lockout mechanism can be used to prevent maintenance personnel from being<br />
unintentionally locked in the danger area, for example.<br />
In locked position, the lockout mechanism prevents activation of guard locking.<br />
The lockout mechanism can be secured in locking position with up to three locks.<br />
The mechanical release can still be used.<br />
Important:<br />
Using the lockout mechanism<br />
Deactivate guard locking and open the safety door before using the lockout<br />
mechanism.<br />
Before entering the danger area:<br />
1. Open the door<br />
2. Press button, move lockout mechanism to locking position (Figures A and B)<br />
and secure with lock (Figure C)<br />
¨¨<br />
Guard locking cannot be activated, and it must not be possible to start the<br />
machine. Important: Test this before entering the danger area.<br />
Resetting the lockout mechanism:<br />
1. Open the safety door if necessary<br />
2. Remove the lock<br />
3. Move lockout mechanism to basic position (Figure A)<br />
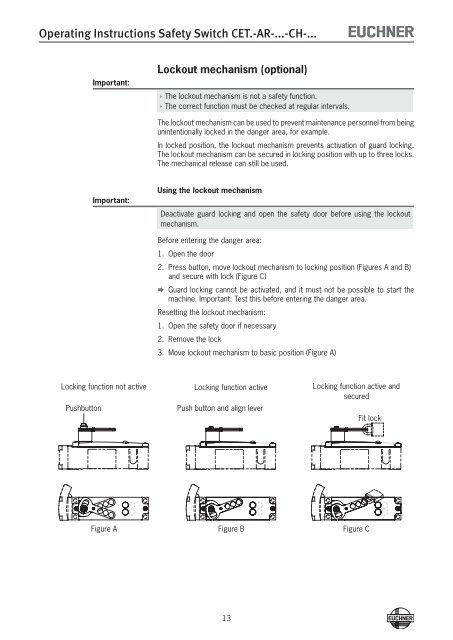
Locking function not active Locking function active Locking function active and<br />
secured<br />
Pushbutton<br />
Push button and align lever<br />
Fit lock<br />
Figure A Figure B Figure C<br />
13