MX510/MX512 Operator & Installation Manual - Simrad Professional ...
MX510/MX512 Operator & Installation Manual - Simrad Professional ...
MX510/MX512 Operator & Installation Manual - Simrad Professional ...

You also want an ePaper? Increase the reach of your titles
YUMPU automatically turns print PDFs into web optimized ePapers that Google loves.
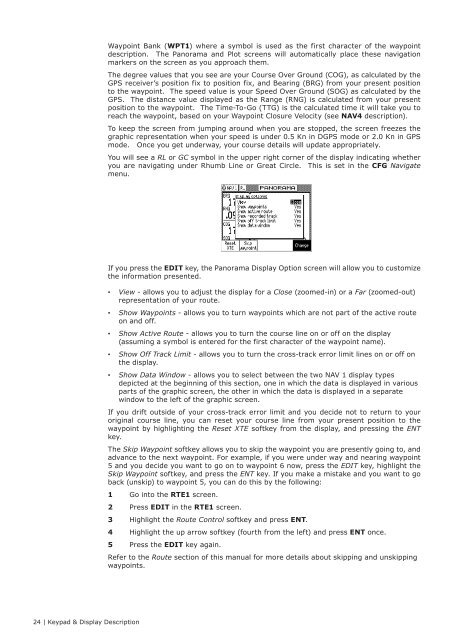
Waypoint Bank (WPT1) where a symbol is used as the first character of the waypoint<br />
description. The Panorama and Plot screens will automatically place these navigation<br />
markers on the screen as you approach them.<br />
The degree values that you see are your Course Over Ground (COG), as calculated by the<br />
GPS receiver’s position fix to position fix, and Bearing (BRG) from your present position<br />
to the waypoint. The speed value is your Speed Over Ground (SOG) as calculated by the<br />
GPS. The distance value displayed as the Range (RNG) is calculated from your present<br />
position to the waypoint. The Time-To-Go (TTG) is the calculated time it will take you to<br />
reach the waypoint, based on your Waypoint Closure Velocity (see NAV4 description).<br />
To keep the screen from jumping around when you are stopped, the screen freezes the<br />
graphic representation when your speed is under 0.5 Kn in DGPS mode or 2.0 Kn in GPS<br />
mode. Once you get underway, your course details will update appropriately.<br />
You will see a RL or GC symbol in the upper right corner of the display indicating whether<br />
you are navigating under Rhumb Line or Great Circle. This is set in the CFG Navigate<br />
menu.<br />
If you press the EDIT key, the Panorama Display Option screen will allow you to customize<br />
the information presented.<br />
••<br />
View - allows you to adjust the display for a Close (zoomed-in) or a Far (zoomed-out)<br />
representation of your route.<br />
••<br />
Show Waypoints - allows you to turn waypoints which are not part of the active route<br />
on and off.<br />
••<br />
Show Active Route - allows you to turn the course line on or off on the display<br />
(assuming a symbol is entered for the first character of the waypoint name).<br />
••<br />
Show Off Track Limit - allows you to turn the cross-track error limit lines on or off on<br />
the display.<br />
••<br />
Show Data Window - allows you to select between the two NAV 1 display types<br />
depicted at the beginning of this section, one in which the data is displayed in various<br />
parts of the graphic screen, the other in which the data is displayed in a separate<br />
window to the left of the graphic screen.<br />
If you drift outside of your cross-track error limit and you decide not to return to your<br />
original course line, you can reset your course line from your present position to the<br />
waypoint by highlighting the Reset XTE softkey from the display, and pressing the ENT<br />
key.<br />
The Skip Waypoint softkey allows you to skip the waypoint you are presently going to, and<br />
advance to the next waypoint. For example, if you were under way and nearing waypoint<br />
5 and you decide you want to go on to waypoint 6 now, press the EDIT key, highlight the<br />
Skip Waypoint softkey, and press the ENT key. If you make a mistake and you want to go<br />
back (unskip) to waypoint 5, you can do this by the following:<br />
1 Go into the RTE1 screen.<br />
2 Press EDIT in the RTE1 screen.<br />
3 Highlight the Route Control softkey and press ENT.<br />
4 Highlight the up arrow softkey (fourth from the left) and press ENT once.<br />
5 Press the EDIT key again.<br />
Refer to the Route section of this manual for more details about skipping and unskipping<br />
waypoints.<br />
24 | Keypad & Display Description