MX510/MX512 Operator & Installation Manual - Simrad Professional ...
MX510/MX512 Operator & Installation Manual - Simrad Professional ...
MX510/MX512 Operator & Installation Manual - Simrad Professional ...

You also want an ePaper? Increase the reach of your titles
YUMPU automatically turns print PDFs into web optimized ePapers that Google loves.
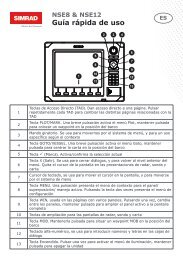
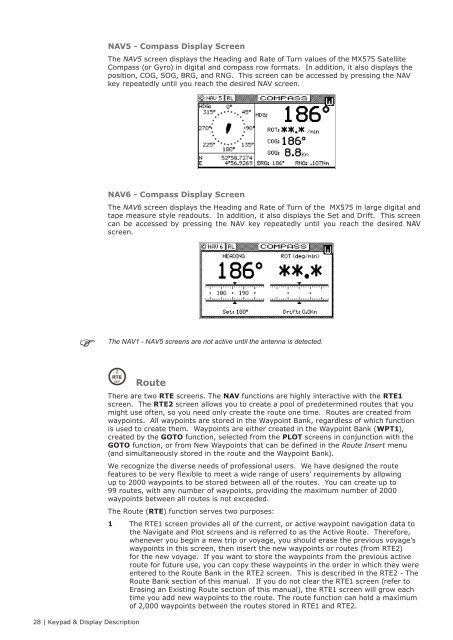
NAV5 - Compass Display Screen<br />
The NAV5 screen displays the Heading and Rate of Turn values of the MX575 Satellite<br />
Compass (or Gyro) in digital and compass row formats. In addition, it also displays the<br />
position, COG, SOG, BRG, and RNG. This screen can be accessed by pressing the NAV<br />
key repeatedly until you reach the desired NAV screen.<br />
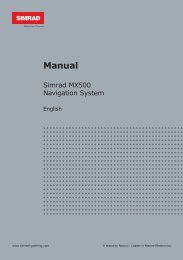
NAV6 - Compass Display Screen<br />
The NAV6 screen displays the Heading and Rate of Turn of the MX575 in large digital and<br />
tape measure style readouts. In addition, it also displays the Set and Drift. This screen<br />
can be accessed by pressing the NAV key repeatedly until you reach the desired NAV<br />
screen.<br />
The NAV1 - NAV5 screens are not active until the antenna is detected.<br />
28 | Keypad & Display Description<br />
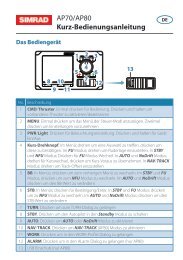
Route<br />
There are two RTE screens. The NAV functions are highly interactive with the RTE1<br />
screen. The RTE2 screen allows you to create a pool of predetermined routes that you<br />
might use often, so you need only create the route one time. Routes are created from<br />
waypoints. All waypoints are stored in the Waypoint Bank, regardless of which function<br />
is used to create them. Waypoints are either created in the Waypoint Bank (WPT1),<br />
created by the GOTO function, selected from the PLOT screens in conjunction with the<br />
GOTO function, or from New Waypoints that can be defined in the Route Insert menu<br />
(and simultaneously stored in the route and the Waypoint Bank).<br />
We recognize the diverse needs of professional users. We have designed the route<br />
features to be very flexible to meet a wide range of users’ requirements by allowing<br />
up to 2000 waypoints to be stored between all of the routes. You can create up to<br />
99 routes, with any number of waypoints, providing the maximum number of 2000<br />
waypoints between all routes is not exceeded.<br />
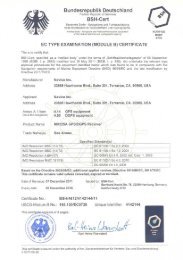
The Route (RTE) function serves two purposes:<br />
1 The RTE1 screen provides all of the current, or active waypoint navigation data to<br />
the Navigate and Plot screens and is referred to as the Active Route. Therefore,<br />
whenever you begin a new trip or voyage, you should erase the previous voyage’s<br />
waypoints in this screen, then insert the new waypoints or routes (from RTE2)<br />
for the new voyage. If you want to store the waypoints from the previous active<br />
route for future use, you can copy these waypoints in the order in which they were<br />
entered to the Route Bank in the RTE2 screen. This is described in the RTE2 - The<br />
Route Bank section of this manual. If you do not clear the RTE1 screen (refer to<br />
Erasing an Existing Route section of this manual), the RTE1 screen will grow each<br />
time you add new waypoints to the route. The route function can hold a maximum<br />
of 2,000 waypoints between the routes stored in RTE1 and RTE2.