Soundcard Isolation Project - VA3CR
Soundcard Isolation Project - VA3CR
Soundcard Isolation Project - VA3CR

Create successful ePaper yourself
Turn your PDF publications into a flip-book with our unique Google optimized e-Paper software.
5.3 Cover Plate<br />
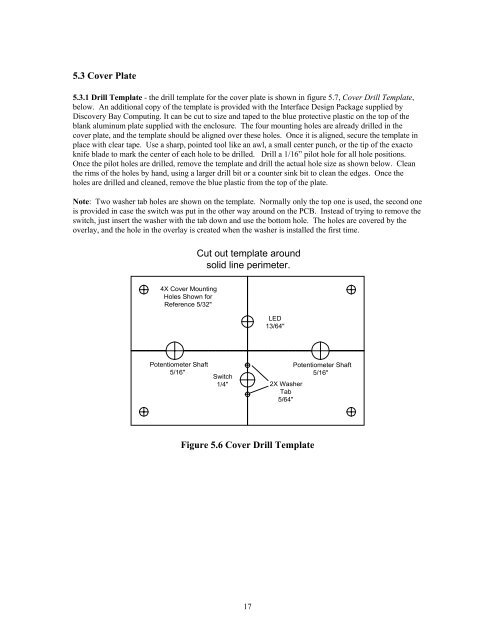
5.3.1 Drill Template - the drill template for the cover plate is shown in figure 5.7, Cover Drill Template,<br />
below. An additional copy of the template is provided with the Interface Design Package supplied by<br />
Discovery Bay Computing. It can be cut to size and taped to the blue protective plastic on the top of the<br />
blank aluminum plate supplied with the enclosure. The four mounting holes are already drilled in the<br />
cover plate, and the template should be aligned over these holes. Once it is aligned, secure the template in<br />
place with clear tape. Use a sharp, pointed tool like an awl, a small center punch, or the tip of the exacto<br />
knife blade to mark the center of each hole to be drilled. Drill a 1/16” pilot hole for all hole positions.<br />
Once the pilot holes are drilled, remove the template and drill the actual hole size as shown below. Clean<br />
the rims of the holes by hand, using a larger drill bit or a counter sink bit to clean the edges. Once the<br />
holes are drilled and cleaned, remove the blue plastic from the top of the plate.<br />
Note: Two washer tab holes are shown on the template. Normally only the top one is used, the second one<br />
is provided in case the switch was put in the other way around on the PCB. Instead of trying to remove the<br />
switch, just insert the washer with the tab down and use the bottom hole. The holes are covered by the<br />
overlay, and the hole in the overlay is created when the washer is installed the first time.<br />
Cut out template around<br />
solid line perimeter.<br />
4X Cover Mounting<br />
Holes Shown for<br />
Reference 5/32"<br />
LED<br />
13/64"<br />
Potentiometer Shaft<br />
5/16"<br />
Switch<br />
1/4"<br />
2X Washer<br />
Tab<br />
5/64"<br />
Potentiometer Shaft<br />
5/16"<br />
Figure 5.6 Cover Drill Template<br />
17