Soundcard Isolation Project - VA3CR
Soundcard Isolation Project - VA3CR
Soundcard Isolation Project - VA3CR

Create successful ePaper yourself
Turn your PDF publications into a flip-book with our unique Google optimized e-Paper software.
7 System Setup and Test<br />
This section describes the procedures for setting up your system to run sound card applications.<br />
You should select one of the programs in section 6 to use for testing and setup purposes. The<br />
examples given below are for the Hamscope program. This program is chosen because it<br />
provides both a waterfall and a spectrum display for monitoring band activity.<br />
7.1 Load the Sound Card Program - Load the program and select “Settings / General<br />
Setup” at the top of the screen. Enter your callsign in the callsign panel, and enter the COM Port<br />
Number of the Serial Port used for PTT control.<br />
Before you hook up your interface and rig, try out the program to get familiar with the sounds<br />
coming from it and the operation of the macros. Later on, once you get familiar with the operation<br />
of the software, you will probably want to customize the macros for your own operation.<br />
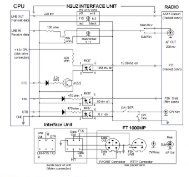
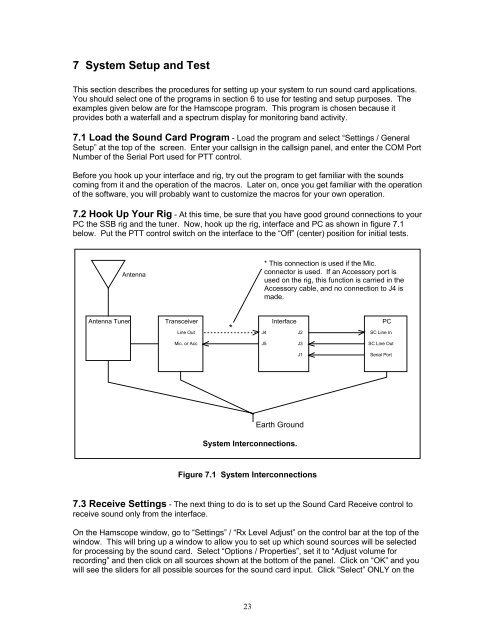
7.2 Hook Up Your Rig - At this time, be sure that you have good ground connections to your<br />
PC the SSB rig and the tuner. Now, hook up the rig, interface and PC as shown in figure 7.1<br />
below. Put the PTT control switch on the interface to the “Off” (center) position for initial tests.<br />
Antenna<br />
* This connection is used if the Mic.<br />
connector is used. If an Accessory port is<br />
used on the rig, this function is carried in the<br />
Accessory cable, and no connection to J4 is<br />
made.<br />
Antenna Tuner Transceiver<br />
Interface PC<br />
Line Out<br />
*<br />
J4<br />
J2<br />
SC Line In<br />
Mic. or Acc<br />
J5<br />
J3<br />
SC Line Out<br />
J1<br />
Serial Port<br />
Earth Ground<br />
System Interconnections.<br />
Figure 7.1 System Interconnections<br />
7.3 Receive Settings - The next thing to do is to set up the Sound Card Receive control to<br />
receive sound only from the interface.<br />
On the Hamscope window, go to “Settings” / “Rx Level Adjust” on the control bar at the top of the<br />
window. This will bring up a window to allow you to set up which sound sources will be selected<br />
for processing by the sound card. Select “Options / Properties”, set it to “Adjust volume for<br />
recording” and then click on all sources shown at the bottom of the panel. Click on “OK” and you<br />
will see the sliders for all possible sources for the sound card input. Click “Select” ONLY on the<br />
23