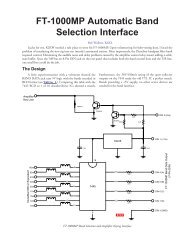
Soundcard Isolation Project - VA3CR
Soundcard Isolation Project - VA3CR
Soundcard Isolation Project - VA3CR

You also want an ePaper? Increase the reach of your titles
YUMPU automatically turns print PDFs into web optimized ePapers that Google loves.
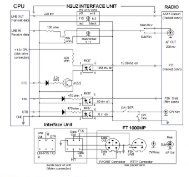
3.2.3.3 PTT Configuration -2 Without Relay - The -2 configuration is in fact the “normal” configuration<br />
for most modern transceivers. It expects the PTT to be connected to solid state, low current requirement,<br />
non-inductive loads. It is driven directly by the output of the opto-isolator. It does not require an external<br />
power source for the interface. The wiring of the LED which indicates PTT activation is moved to be in<br />
series with the serial port control signals arriving via D1 or D2. The output of U1 is moved to connect to<br />
the PTT lines of the SSB rig. “Just in case” there is a diode placed across the output of U1 to protect it if<br />
an inductive load is ever connected to it. In the -2 configuration, several components are NOT stuffed.<br />
The components NOT used are J6, K1, R3 D3 and C2. Jumpers A-A, B-B and D-D ARE installed for this<br />
configuration.<br />
Some laptop computers have lower than standard RS 232 voltage levels on the RTS and DTR lines. The<br />
current derived from these signals may not be high enough to properly light the LED or activate the optoisolator<br />
circuit. A set of pads has been provided at location R9 to allow a 2.2k ohm resistor to be inserted<br />
to parallel R7. This reduces the series resistance and increases the current drive. See the discussion on<br />
PTT test in section 7.4.2.6 to determine if you need to add this component.<br />
3.2.3.4 PTT Indicator - LED1 is a low current, red LED used to indicate that PTT has been activated. In<br />
the -1 configuration, it means that the output PTT control lines have been activated. In the -2<br />
configuration, the LED means that either RTS or DTR on the serial port has been activated.<br />
3.2.3.5 PTT Mode Control Switch - Switch SW1 provides control over the PTT lines of the rig. If the<br />
switch is in the UP position, automatic PTT has been enabled. Any time either RTS or DTR on the serial<br />
port is active, the PTT output will be activated (low impedance). If the switch is in the CENTER position,<br />
the PTT lines can not be activated. If the switch is in the DOWN position, the PTT lines are forced to the<br />
active state, and the rig is keyed. This latter mode is useful for testing, and for those installations which do<br />
not have a serial port, or VOX available to key the rig. It can be keyed manually by activating the switch.<br />
3.3 Deciding Which Configuration is Right for Your Rig<br />
Check the manual for your rig. Often, it will tell you what the current will be drawn when the PTT input is<br />
activate. If not, you can measure it using the following procedure.<br />
Find the pin out configuration of the microphone connector on your rig from the rig manual. There will be<br />
a PTT pin, and a return pin for the PTT. Sometimes the PTT return and the microphone audio return are<br />
on the same pin. Using the VOLTAGE scale on a multi-meter set at 50v or higher, measure the voltage<br />
from the return pin to the PTT pin. Note the voltage and polarity. Typical measurements would show<br />
something on the order of + 5 to + 14 volts on the PTT pin as referenced to the return pin.<br />
Next measure the current between these same two pins using the CURRENT scale of the multi-meter. Set<br />
the range for around 1 amp. When you do this, you will be keying the rig, so before making the<br />
measurement, set the rig control to USB and connect it to a dummy load. Momentarily connect the meter<br />
across the PTT and return pins. You should see activation of the rig, and see some current on the meter.<br />
You may see current in the range of a few ma. to a few hundred ma. If the current is really low, you may<br />
have to reduce the scale on the multi-meter to get a good reading.<br />
If the current measures around 30 ma. or less, then it is most likely a solid state connection, or else a low<br />
current reed relay. If the measurement is more than 30 ma., you probably have a larger relay coil being<br />
activated. Use the -1 option if you have a current above 30 ma., or voltage measurements above 15 volts.<br />
Use the -2 option if the current is less than 30 ma. and the voltage is less than 15 volts.<br />
During construction, follow the procedures for the appropriate configuration.<br />
7